Well this will be an exciting post…about storage. But then it’s useful to find information about things you’re considering buying isn’t it, and I’m fortunate to get access to some decent tech, so I thought I’d share my experiences.
I’ve recently been sorting out some of my fast storage – stuff I use for video editing and the like. While I can run this directly from my NAS it’s never quite as smooth as running it from a fast SSD – and Apple’s SSD pricing is criminal, so external it is.
I now use a couple of Thunderbolt 5 enclosures and the performance – and the reliability so far – has been awesome. They are, however, expensive. So I also have some UGreen Thunderbolt 4 enclosures. These ones in fact:
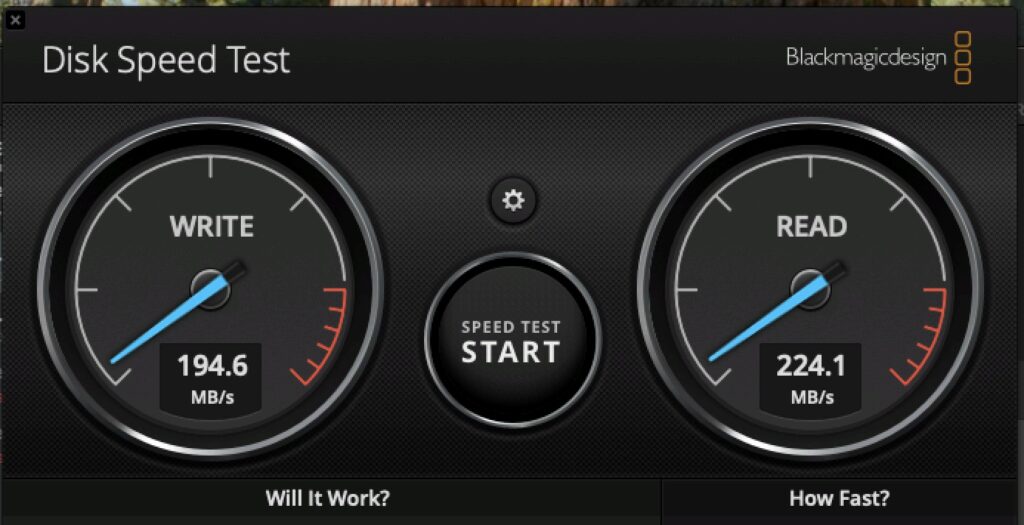
These units cost about 65GBP which is about 200GBP cheaper than the TB5 units, but the performance is still solid. This one has a Samsung SSD 990 EVO Plus 2TB drive in it – and the performance connected directly to my Macbook Pro M4 Max is pretty good:
UGreen Thunderbolt Enclosure
By way of comparison, this is the performance in the Thunderbolt 5 Enclosure:
Thunderbolt 5 NVMe
So far then, so very good.
The case is a little chonky – 120 x 48 x 19 mm – and it weighs about 200 grams. This is still small enough to throw in a bag when needed. It also comes with a fan for cooling – I understand it’s supposed to varey its speed, but I’ve not noticed that. It’s either on (and barely audible), or off! It’s not an issue anyway, and I’d much rather have the fan than not.
In terms of device compatibility, the unit will accept 2230, 2242, 2260, and 2280 NVMe units, which is pretty flexible.
At the cost I am very happy with them – it’s not that much more than a USB3 enclosure but they top out at 1Gbps, so I think it’s a worthy uplift in terms of performance.
Anyway, I did warn you this wouldn’t be interesting.
Earlier I had a need to move a 500GB Virtual Machine to another one of my virtual hosts. I could of course have copied it across my 10Gbe network, which would have taken 20 minutes or so, but instead I thought it simpler to throw it on an external NVMe drive I have. My Mac happily told me it was going to take 2.5 minutes to copy the virtual machine to the drive.
TWO AND HALF MINUTES!
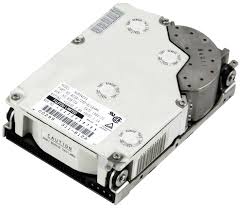
In the end it took nearer three, but hey, that’s fast. This got me reminiscing. Back in the day when I first started working on ‘larger’ stuff, I did a lot of Novell Netware. We used to use Fujitsu 500MB SCSI drives in our normal server setups (the M2624FA I think)…. like this:
Fujitsu M2624FA SCSI Hard Drive
This was hooked up to 10Mbps Ethernet – mostly Co-ax (Cheapernet), and then later moving to UTP (at a heady 100Mbps). What I remember about those drives is that copying that 500MB drive to a new server typically took about 20 minutes. That’s about 0.4MB/s. Shudder. The drives themselves were capable of more than that – sometimes a whopping 4MB/s – but the overheads of copying/delivering over 10Mbps limited that.
Now, I’m sat here copying a 500GB virtual machine at about 2.8GB/s. That’s 7,000 times faster. That’s some progress. At 0.4MB/s it would have taken 14.5days…assuming it didn’t just melt.
I then got thinking about some of the Microsoft Exchange implementations I’ve done over the years. IOPS and drive performance were king in those configurations. We’d end up putting in a lot of drives to meet the performance requirements rather than the space requirements – single enterprise drives would often only deliver 150-200MB/s, with maybe a 150IOPS per drive. For a 5,000 mailbox solution, you’d need about 5-10,000IOPS (I haven’t worked this out fully, don’t @ me!). So you see the problem. Here’s a 16TB Toshiba Enterprise Drive for example:
16TB Spinning Hard Disk
Now a single NVMe (PCIe 4×4 for example) 500,000 to 1,000,000 IOPS. So yeah, the world changed.
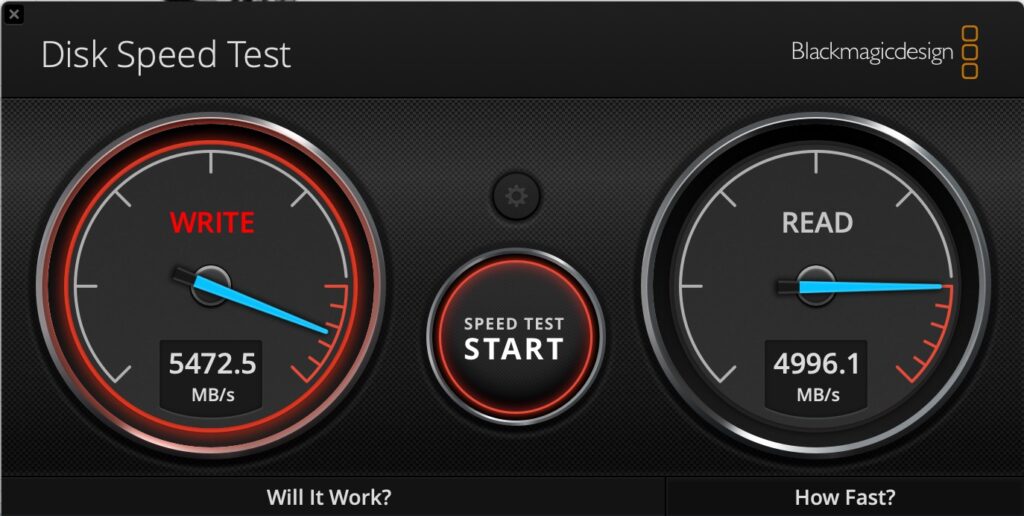
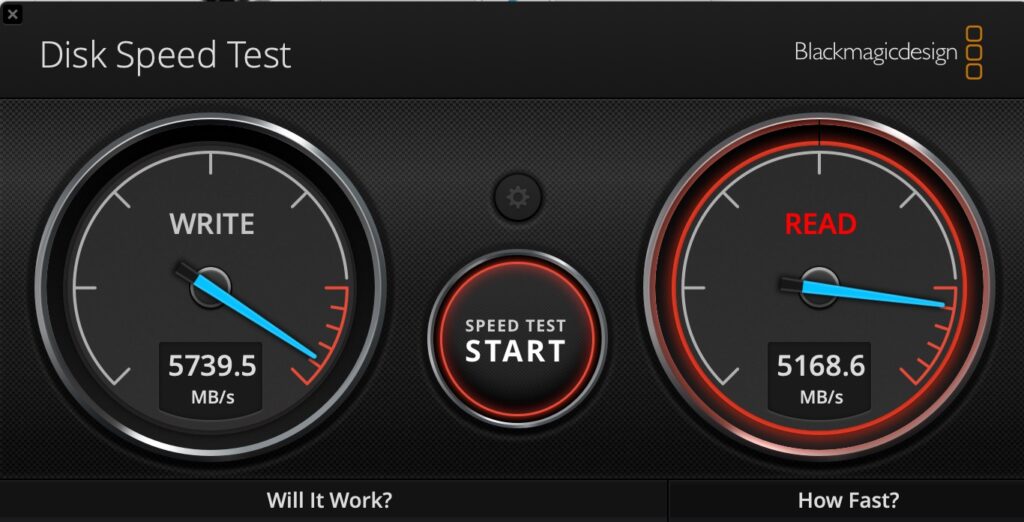
So about 5.5GB/s write, and 5GB/s read. That compares pretty well with the internal SSD on my MacBook Pro M4 Max:
MacBook Pro M4 Max Internal SSD Performace
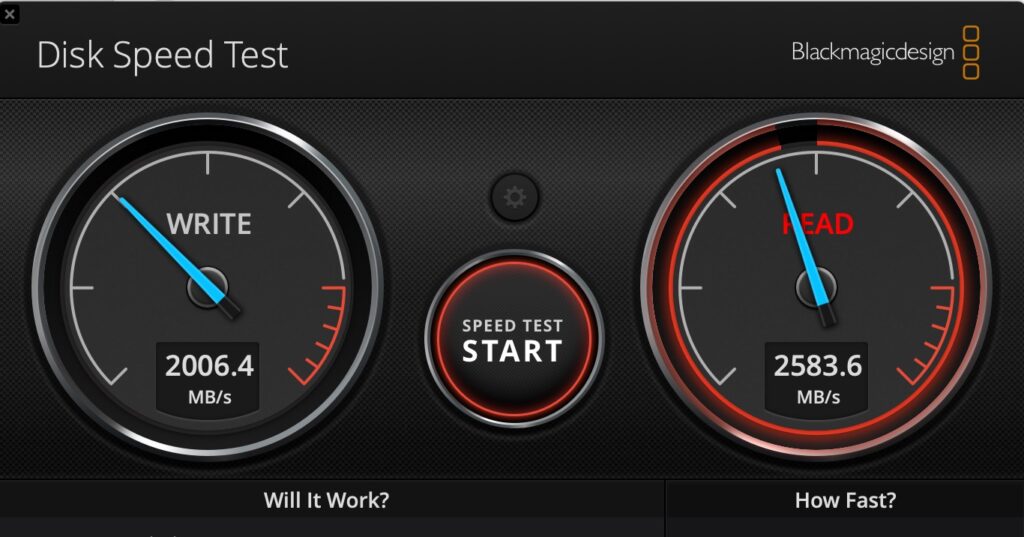
Thunderbolt 3/4 was also pretty fast of course, but it couldn’t get close to the internal speeds – this is a 2TB version of that same Samsung drive but in a Samsung X5 Thunderbolt 3 enclosure:
Samsung 990 Pro 2TB/Thunderbolt
That external Thunderbolt 5 enclosure is a bit pricey at about 250GBP, however you pay the price for new stuff don’t you. It does work, and it works very well. It’s also got a cooling fan in which I thought could be helpful as I’ve often seen drives slow down considerably under constant load due to heat – there’s also the faster cache to consider too. These 990s have about 400GB of pseudo-SLC cache on them before they slow down.
I’ve been thoroughly impressed with them (I’ve a couple), and am always constantly surprised by the performance. Being able to use Carbon Copy Cloner for example to backup a few TBs from one to the other becomes a quick coffee break rather than a plug in, forget, check tomorrow operation.
Anyway, that’s enough reminiscing for one day. New stuff is newer, faster, spankier – who knew.
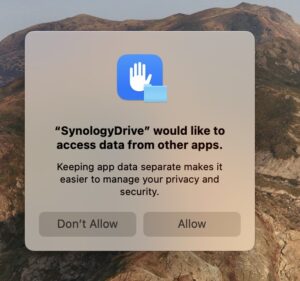
This is an irritating error message I seem to be getting from the Synology Drive App Recently:
SynologyDrive would like to access data from other apps
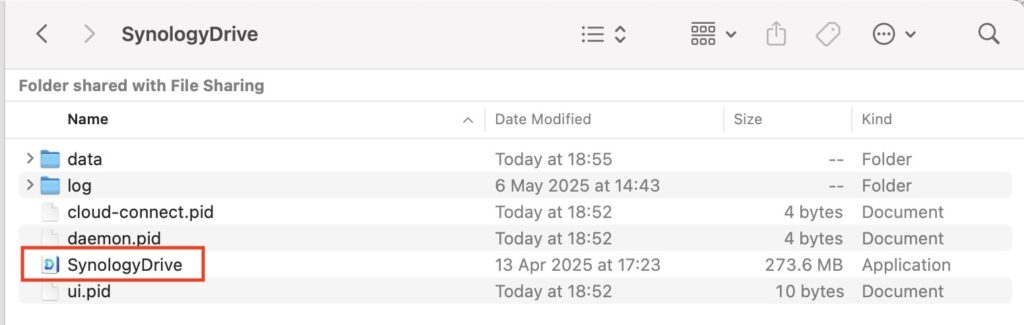
In a fit of boredom I thought I’d set out to search why this was so – I tried adding the Synology Drive app to full disk access however it didn’t help. Then I noticed the clue is in the error – ‘SynologyDrive’ – notice the lack of space. So, off I search for SynologyDrive…and you’ll find it here:
That’s the app we need to add to Full Disk Access. Now, this is usually hidden (the Library folder) – so we need to show hidden files. You can do this with CMD+Shift+. (That’s . at the end!). You can also do this in terminal:
defaults write com.apple.finder AppleShowAllFiles TRUE killall Finder # refreshes Finder
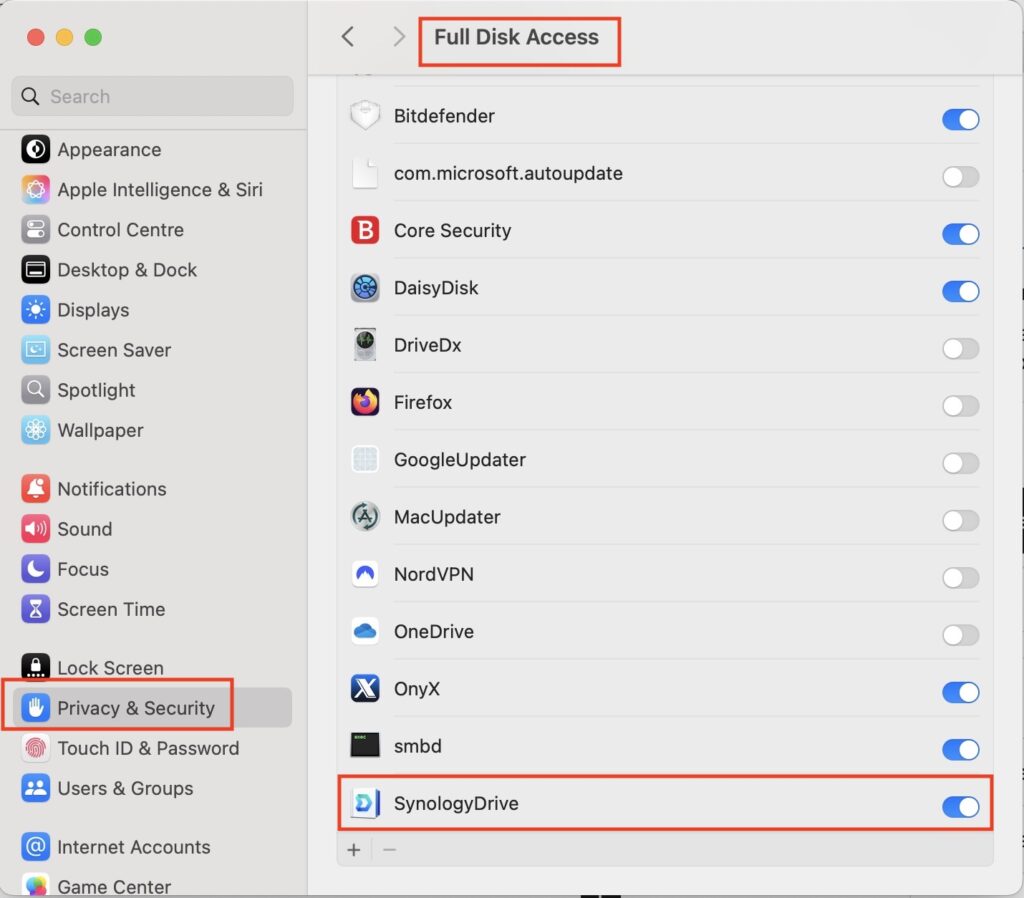
Browse to the location and make sure you can see the file. Next, open Preferences and go to ‘Privacy and Security’, followed by ‘Full Disk Access’.
What you now need to do is drag ‘SynologyDrive’ from Finder to the panel in preferences, and ensure it’s turned on:
Full Disk Access
You’ll be warned that you need to restart Synology Drive – do so, and you should see that message no longer pops up.
You can turn off showing hidden files using the same CMD+Shift+. or the following in Terminal:
defaults write com.apple.finder AppleShowAllFiles FALSE killall Finder # refreshes Finder
Since upgrading to MacOS Sequoia I noticed backups of my machines that had a lot of small files were either taking an age or failing. I also noticed that large transfers would slow down significantly after a while.
After thinking this was an issue with my networking…and finding it wasn’t, I managed to narrow it down to Sequoia – the issue wasn’t experienced on previous versions of MacOS or Windows. How odd.
Anyway, this setting on the Synology NAS seems to resolve the issue:
Do not reserve disk space when creating files
To configure it, go into ‘Control Panel’ on the Synology, and select ‘File Services’:
File Services
From the ‘Advanced Settings’ menu, you want to select ‘Others’ at the top, and turn on ‘Do not reserve disk space when creating files’:
Do not reserve disk space when creating files
NOTE: This will reset the SMB Service so if you have any active connections they may disconnect and re-connect.
Anyway, after I’ve done that, those weird little problems seem to have gone away. For the more technically minded, there’s a description of what this does below:
strict allocate (S) This is a boolean that controls the handling of disk space allocation in the server. When this is set to yes the server will change from UNIX behaviour of not committing real disk storage blocks when a file is extended to the Windows behaviour of actually forcing the disk system to allocate real storage blocks when a file is created or extended to be a given size. In UNIX terminology this means that Samba will stop creating sparse files.
This option is really designed for file systems that support fast allocation of large numbers of blocks such as extent-based file systems. On file systems that don’t support extents (most notably ext3) this can make Samba slower. When you work with large files over >100MB on file systems without extents you may even run into problems with clients running into timeouts.
When you have an extent based filesystem it’s likely that we can make use of unwritten extents which allows Samba to allocate even large amounts of space very fast and you will not see any timeout problems caused by strict allocate. With strict allocate in use you will also get much better out of quota messages in case you use quotas. Another advantage of activating this setting is that it will help to reduce file fragmentation.
To give you an idea on which filesystems this setting might currently be a good option for you: XFS, ext4, btrfs, ocfs2 on Linux and JFS2 on AIX support unwritten extents. On Filesystems that do not support it, preallocation is probably an expensive operation where you will see reduced performance and risk to let clients run into timeouts when creating large files. Examples are ext3, ZFS, HFS+ and most others, so be aware if you activate this setting on those filesystems.
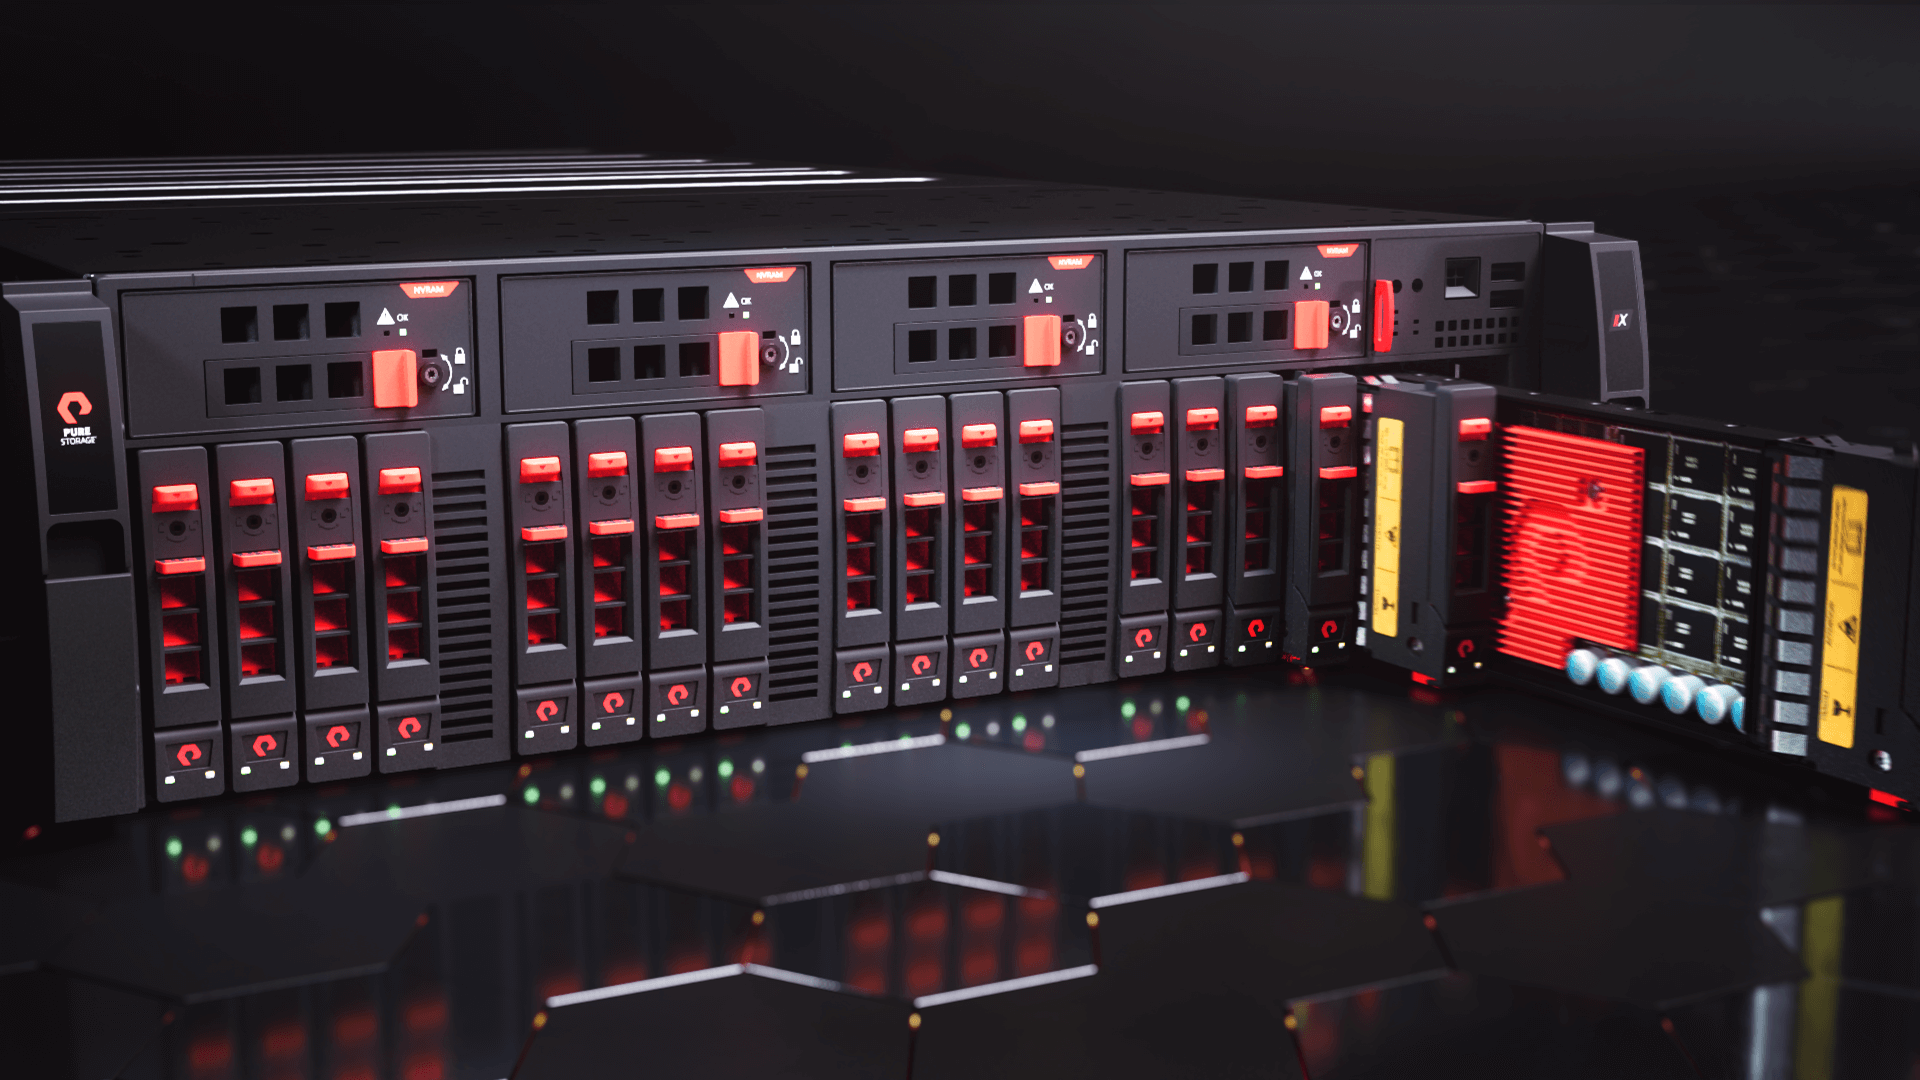
A friend of mine asked me to check over a spec of a Network Attached Storage (NAS) device he was buying for home. Mostly for media, backups, and general storage, and a light bit of work use. The spec he sent me bothered me a bit, and I gave it some thought before replying. The spec he’d chosen was:
-> 4 x 24TB Hard Drives
-> 32GB RAM
-> 10Gbe Upgrade
The main thing that bothered me was the upgrade to 10Gbe when only using 4 drives, shortly followed by the thought of 24TB drives simply being too big – my preference would be for more, smaller, drivers. Let’s say 8 x 12TB in this instance, to give the same available storage.
Let’s talk through this logic – I’d be interested in your views.
Recovery Time
This is probably my key observation when choosing larger drives – recovery times become uncomfortable. Let’s imagine you have a four drive NAS consisting of those 4 x 24TB drives, and one of them fails. You order another one, and pop in the new drive – all good, right? No data lost.
Well, consider how long it is going to take your NAS to rebuild that array back to the point that you have some high availability again. Assuming a fast spinning drive (I use these) they’ll average perhaps 125-150MB/s during a RAID rebuild. That means it’s going to take 2-3 days for your RAID to rebuild. During that time your data is exposed, and the performance of your NAS will be severely impacted.
Assuming smaller drives – say 12TB – that recovery will take just over a day. Still a significant amount of time.
Performance
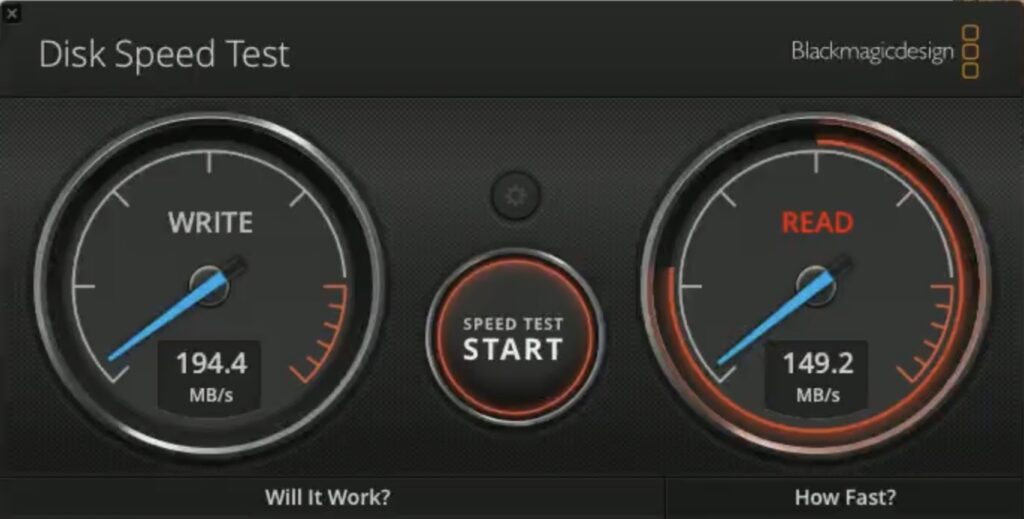
Back in the day when I was designing large Microsoft Exchange on-premises stuff, we always went for more drives. This was for the performance requirements. You could often end up with a lot more physical space than you needed, in order to achieve the performance throughput you required. Let’s consider the 4 x 24TB and a 10Gbe upgrade – you’re not going to see all of the benefit of the 10Gbe upgrade. One of the fastest spinning drives I have is an Enterprise Toshiba 16TB drive – here is its performance in a Thunderbolt chassis:
Screenshot
Even with four of those in your NAS, you’re not going to see more than 600MB/s across them (assuming one is for parity/high availability), despite having approximately 800MB/s of raw performance. Sure, it’s still loads better than your 110MB/s you’d get over 1Gbe.
If however you used 8 x 12TB drives, assuming they offered similar 200MB/s performance per drive, you’d get approximately 1600MB/s (raw). Even dropping a single drive for parity gives you 1400MB/s, which means you would get the benefit of the 10Gbe upgrade. You should get your 1-1.1Gb/s performance.
High Availability
This ties back to the recovery time I mentioned earlier—more drives allow for more robust availability models. Take RAID 5, for example, or Synology’s equivalent, SHR. In a four-drive setup, one drive is dedicated to redundancy, meaning you can lose a single drive without losing data.
With an eight-drive setup, you could opt for RAID 6, which provides even greater protection. In this model, two drives are used for parity, allowing you to sustain up to two drive failures before data loss becomes a risk. Think of it this way: if a drive fails, you can replace it while still maintaining redundancy during the rebuild process. However, you wouldn’t want to wait for a second failure!
Anecdotally (though anecdotes ≠ data), drives purchased together often come from the same batch, and rebuilds place significant stress on remaining drives. I’ll let you draw your own conclusions on that…
Space Availability
Next, let’s look at usable space – best demonstrated below.
RAID & Space AnalysisScreenshot
A 4 drive 24TB RAID 5 array gives you 72TB of available space, with 1 drive used for parity.
If you went with 8 x 12TB you’d better performance, and 84TB of usable space with a single drive for parity. I wouldn’t though, I would go with 8 x 12TB drives, in RAID 6 – in this model, you get the performance, the same usable space (72TB) as the 4 drive RAID 5, as well as two drives used for party.
Seems obvious to me!
Downsides of more drives?
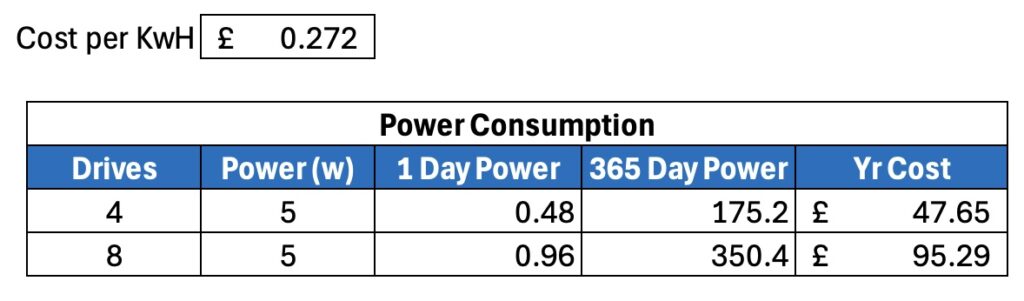
It’s not all sunshine of course, there are some things to consider. Firstly – power consumption – 8 x 12TB drives will use about 1KwH of power a day (assuming about 5w/drive). 4 x 24TB will use half of that – a difference of 183KwH over a year. In real money – well, GBP – that’s about 50GBP in extra power used by the 8 drives over the 4, over the 4. Not so terrible when you look at it like that?
Cost of power 8 drives compared to 4.
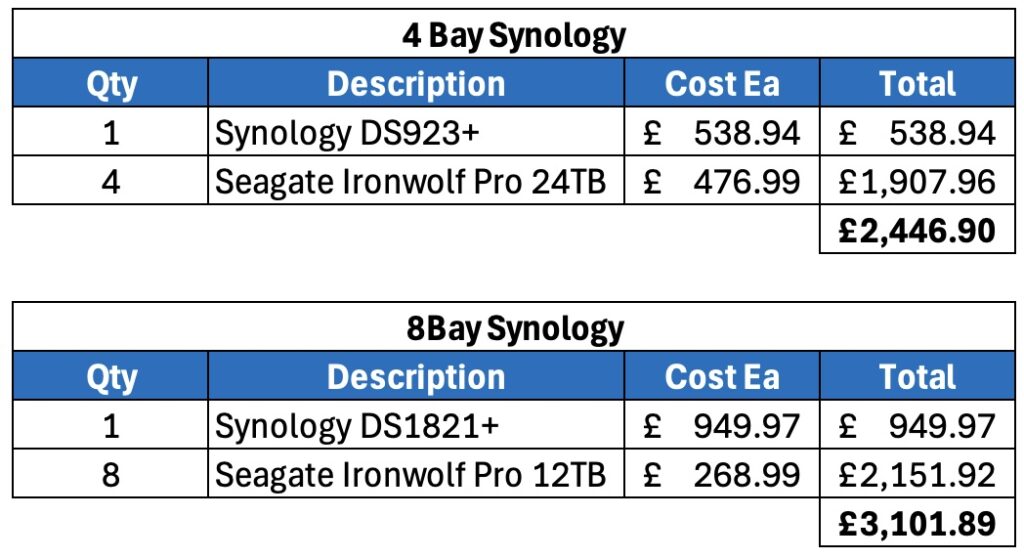
The other thing of course is that 8 bay NAS chassis cost more. A Synology DS923+ for example is about 500GBP, whereas an 8-bay Synology like the DS1821+ is nearer GBP950.
Let’s work out the costs, ignoring the RAM/10Gbe upgrade.
Cost ComparisonScreenshot
(For my American friends, in the UK our prices include VAT/Sales Tax – currently 20%).
Closer than you’d think isn’t it? The only downsides from what I can see are the increases in operational power costs, with the upsides being performance and data protection.
Summary
Personally, I’d go for more drives simply from the recovery time and data protection perspective – the increased performance is an added bonus.