A while ago I picked up a Minisforum MS-01 to act as a lab machine, in replacement of my aging 2018 Mac Mini units. You can read about it here:
New Home Lab Beast – Minisforum MS01
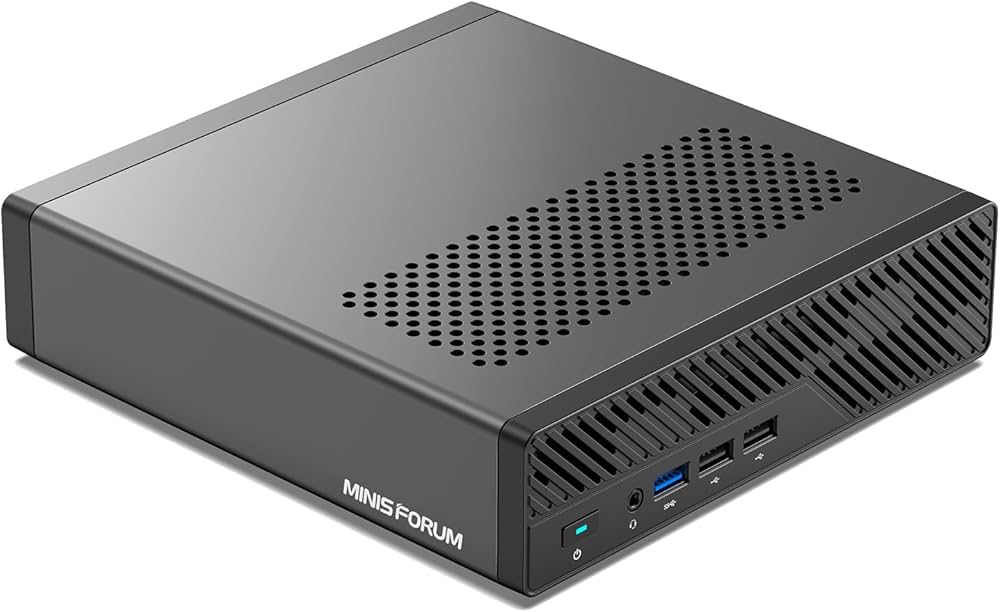
It’s proven to be excellent so far, and has handled everything I’ve thrown at it. Now though, Minisforum have top-trumped it and released the MS-A2. This is in the same chassis as the MS-01 however it’s now based on the Ryzen 9 9955HX 16 core/32 thread processor…and wow is it a beast.
The specification of the unit I have is as follows:
-> AMD Ryzen 9 9955HX – 16 core/32 threads
-> 96GB DDR5 RAM
-> 4TB Lexar NM790 NVMe
-> Samsung 990 EVO Plus 2TB NVMe
-> 2 x USB-C 3.2 Gen 2 (10Gbps) – No USB4/Thunderbolt
-> 2 x 2.5Gb Ethernet
-> 2 x 10Gbe SFP+
-> HDMI 2.1
There’s no USB4/Thunderbolt on those USB-C ports, but they do support DisplayPort Alt‑Mode 2.0 which I think is up to 8K/60Hz or 4K 144Hz.
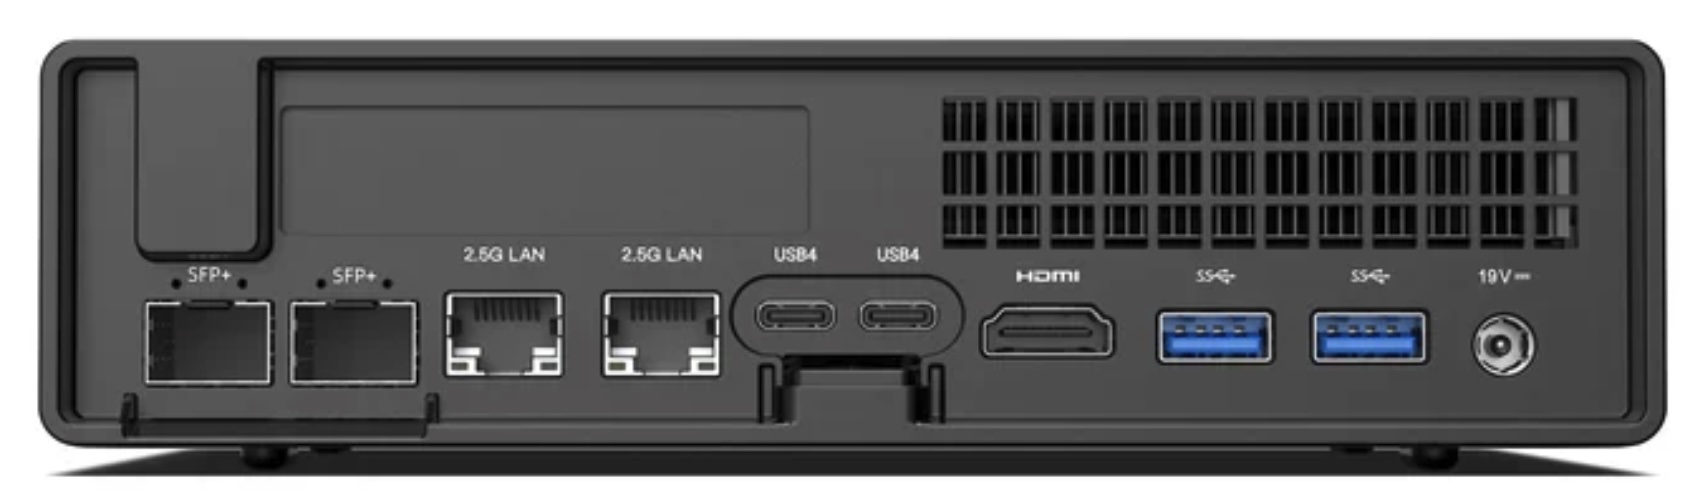
So very similar to the MS-01, bar the lack of USB4/Thunderbolt. It’s a lot of connectivity – interestingly, mine is marked up as USB4 on the back, but it absolutely is not!
Internally it’s just as strong. There are three NVMe slots, all supporting PCI 4.0 x 4, however interestingly slots two and three are configured as Gen 3 in the BIOS, and not Gen 4. I imagine this is to do with cooling, however I’ve configured the ports for Gen 4 and so far it’s been all good. There is a fan directly above slots 2 & 3, but it does not extend to slot 1.
Interestingly, with slot 1, you can install an adapter for U.2 drives, which could be incredibly useful.
It’s a solid platform, with great connectivity.
Benchmarks
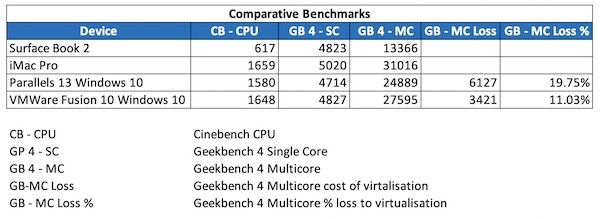
Let’s look at the benchmarks first, comparing it to the 13900H in the MS-01, and the M4 Max 16 core in my main laptop.
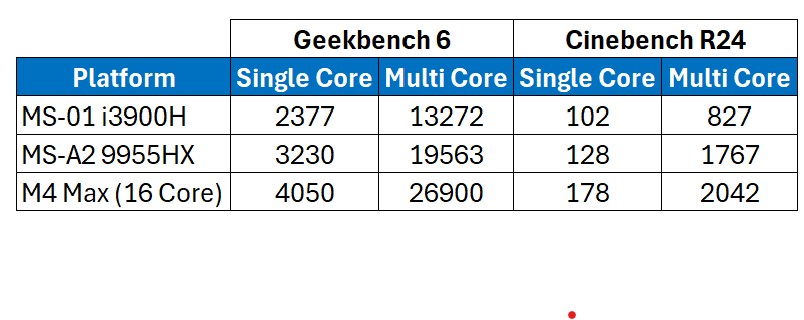
That is a solid improvement over the MS-01 isn’t it! The 13900H has 6 performance cores with hyper-threading, and 8 efficiency/non-hyperthreading cores. This compares to the 9955HX having ‘only’ 16 performance cores, all supporting hyper-threading.
For comparison, the M4 Max in the table above has 12 performance cores, and 4 efficiency cores. That is an impressive bit of silicon isn’t it?!
The performance increase over the 13900H is substantial, and for a lab machine incredibly useful. I’ve copied across my main HyperV lab (Active Directory, Exchange, SQL, and Skype/Teams integration), and there is a notable difference in performance on the MS-A2 over the MS-01, although to be clear it runs very well on both.
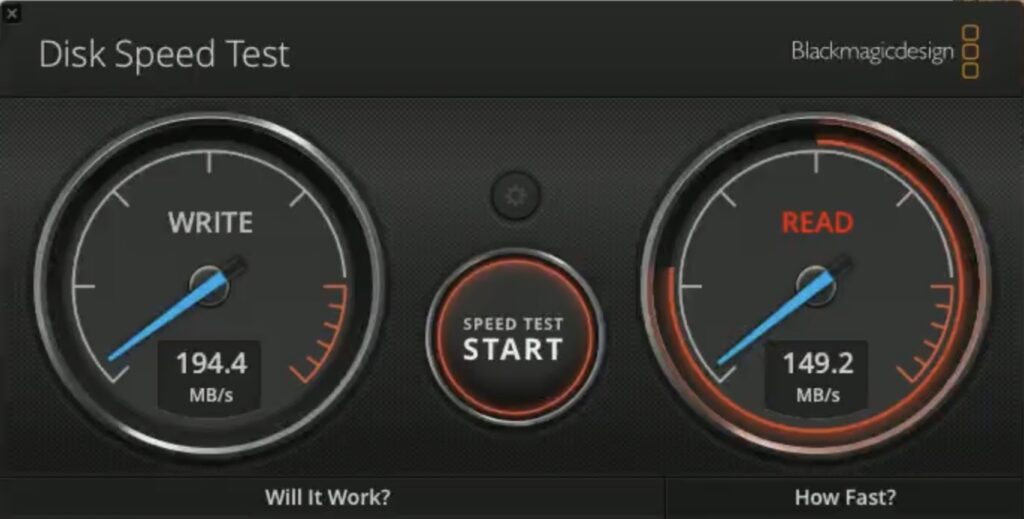
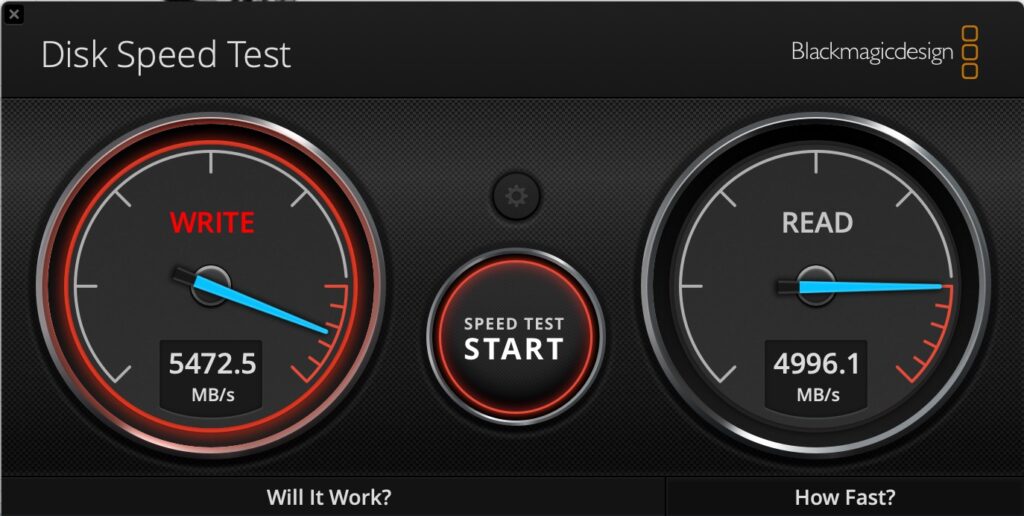
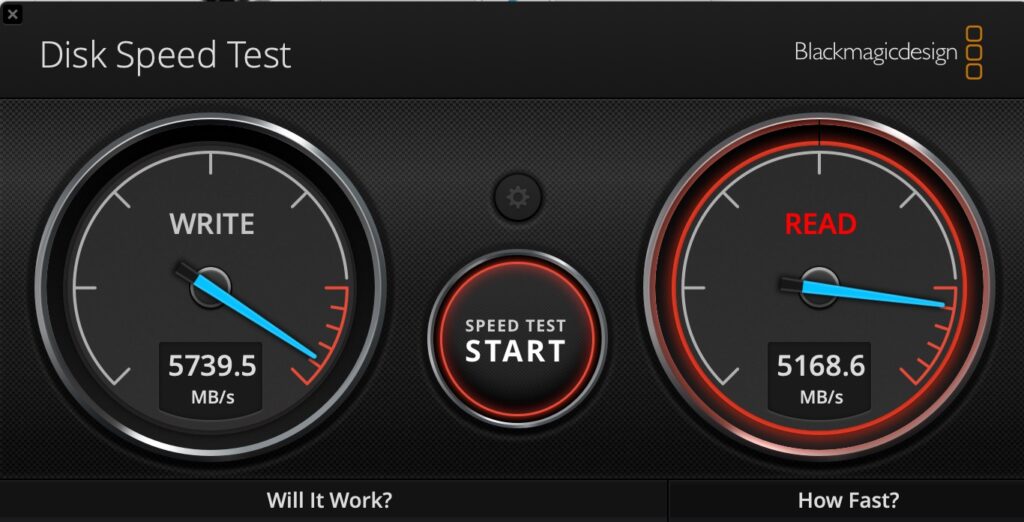
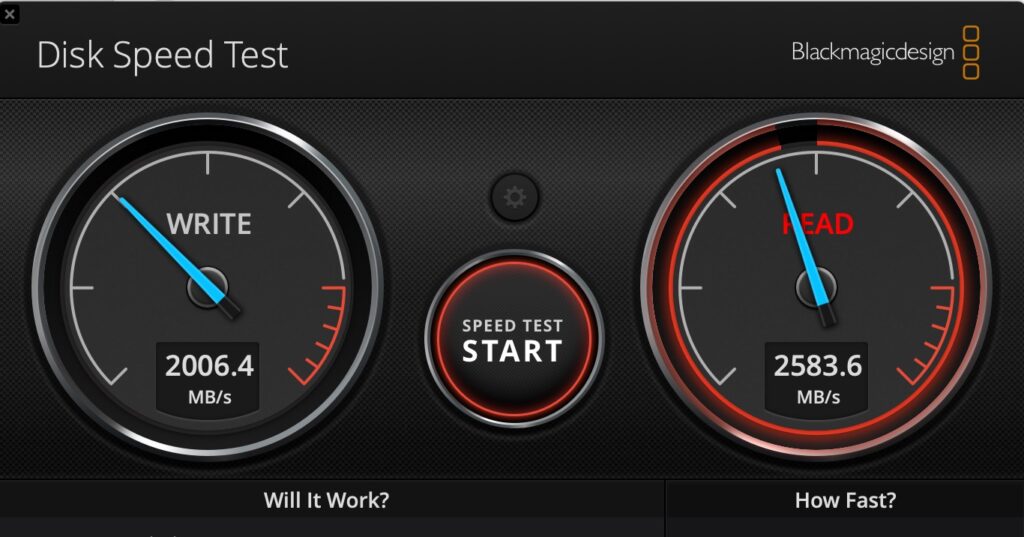
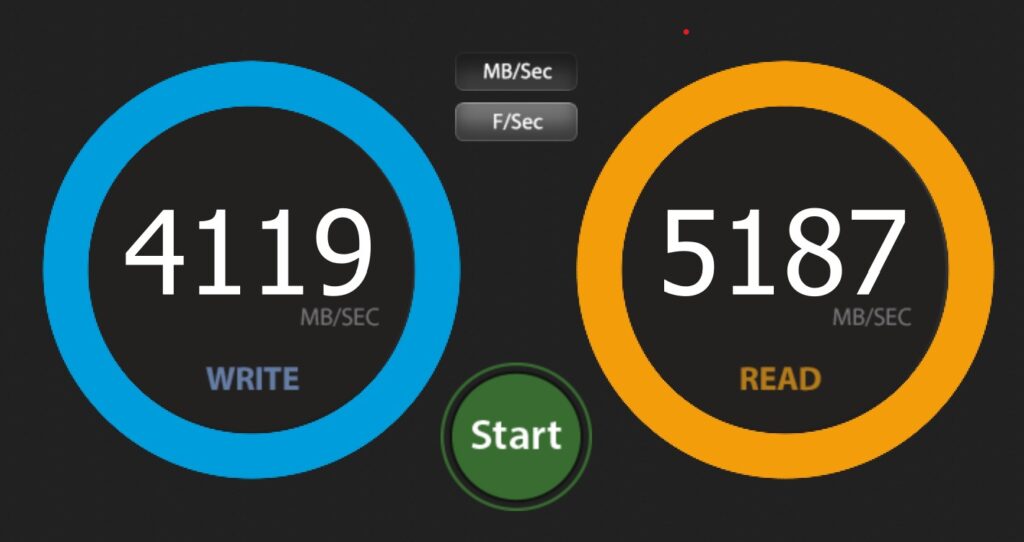
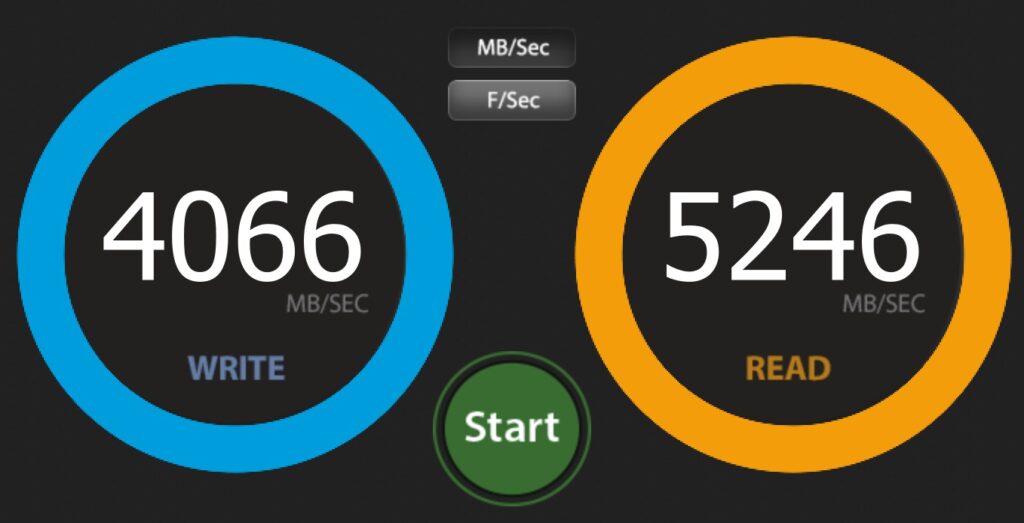
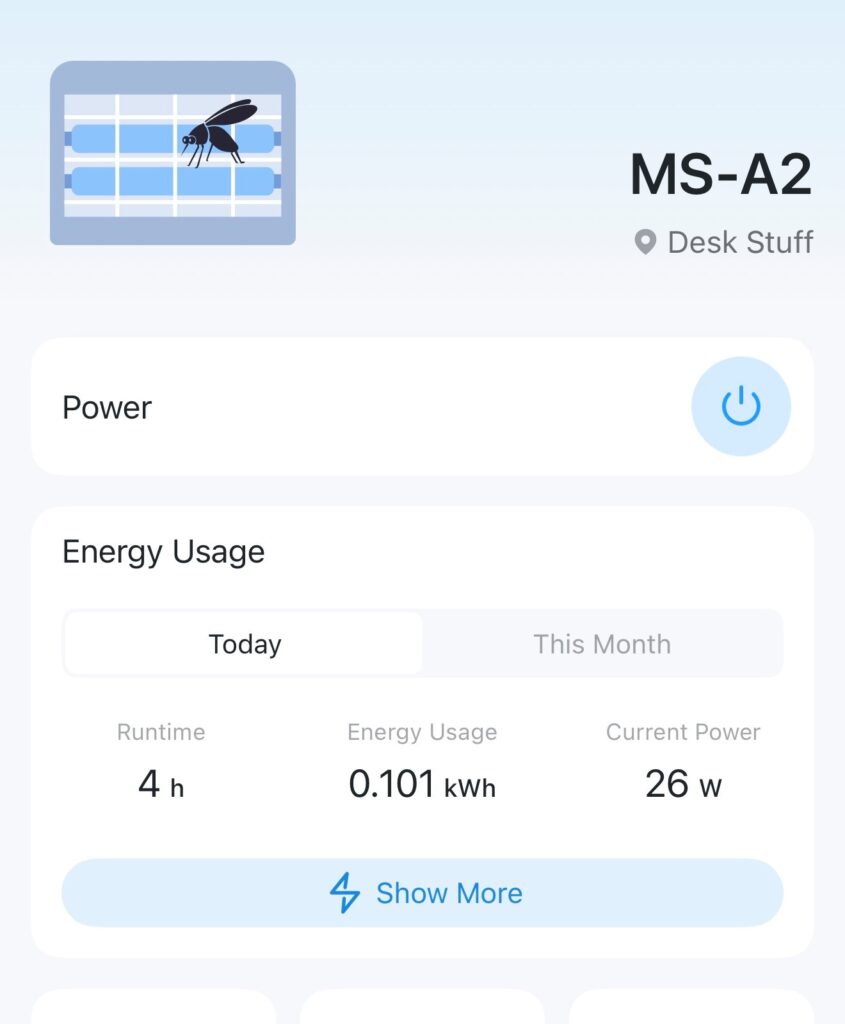
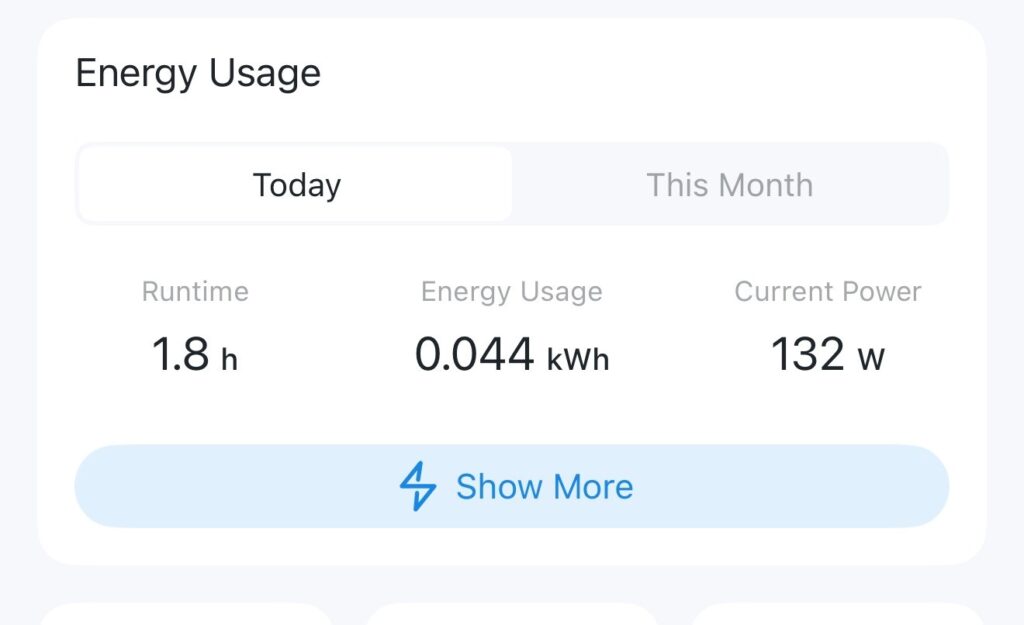
Drive performance is great on both NVMe slots that I have in use. Note that slots 2 & 3 are configured for Gen 3 by default, however I have changed them to Gen 4 in the BIOS. Below shows the primary (Lexar) and the secondary (Samsung)drive respectively.
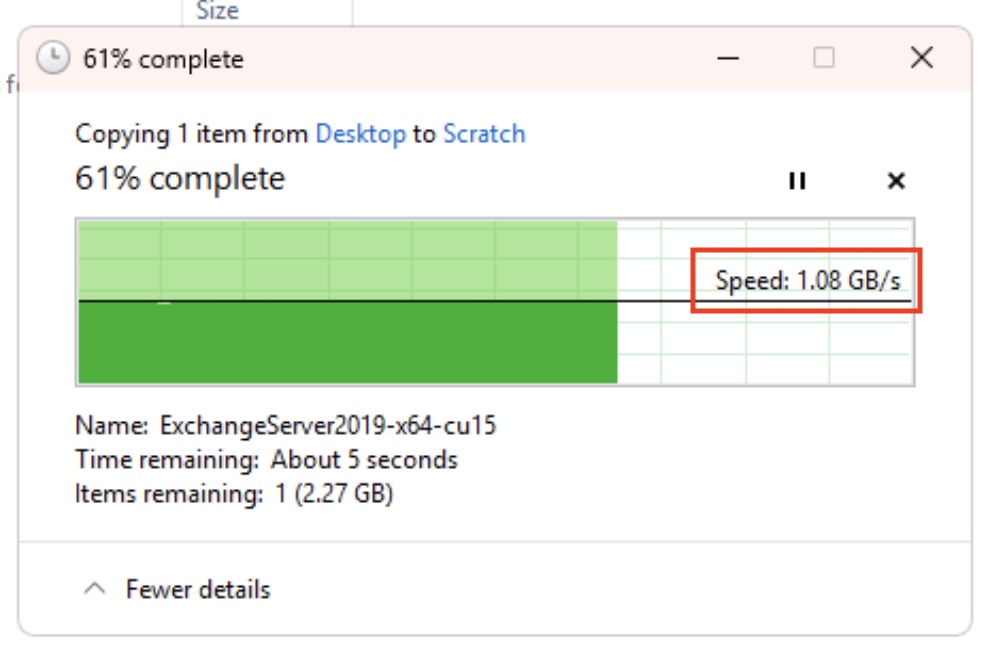
Network performance over the 10Gbe and the 2.5GB was solid too. Note that on the MS-01 I had issues using both SFP+ ports with SFP+ to RJ45 adapters in them – I think they were overheating. I haven’t tested that in the MS-A2 however both the MS-01 and the MS-A2 are using fibre SFP+ connections in both ports, and over fibre they’re solid and work at circa 1Gb/s to/from my SSD NAS.
Impressive performance all round. I’ve included the Apple chip for reference – the story would be more interesting there if we included power per watt wouldn’t it? Talking of power…
Minisforum MS-A2 Power Consumption
At idle, with the configuration outlined above (2 x NVMe, 2 x 10Gbe SFP+ connected), I’m seeing power consumption at circa 25-30watts. That seems roughly in line with the MS-01, which surprised me a little.
The gap widens under load however – which is what you’d expect. When running Cinebench R24 I was seeing peak power usage around 130-140watts.
I understand that the default TDP of the Ryzen 9 9955HX in the MS-A2 is configured at 55Watts. You can however configure that in the BIOS up to 75Watts if you wish – I’ve not as yet looked at that to see if it has any real-world impacts, however it’s certainly something I’ll be having a look at – theoretically that could offer a 15% ish uplift in performance in multicore workloads, so worth a look see.
Costs
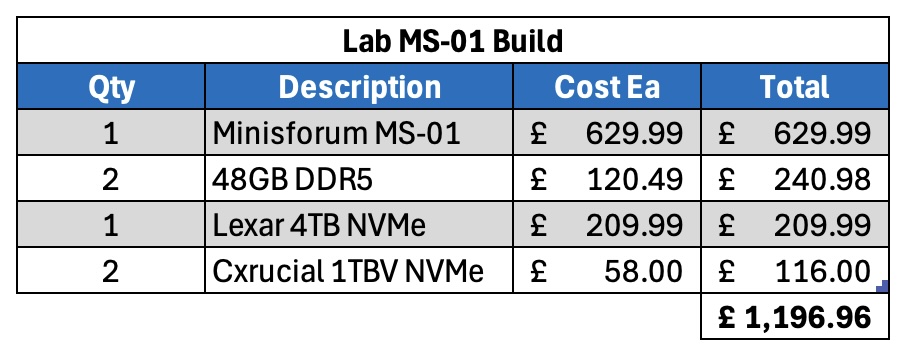
It is a little bit pricier than the MS-01 – let’s compare the two. Firstly, the MS-01.
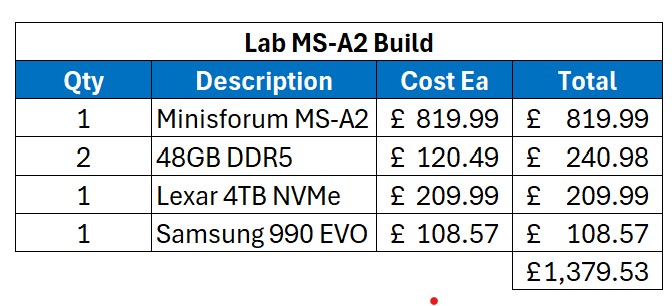
Let’s now have a look at the MS-A2.
For my non-UK readers, the above costs are in GBP, and include VAT – our sales tax – at 20%.
So the base unit is more expensive than the MS-01, even more so as you can get further discounts on the MS-01 compared to when I originally bought them.
Fan Noise
The fans are very audible on the unit – similar to the MS-01. Ask the unit to do practically anything and the fans will spin up. It doesn’t bother me, however if it’s right next to you I suspect it could get irritating? That’s very subjective, and hard to qualify.
Support
I think the comments I made back when looking at the MS-01 still bear true: Now, this is worth being aware of. I’ve seen a few horror stories about dealing direct with Minisforum, and if it was anything like my experience dealing with Geekom I’d be very nervous about buying direct. Buy from Amazon however and any problems you can make their problem, and their returns process is usually excellent.
Summary
So far I’m very impressed by the thing. It’s a super-fast version of the already impressive MS-01. For my use – as a lab virtualisation machine – it’s a great fit!
Minisforum seem to be producing some great stuff. I’m really looking forward to testing their upcoming NAS device for example.
Anyway, any questions about this unit please let me know, and I’ll do my best to answer.
EDITed to add – while I remember, this unit doesn’t support vPro like the MS-01.