Category: MacOS

  • Synology NAS and MacOS Sequoia – Poor Performance

    Synology NAS and MacOS Sequoia – Poor Performance

    Since upgrading to MacOS Sequoia I noticed backups of my machines that had a lot of small files were either taking an age or failing. I also noticed that large transfers would slow down significantly after a while.

    After thinking this was an issue with my networking…and finding it wasn’t, I managed to narrow it down to Sequoia – the issue wasn’t experienced on previous versions of MacOS or Windows. How odd.

    Anyway, this setting on the Synology NAS seems to resolve the issue:

    Do not reserve disk space when creating files

    To configure it, go into ‘Control Panel’ on the Synology, and select ‘File Services’:

    Image shows the File Services screen from Control Panel on a Synology NAS.
    File Services

    From the ‘Advanced Settings’ menu, you want to select ‘Others’ at the top, and turn on ‘Do not reserve disk space when creating files’:

    Image shows where to select 'Do not reserve disk space when creating files' on a Synology NAS
    Do not reserve disk space when creating files

    NOTE: This will reset the SMB Service so if you have any active connections they may disconnect and re-connect.

    Anyway, after I’ve done that, those weird little problems seem to have gone away. For the more technically minded, there’s a description of what this does below:

    strict allocate (S)
    This is a boolean that controls the handling of disk space allocation in the server. When this is set to yes the server will change from UNIX behaviour of not committing real disk storage blocks when a file is extended to the Windows behaviour of actually forcing the disk system to allocate real storage blocks when a file is created or extended to be a given size. In UNIX terminology this means that Samba will stop creating sparse files.

    This option is really designed for file systems that support fast allocation of large numbers of blocks such as extent-based file systems. On file systems that don’t support extents (most notably ext3) this can make Samba slower. When you work with large files over >100MB on file systems without extents you may even run into problems with clients running into timeouts.

    When you have an extent based filesystem it’s likely that we can make use of unwritten extents which allows Samba to allocate even large amounts of space very fast and you will not see any timeout problems caused by strict allocate. With strict allocate in use you will also get much better out of quota messages in case you use quotas. Another advantage of activating this setting is that it will help to reduce file fragmentation.

    To give you an idea on which filesystems this setting might currently be a good option for you: XFS, ext4, btrfs, ocfs2 on Linux and JFS2 on AIX support unwritten extents. On Filesystems that do not support it, preallocation is probably an expensive operation where you will see reduced performance and risk to let clients run into timeouts when creating large files. Examples are ext3, ZFS, HFS+ and most others, so be aware if you activate this setting on those filesystems.

    Default: strict allocate = no

  • Parallels or Fusion?

    Virtualisation on MacOS is astonishingly capable. Before I get text-abuse, I’m fully aware that you can virtualise on Windows too – HyperV, VMWare Workstation etc. Can you run Final Cut Pro though…? Legally…? Nope. Anyway, I digress.

    I tend to use Parallels Desktop for my client-side virtualisation, and VMWare Fusion for my server stuff – but what should you use? Assuming we’re just looking at client-side virtualisation, then this video may help.

  • Oh Mer Gawd 2018 Macbook Pro (Apple)

    2018-08-02 Brief update – I’ve added a video clip at the bottom showing the 2018 i9 MacBook Pro against the 2017 iMac Pro 10 Core/64Gb RAM unit).

    iMac completes it in 4 min 43 seconds, 2018 i9 MacBook Pro 9 Minutes 33 seconds. 

    iMac Pro Example Times

    ====

    Anybody with any interest in tech can’t fail to have noticed all the noise around the recent update to the Apple MacBook Pro range – in particular around thermal throttling and the performance of the units. To be fair to Apple, they responded quickly ( surprisingly so… ) and the patches they published did seem to make a significant difference.

    I’m not particularly in to the ‘OMG it wouldn’t have happened under Steve Jobs’ thing, but I can’t help thinking this wouldn’t have happened under…//slaps myself. It does however seem that Apple’s quality control is struggling a bit doesn’t it? Let’s think, there was the ridiculous High Sierra Security Bug, the throttling issue, T2 kernel panics (work in progress), iPhone throttling, and of course the issue around the failing keyboards.

    As a quick side-note, if you’re interested in the repairability side of Apple kit, you could do worse than to subscribe to Louis Rossmann’s channel over on YouTube. It’s fair to say he’s not a fan of Apple’s attitude to repairability! Quite reasonably so from what I’ve seen.

    I’m not going to bang on about the throttling, however I thought I would look at the performance of the 2018 unit and compare it to my older ones, and just for the laughs to the Surface Book 2 I also have. You can see the results in the video below – spoilers: The i9 is faster than all of them, who knew.

    I should also do a comparison against my iMac Pro but I can’t at the minute as Apple is busy swapping it for another one. More on that in a later blog, once I have an outcome. 

    So, quick summary. Do I like the 2018 unit? Is it a big step up from the 2017? Do I have any concerns? Well:

    Yes. It’s fast.

    Yes. The 32Gb upgrade is going to help me a lot. In some instances I’ve had to carry two laptops to achieve some things (admittedly an unusual use case), but I won’t have to do that any more.

    Concerns? Wow it runs hot. That makes me wonder about reliability. But. We shall see.

    Anyway, the video is below should you be interested. You can see the information on the 2017 unit here: 2017 Kaby Lake MacBook Pro

    Comparison with the 2017 iMac Pro:

  • MacOS High Sierra – Another Security Bug

    So there’s been yet another security issue with MacOS High Sierra highlighted – the fact that you can authenticate to the App Store preference pane with any old password. Combine this with the recent one where you could authenticate to any MacOS machine with no password on a root user…well, it’s enough to make anyone a little concerned isn’t it?

    You can read about them here:

    macOS High Sierra’s App Store System Preferences Can Be Unlocked With Any Password

    Major macOS High Sierra Bug Allows Full Admin Access Without Password 

    I find it interesting that people think MacOS is so, so secure against the competition (Yes Windows, I’m looking at you). Really, is it? I’m not convinced. I think it’s probably reasonable to say that MacOS users are at less risk than their Windows counterparts (security by obscurity and all that), but I don’t think it’s inherently more secure. If this latest bug doesn’t convince you of that I’m not sure what else will.

    It’s the same with Anti-Virus/Malware in my opinion. Wrote about that previously:

    I don’t need Anti-Virus on my Mac…Right?

    Aaaanyway, sure I’ll now get to be told just how wrong I am? The joy of the Internets.

    Video below shows the exposure: Video no longer available.

  • Cannot export from iMovie in 1080p

    I ran in to an odd issue with iMovie – it wouldn’t let me export the project to a file at 1080p, it would only let me select 720p or 540p. This was a bit odd – I checked all the source footage and it was all at least 1080p? Anyway, there’s a simple way to fix, and it involves:

    • Select all of your project footage with CMD+A, and then copy it with CMD+C.
    • Create a new project, and insert any photo in there – it has to be at least 1920×1080, so any decent resolution photo.
    • Paste in your project data with CMD+V.
    • Delete the photo you inserted….
    • …and you can now export in 1080.

    Bit weird, but like I say, quite simple to fix. The video below shows a run through on how to do it.

  • I don’t need Anti-Virus on my Mac…Right?

    Wrong – on so many levels. 

    Since my article yesterday about protecting your stuff, a few people have asked me about Anti-Virus (AV)protection for their Apple Macs. The general assumption out there seems to be that you don’t need AV protection on a Mac. I think this is wrong.

    It’s true there’s far fewer malware and virus packages targeted at OSX – and because of this the probability of you getting hit by such a thing is far lower. But probability isn’t protection is it?

    Apple themselves used to claim that the Mac ‘doesn’t get PC viruses’ and told owners they could ‘safeguard your data’, ‘by doing nothing’. They quietly dropped this claim in 2011/2012 following the outbreak of the Flashback Trojan on OSX.

    So if you have a Mac, and you’re not running any form of AV….you’re protected by the lower volume of targeted malware out there, and that’s it. You’re playing the probability game.

    The other thing to consider is that for some strange cultish reason people who like OSX/MacOS (to be clear, I’m a big, big fan) seem to think it’s a fully secure operating system, and often compare it to Windows. Usually in a facetious ‘lol Windows’ sort of way. 

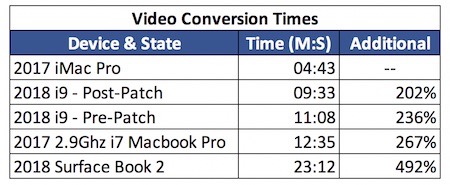
    Here’s the thing though – MacOS mostly fairs worse than Windows when it comes to hacking and security testing. Read that again – it’s true. Didn’t expect that did you?

    Time and time again MacOS has come out badly on InfoSec & hacking tests.

    So as I say – no virus protection, you’re playing the game of numbers rather than offering any real protection.

    The other element to consider is that of being a good net-citizen. What do I mean by this? Well, if you’re not careful you could find yourself passing along virus & malware code that while it couldn’t infect your MacOS machine it could of course infect a Windows machine who you happen to send stuff too – via email for example. 

    So how do I protect my stuff…? From a scenario point of view I have a couple of MacOS laptops, and a main big spec iMac that is the centre of the my digital life. Each one of those units also runs Windows in Parallels. I.e. Virtualised. So how do I protect my environment?

    As per the previous article, I start at the basic level and then work up to some more specific stuff that is probably more due to my paranoia than any great technical need – so let’s work through them.

    Don’t do stupid

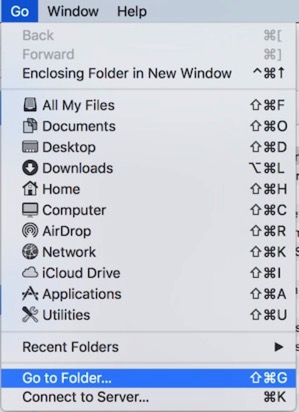
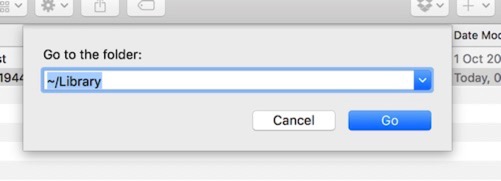
    This is probably the core to all of your security really. Don’t do daft things like download hooky software, or click on links in suspicious emails. That last one is an interesting one – when I get emails saying ‘login to your account’ for example, I never do it from the email links, I always go directly to the website myself.

    There’s also other core stuff to do, including:

    Encrypting your hard disk (Encryption – it’s for everyone)

    Use a password manager (Why don’t more people use password managers?)

    Protecting Core MacOS/OSX

    There’s various anti-virus/malware products out there for OSX. There’s a decent review of the products here at Tom’s Guide:

    Best Antivirus Software and Apps 2017

    Personally, I use BitDefender. Quite pleased that my own assessment of products out there comes top of the list at Tom’s Guide too! Anyways, it’s a great product – works well and is not intrusive.

    There’s various other products out there – another common one is ClamXAV for example.

    Protecting my Windows Machines

    I run a number of Windows machines in Parallels. Windows comes with its own anti-virus built in – something called Windows Defender. I will  say that Windows Defender never seems to fair very well in most testing scenarios. It is of course far better than nothing.

    If your core OSX platform is protected by a good platform like BitDefender, it’s arguable that Windows Defender would suffice in your Windows machines. Personally, I don’t believe in ‘average’ security. You may have spotted this. So…in my Windows machines I use the AVG product. I only use the free one in Windows now rather than the subscription model, mainly as my core MacOS platforms are so well protected.

    UPDATED: I no longer use AVG – after issues getting it installed and working with my account, I gave up. Interaction with tech support was terrible. I now use Bitdefender in Windows as well.

    For most people, the above would be enough to provide you a decent level of protection. There are however additional things you can do. This is perhaps where I start moving in to the area that’s beyond most people’s requirements. I work in IT, and am constantly on people’s systems – so protecting me and them is absolutely critical to my day job.

    So, some of the extra stuff I do.

    LittleSnitch for OSX

    While MacOS has a decent in-built firewall, it doesn’t tell you an awful lot about what your machine is up to in terms of network connections. Who are you connecting to right now…? You probably have no idea. Anyways, this is where LittleSnitch steps in. You can read a bit more about it here:

    Little Snitch keeps an eye on your Mac’s Internet connections

    It essentially allows you to view exactly what your Mac is connecting too.

    Sandboxed Machines

    Using virtualisation it’s pretty easy to build new machines – whether MacOS or Windows. In view of this, I have some sandboxed machines for each of the common OS environments I use. What’s a sandbox? Well it’s an isolated machine that you can use to test stuff on.

    I have some MacOS and Windows Sandbox environments that I use for testing stuff in. 

    Summary

    Protecting your environment is key to protecting your data. It’s also part of being a good net-citizen really. Don’t risk your stuff – and don’t risk mine either.

  • Outlook 2016 – Cannot delete reminders

    I’ve been running into an issue recently where my Outlook 2016 for Mac would constantly bring up reminders that I had already dismissed. I noticed it seemed to be related to using Outlook on another Mac for the same Exchange account – I.e. As soon as I did it on another Mac, then boom all the reminders were back on *all* machines.

    It’s irritating, but not catastrophically so I guess.

    Anyway, after doing some research there’s a fix that seems to sort it.  Firstly, shut down the Outlook 2016 for Mac client on all of your Macs. 

    Go to the user’s library folder – you can do this by selecting the ‘Go’ menu in Finder, selecting ‘Go to Folder’ and entering ‘~/Library’:

    Go to folder

    Under the home user’s library, navigate to:

    /~Library/Group Containers/UBF8T346G9.Office/Outlook/Outlook 15 Profiles/Main Profile/Data/Events

    …then just delete all the folders/contents of that directory. Do that on all of your Macs.

    Once done, fire up Outlook and they should stop popping up in such an annoying fashion.

  • Microsoft Lync wants to use the OC_KeyContainer

    Ran into a weird issue on Lync 2011 on my Mac machines (as a side note, how rubbish is this client? Let’s hope the upcoming Skype for Business for MacOS is everything we expected and more… ). It was putting up a prompt saying:

    Microsoft Lync wants to the “OC_KeyContainer_useraddress” keychain

    …and asking for a password. Usual user password doesn’t work. Anyway, after some digging it’s pretty easy to fix if you see it.

    Exit Lync 2011.

    Use Finder to go to the user’s library – you can use ‘Go to folder’ and enter ~/Library

    Library

    In the Library folder, go into the Keychains directory. You’ll see a few files called:

    OC_KeyContainer_useraddress

    For example: OC_KeyContainer_AndyPandy@Contoso.com

    Simply delete them. Once you’ve removed them start Lync 2011 again and it should continue as normal

  • 2016 Retina Macbook 12″

    Toward the tail end of last year, Apple released the Macbook. A 12″ Retina machine with a mobile processor. You can read about my initial thoughts about it here:

    2015 12″ Retina Macbook

    That wasn’t really a review, just my first thoughts on the product. So how did I end up liking it?

    Well, a lot would be the simple answer. Very portable, runs native apps, battery – I’d say I ended up treating it more like my iPad than my laptops. I.e. Being a bit ‘oh, I should probably plug this in at some point’ rather than trying to keep my laptops fully charged just in case.

    Any frustrations? Well, a few, with the main one being performance. As I touched on in the original article above, if you treat the unit as a super-iPad it’s great. Here’s the thing though – it runs OSX. All of a sudden I wanted to do more, like run Win 10 now and again, or do the odd bit of video processing while out on my travels. Not a great experience truth be told. Running Windows 10 in Parallels was something I’d do if I had to – I.e. To get access to mail archives, or open/run Visio etc. If I thought I needed to do that during the day, out would come my 15″ i7 and straight in to the backpack.

    The single port didn’t really offer me any problems – but again, you have to remember what the unit is aimed at. I carried a 3 port USB3 hub around ‘just in case’ and rarely had to get the thing out.

    So, with literally no surprise anywhere, Apple update the units to the Skylake processors. The idea of a bit more performance in this form factor made me hop, skip, and jump to the Apple store post haste* to pick up one of the more powerful M5 units (my 2015 unit was the entry level).

    *Opened the door to courier with a look of surprise having forgotten I’d ordered it.

    What’s the difference? Well, a lot of those original frustrations are gone. Running Windows 10 in Parallels is no longer the frustrating sludge-fest it was on the 2015 unit, and I can even process some GoPro footage in the background while carrying on with my Email. There’s no way I could have done this on the 2015 unit without longingly thinking about my 15″ rMBP.

    There’s some videos below that show the general performance of the two.

    The thing I really find interesting about these units by the way is how much they polarise opinion. You only have to look at the threads over at Macrumors (here and here for example) to see the gap of opinion:

    The comments do seem to focus on price. Lol OMG for *this amount* you could have gotten a 15″ rMBP that could run a space station. Well, yes, but then I know when I have my rMBP in my back pack.

    You see this idea elsewhere too, in the world of cars for example. 

    Man A: I’m looking at this three year old model of car x, at 20k.

    The Internet: You idiot, you should buy this one brand new at 80k because warranty or something.

    It’s almost like people expect their own position or compromises to apply to everyone else. What’s that about?

    For me, as somebody who works from multiple locations, doing things that range from meeting notes to running multiple virtual machines – an iMac would be a ridiculous compromise. Ever tried carrying one of those on the tube….? So, yeah, I get a 15″ rMBP for that, and keep my top spec iMac for doing the hard work.

    Well….if I’m out and about whether for fun or meetings or whatever, then lugging the rMBP about is also a compromise. This is the space the 12″ Macbook fills for me. It’s highly portable, battery lasts an age…and I can run pretty much anything I like on it.

    If it’s not fast, pink, grey, large, small, have enough ports, made by elves etc (insert own preference here), then perhaps it isn’t the unit for you. Why people think that your own requirements and compromises should apply to everyone else is a mystery.

    The other comments around – LOL OMG IT’S SO EXPENSIVE. Well, nobody is forcing you to buy one. Too expensive, don’t buy it.

    People, we’re an interesting bunch aren’t we.

    Anyways, the videos.

    2015 Macbook

    2016 Macbook

  • Clearing the DNS Cache in MacOS/OSX

    A friend of mine was having some issues clearing the DNS Cache on his OSX 10.9 Mavericks machine – the well known way of doing it in terminal:

    sudo dscacheutil -flushcache

    …it doesn’t work though in Mavericks….and it doesn’t tell you either:

    ClearCache

    I could feel his pain…Anyway, the method of clearing the DNS Cache changed with 10.7 OSX Lion. To do it with Lion, Mountain Lion or Mavericks you need to use the following command:

    sudo killall -HUP mDNSResponder

    Cunning hey? Also, if you do the right thing and have your normal day to day account without Administrative rights, you may be interested in this article:

    Running Terminal as a Different User

    If you’re particularly lazy…there’s an app for this.

    EDIT: Apple Support document: OS X: How to reset the DNS cache