A friend of mine asked me an interesting question the other day – what compact camera would I recommend for them? Of course I immediately jumped to the Canon G7X Mk III and the daddy of them all, the Sony RX100VII, Both brilliant cameras, both expensive at 820GBP and GBP1050 respectively. So that was my first mistake – not asking about budget. Instead I assumed based on how *I* would buy such a camera.
As a side note, that Sony camera was released in 2019, and it’s still right at the top of the heap. How mad is that?
Anyway, we established a reasonable budget of GBP500…and this is when I hit a bit of a wall. I couldn’t come up with a reasonable answer that wasn’t upgrade your phone. This surprised me, so I thought I’d throw this out there to see what others thought.
The more I looked at GBP500 ish compact cameras the more of a compromise I found them to be – and not in a positive way. The quality of the output dropped, the feature set dropped, and it led me to the question of why not get a better phone? Having discussed this further, it seemed my mate had an older, single-lens iPhone … that is probably not that far from its end of life anyway…so at some point will be upgraded.
This got me thinking about the cameras/lenses in my iPhone 16 Pro Max (as a side note, the dumbest, most pointless iPhone upgrade in as long as I can remember). This phone has three lenses:
-> 48MP 24mm Main Camera
-> 48MP 13mm Wide-Angle
-> 12MP Telephoto 5x Optical Zoom
Let’s not forget the sensor size here though – it’s a 1/1.14″ sensor.
If we compare it to say the Panasonic Lumix TZ99 (GBP469), it’s closer than you’d think.
This camera produces 20MP photos from a 1/2.3″ sensor, and has a 24-70mm zoom (30x Optical). A smaller sensor than the iPhone, but with a better zoom. The iPhone should be better in low-light, and also perhaps in dynamic range.
When you combine the convenience of one device, with the limited uplift in quality from the cheaper compact, I think the phone comes out a significant winner. I’m more likely to have it with me, more likely to use it, and I will enjoy using it. Are there benefits to the compact? Sure.
It’s got a better zoom. You can do manual photos (setting the aperture/shutter speed) better than you can in the iPhone. The output is marginally better (and even that is subjective I believe) than the iPhone – you can of course now shoot RAW on the iPhone if you want.
Is it enough for me to use that Lumix over an iPhone? I don’t think I would.
Let’s revisit the requirement then, and add some additional parameters:
-> I want a better camera
-> Some zoom/flexibility would be great
-> I want better quality
-> My current iPhone is nearing end of life
-> My budget is about 500GBP for the camera
…I can’t see a better answer than combining the iPhone upgrade (other phones are available…) with the camera, and ending up with one device. I’d be far more likely to use it, and I think the minor losses in quality are more than made up for in flexibility.
This is not how I purchase tech typically, so I thought I’d throw this out there for the opinions of others!
It’s proven to be excellent so far, and has handled everything I’ve thrown at it. Now though, Minisforum have top-trumped it and released the MS-A2. This is in the same chassis as the MS-01 however it’s now based on the Ryzen 9 9955HX 16 core/32 thread processor…and wow is it a beast.
The specification of the unit I have is as follows:
-> AMD Ryzen 9 9955HX – 16 core/32 threads
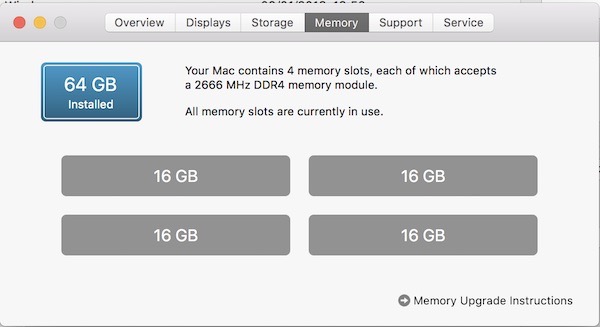
-> 96GB DDR5 RAM
-> 4TB Lexar NM790 NVMe
-> Samsung 990 EVO Plus 2TB NVMe
-> 2 x USB-C 3.2 Gen 2 (10Gbps) – No USB4/Thunderbolt
-> 2 x 2.5Gb Ethernet
-> 2 x 10Gbe SFP+
-> HDMI 2.1
There’s no USB4/Thunderbolt on those USB-C ports, but they do support DisplayPort Alt‑Mode 2.0 which I think is up to 8K/60Hz or 4K 144Hz.
So very similar to the MS-01, bar the lack of USB4/Thunderbolt. It’s a lot of connectivity – interestingly, mine is marked up as USB4 on the back, but it absolutely is not!
Internally it’s just as strong. There are three NVMe slots, all supporting PCI 4.0 x 4, however interestingly slots two and three are configured as Gen 3 in the BIOS, and not Gen 4. I imagine this is to do with cooling, however I’ve configured the ports for Gen 4 and so far it’s been all good. There is a fan directly above slots 2 & 3, but it does not extend to slot 1.
Interestingly, with slot 1, you can install an adapter for U.2 drives, which could be incredibly useful.
It’s a solid platform, with great connectivity.
Benchmarks
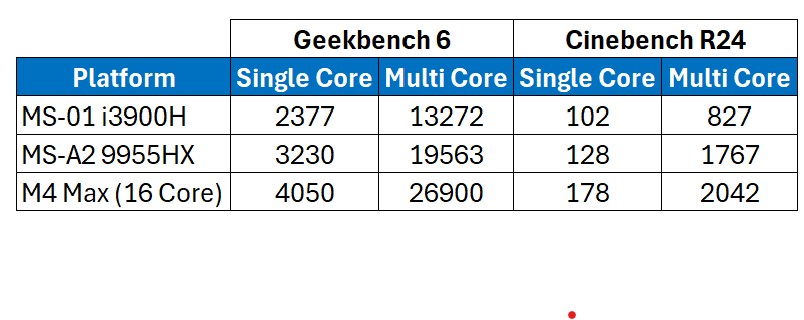
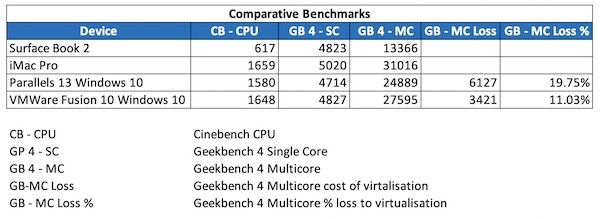
Let’s look at the benchmarks first, comparing it to the 13900H in the MS-01, and the M4 Max 16 core in my main laptop.
Benchmarks
That is a solid improvement over the MS-01 isn’t it! The 13900H has 6 performance cores with hyper-threading, and 8 efficiency/non-hyperthreading cores. This compares to the 9955HX having ‘only’ 16 performance cores, all supporting hyper-threading.
For comparison, the M4 Max in the table above has 12 performance cores, and 4 efficiency cores. That is an impressive bit of silicon isn’t it?!
The performance increase over the 13900H is substantial, and for a lab machine incredibly useful. I’ve copied across my main HyperV lab (Active Directory, Exchange, SQL, and Skype/Teams integration), and there is a notable difference in performance on the MS-A2 over the MS-01, although to be clear it runs very well on both.
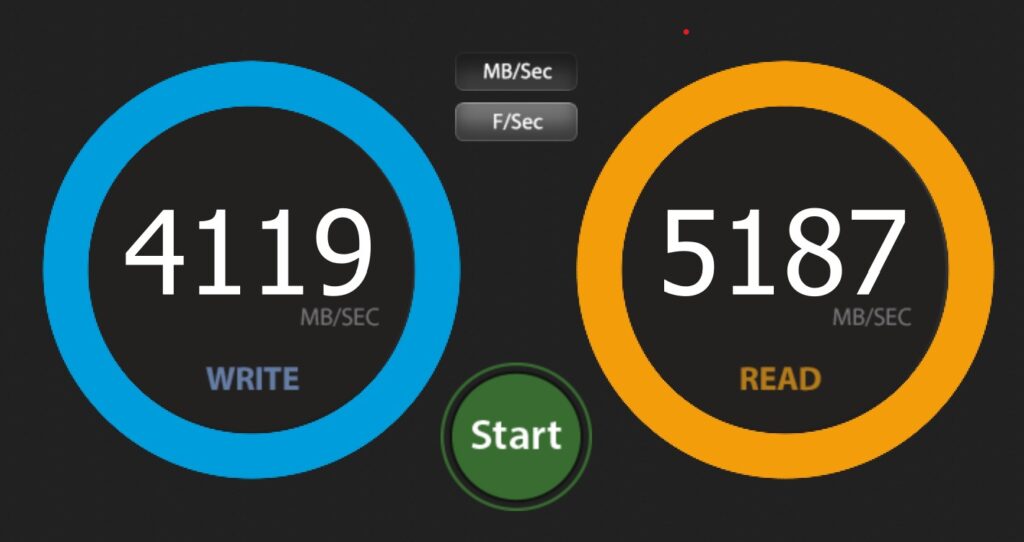
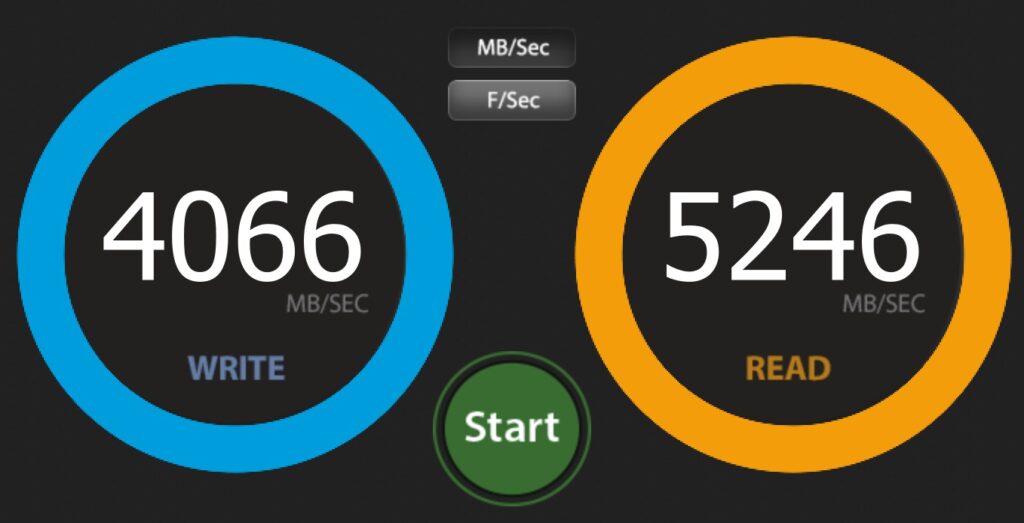
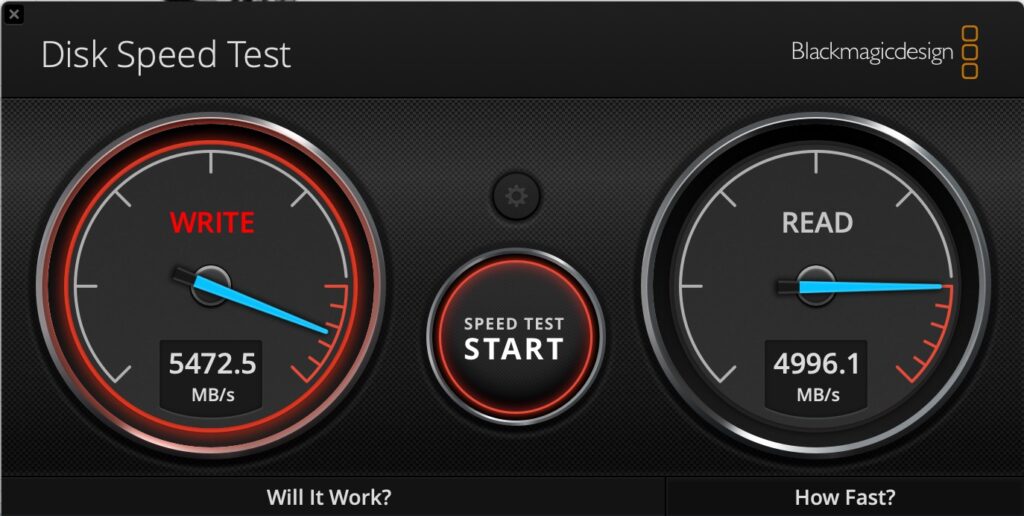
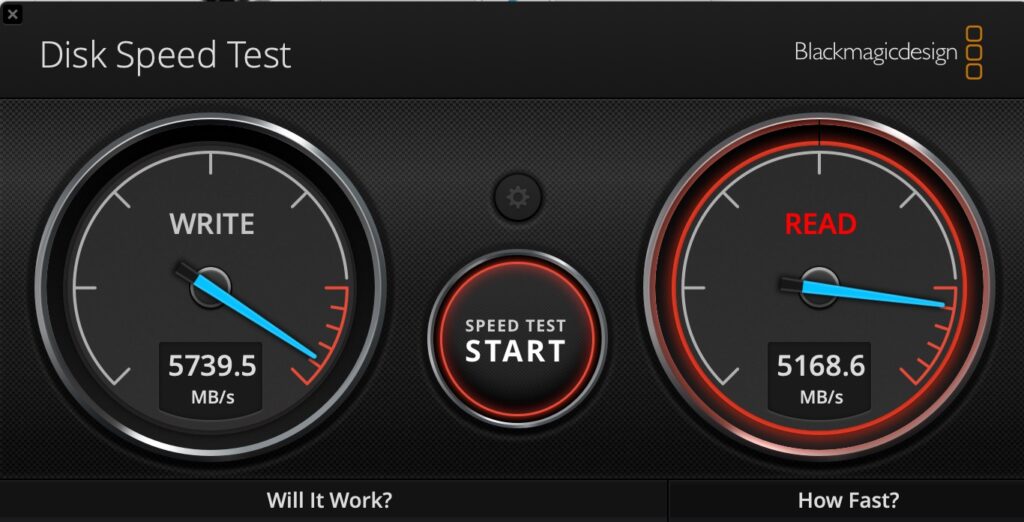
Drive performance is great on both NVMe slots that I have in use. Note that slots 2 & 3 are configured for Gen 3 by default, however I have changed them to Gen 4 in the BIOS. Below shows the primary (Lexar) and the secondary (Samsung)drive respectively.
Network performance over the 10Gbe and the 2.5GB was solid too. Note that on the MS-01 I had issues using both SFP+ ports with SFP+ to RJ45 adapters in them – I think they were overheating. I haven’t tested that in the MS-A2 however both the MS-01 and the MS-A2 are using fibre SFP+ connections in both ports, and over fibre they’re solid and work at circa 1Gb/s to/from my SSD NAS.
Impressive performance all round. I’ve included the Apple chip for reference – the story would be more interesting there if we included power per watt wouldn’t it? Talking of power…
Minisforum MS-A2 Power Consumption
At idle, with the configuration outlined above (2 x NVMe, 2 x 10Gbe SFP+ connected), I’m seeing power consumption at circa 25-30watts. That seems roughly in line with the MS-01, which surprised me a little.
MS-A2 Idle Power Consumption
The gap widens under load however – which is what you’d expect. When running Cinebench R24 I was seeing peak power usage around 130-140watts.
Minisforum MS-A2 Power Consumption
I understand that the default TDP of the Ryzen 9 9955HX in the MS-A2 is configured at 55Watts. You can however configure that in the BIOS up to 75Watts if you wish – I’ve not as yet looked at that to see if it has any real-world impacts, however it’s certainly something I’ll be having a look at – theoretically that could offer a 15% ish uplift in performance in multicore workloads, so worth a look see.
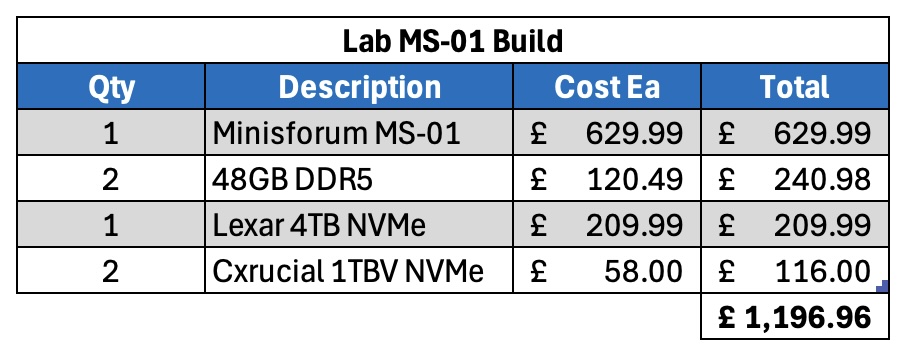
Costs
It is a little bit pricier than the MS-01 – let’s compare the two. Firstly, the MS-01.
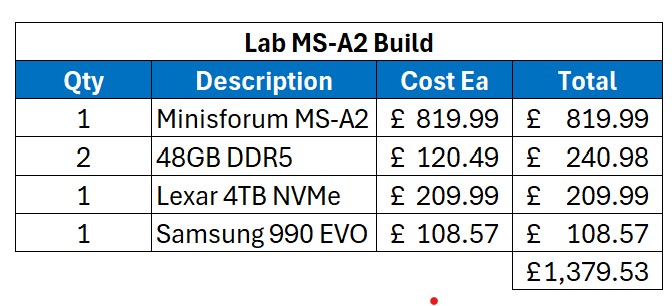
Let’s now have a look at the MS-A2.
MS-A2 Costs
For my non-UK readers, the above costs are in GBP, and include VAT – our sales tax – at 20%.
So the base unit is more expensive than the MS-01, even more so as you can get further discounts on the MS-01 compared to when I originally bought them.
Fan Noise
The fans are very audible on the unit – similar to the MS-01. Ask the unit to do practically anything and the fans will spin up. It doesn’t bother me, however if it’s right next to you I suspect it could get irritating? That’s very subjective, and hard to qualify.
Support
I think the comments I made back when looking at the MS-01 still bear true: Now, this is worth being aware of. I’ve seen a few horror stories about dealing direct with Minisforum, and if it was anything like my experience dealing with Geekom I’d be very nervous about buying direct. Buy from Amazon however and any problems you can make their problem, and their returns process is usually excellent.
Summary
So far I’m very impressed by the thing. It’s a super-fast version of the already impressive MS-01. For my use – as a lab virtualisation machine – it’s a great fit!
Minisforum seem to be producing some great stuff. I’m really looking forward to testing their upcoming NAS device for example.
Anyway, any questions about this unit please let me know, and I’ll do my best to answer.
EDITed to add – while I remember, this unit doesn’t support vPro like the MS-01.
Well this will be an exciting post…about storage. But then it’s useful to find information about things you’re considering buying isn’t it, and I’m fortunate to get access to some decent tech, so I thought I’d share my experiences.
I’ve recently been sorting out some of my fast storage – stuff I use for video editing and the like. While I can run this directly from my NAS it’s never quite as smooth as running it from a fast SSD – and Apple’s SSD pricing is criminal, so external it is.
I now use a couple of Thunderbolt 5 enclosures and the performance – and the reliability so far – has been awesome. They are, however, expensive. So I also have some UGreen Thunderbolt 4 enclosures. These ones in fact:
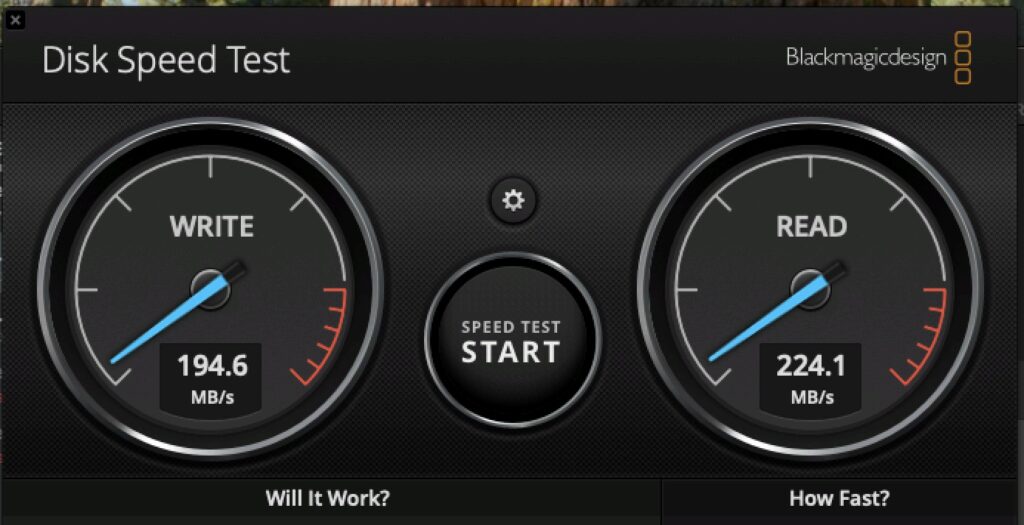
These units cost about 65GBP which is about 200GBP cheaper than the TB5 units, but the performance is still solid. This one has a Samsung SSD 990 EVO Plus 2TB drive in it – and the performance connected directly to my Macbook Pro M4 Max is pretty good:
UGreen Thunderbolt Enclosure
By way of comparison, this is the performance in the Thunderbolt 5 Enclosure:
Thunderbolt 5 NVMe
So far then, so very good.
The case is a little chonky – 120 x 48 x 19 mm – and it weighs about 200 grams. This is still small enough to throw in a bag when needed. It also comes with a fan for cooling – I understand it’s supposed to varey its speed, but I’ve not noticed that. It’s either on (and barely audible), or off! It’s not an issue anyway, and I’d much rather have the fan than not.
In terms of device compatibility, the unit will accept 2230, 2242, 2260, and 2280 NVMe units, which is pretty flexible.
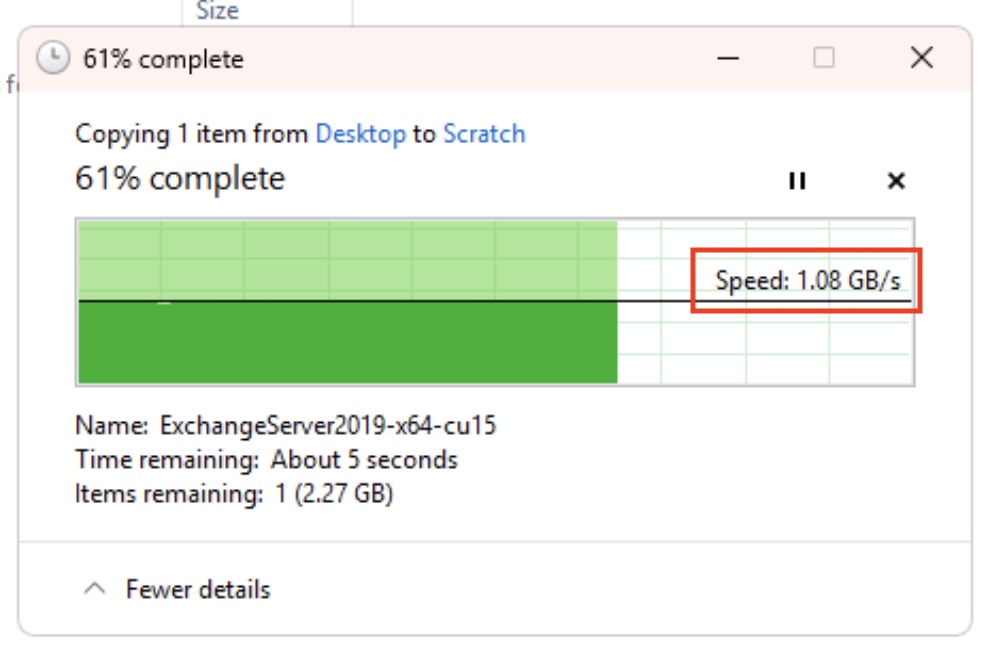
At the cost I am very happy with them – it’s not that much more than a USB3 enclosure but they top out at 1Gbps, so I think it’s a worthy uplift in terms of performance.
Anyway, I did warn you this wouldn’t be interesting.
Earlier I had a need to move a 500GB Virtual Machine to another one of my virtual hosts. I could of course have copied it across my 10Gbe network, which would have taken 20 minutes or so, but instead I thought it simpler to throw it on an external NVMe drive I have. My Mac happily told me it was going to take 2.5 minutes to copy the virtual machine to the drive.
TWO AND HALF MINUTES!
In the end it took nearer three, but hey, that’s fast. This got me reminiscing. Back in the day when I first started working on ‘larger’ stuff, I did a lot of Novell Netware. We used to use Fujitsu 500MB SCSI drives in our normal server setups (the M2624FA I think)…. like this:
Fujitsu M2624FA SCSI Hard Drive
This was hooked up to 10Mbps Ethernet – mostly Co-ax (Cheapernet), and then later moving to UTP (at a heady 100Mbps). What I remember about those drives is that copying that 500MB drive to a new server typically took about 20 minutes. That’s about 0.4MB/s. Shudder. The drives themselves were capable of more than that – sometimes a whopping 4MB/s – but the overheads of copying/delivering over 10Mbps limited that.
Now, I’m sat here copying a 500GB virtual machine at about 2.8GB/s. That’s 7,000 times faster. That’s some progress. At 0.4MB/s it would have taken 14.5days…assuming it didn’t just melt.
I then got thinking about some of the Microsoft Exchange implementations I’ve done over the years. IOPS and drive performance were king in those configurations. We’d end up putting in a lot of drives to meet the performance requirements rather than the space requirements – single enterprise drives would often only deliver 150-200MB/s, with maybe a 150IOPS per drive. For a 5,000 mailbox solution, you’d need about 5-10,000IOPS (I haven’t worked this out fully, don’t @ me!). So you see the problem. Here’s a 16TB Toshiba Enterprise Drive for example:
16TB Spinning Hard Disk
Now a single NVMe (PCIe 4×4 for example) 500,000 to 1,000,000 IOPS. So yeah, the world changed.
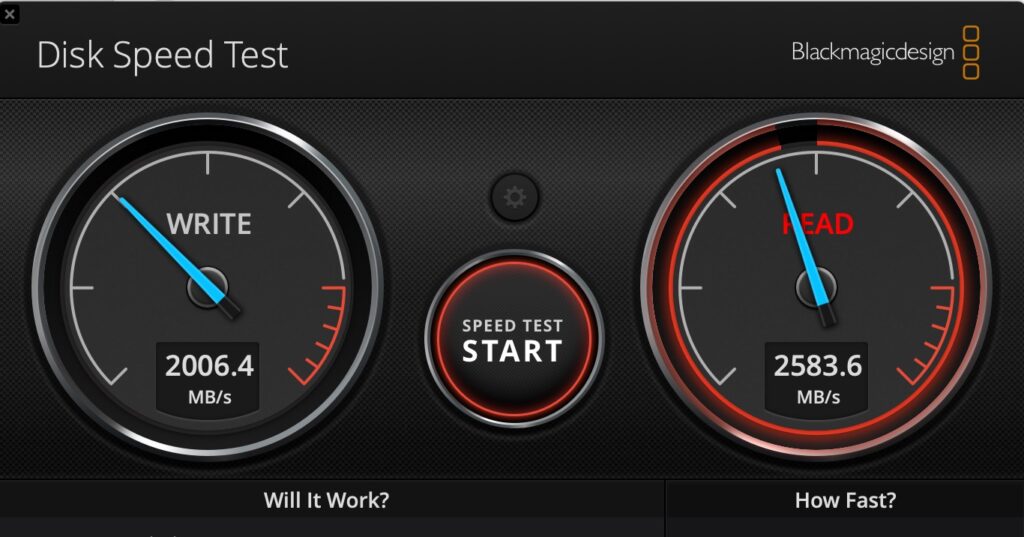
So about 5.5GB/s write, and 5GB/s read. That compares pretty well with the internal SSD on my MacBook Pro M4 Max:
MacBook Pro M4 Max Internal SSD Performace
Thunderbolt 3/4 was also pretty fast of course, but it couldn’t get close to the internal speeds – this is a 2TB version of that same Samsung drive but in a Samsung X5 Thunderbolt 3 enclosure:
Samsung 990 Pro 2TB/Thunderbolt
That external Thunderbolt 5 enclosure is a bit pricey at about 250GBP, however you pay the price for new stuff don’t you. It does work, and it works very well. It’s also got a cooling fan in which I thought could be helpful as I’ve often seen drives slow down considerably under constant load due to heat – there’s also the faster cache to consider too. These 990s have about 400GB of pseudo-SLC cache on them before they slow down.
I’ve been thoroughly impressed with them (I’ve a couple), and am always constantly surprised by the performance. Being able to use Carbon Copy Cloner for example to backup a few TBs from one to the other becomes a quick coffee break rather than a plug in, forget, check tomorrow operation.
Anyway, that’s enough reminiscing for one day. New stuff is newer, faster, spankier – who knew.
I’ve been clearing stuff out at home, and a big chunk of that clear out has been cables. I was throwing out a ton of US extension cables (I worked in the US for a while), and two things struck me:
1: None had fuses in. I even hacked one of them apart to check. 2. Some of them weren’t earthed.
This got me thinking about safety & stuff. The plug receptacles will be protected by the circuit breaker at the fuse box – but that will only protect the cable in the wall to that central distribution cabinet won’t it? Assuming it’s say a 20Amp breaker (I don’t know what they actually are), that means you could have 20Amps (or 2200watts) being pushed down an extension cable rated for less than half of that. Seems a recipe for a bonfire doesn’t it?!
Throw in some daisy-chained extension cables etc. and that sounds disastrous. What am I misunderstanding here? Anyway, it got me further thinking about how we do things in the UK.
We of course have similar circuit breakers in the UK, although I think they’re typically rated at 32amps – which is 7680 watts. Our extension cables and plugs however are fuse protected – typically with a 13amp fuse. A 13amp fuse will allow up to circa 3120 watts at 240v before the fuse blows.
Yet everything is fitted it would seem with 13 amp fuses, regardless of power-draw. While it seems a lot safer than the US system it does seem like a blank assumption that 13 amps is the right protection point.
My main tech stack for example consists of 5 extension cables configured in a star formation. I.e., one ‘master’, and four connected to that master. Sounds excessive until you look at the load:
Tech Hub Power Draw
It averages about 150w during general day to day usage, which is about 0.62amps. Tiny. Even at full power on it peaks at about 500watts for a couple of minutes – again only 2.08Amps. So why would it be protected by a 13Amp fuse? It isn’t any more, it has a 3amp fuse in it and it powers up just fine. If it blows, I’ll put a 5amp fuse in I think. It’s all UPS protected anyway.
I had a brief scan around other things – Microwave, 13amps (reasonable), Kettle 13amps (reasonable), TV 13amps….Lol wut. I’ve never seen my TV pull more than 150watts so why on earth is it protected with a 13amp fuse? Just because, I guess. Same on the Playstation 5.
Anyway, I am probably obsessing over something I found vaguely interesting. Firstly, my sudden perception of how unsafe the US model of extension cables & power control seems to be, and secondly with our obsession with 13amp fuses over here in the UK!
I will say though that I think the UK plug is an absolute master of design. It would also seem I’m not the only one to think so!
I’d love to hear perhaps a better educated opinion on the matter.
A while ago, I wrote about a way of easily backing up your Windows drivers. Believe it or not, there’s a fairly simple way to do it for (most) of your apps too, making setting up new machines fairly simple. You can also update all the apps using a similar method. So let’s have a look.
Updating all your packages
Windows now includes a package manager not that dissimilar to Linux. You can use this package manager to update your apps – well, apps where there is a repository available.
So, how do we update those apps? It’s easy. Start an elevated command prompt and use this command:
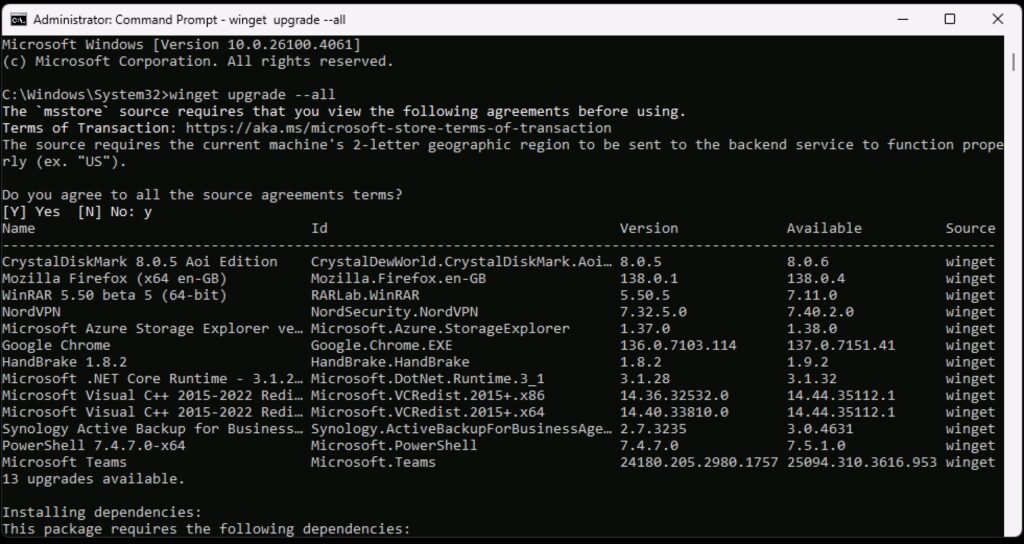
winget upgrade --all
NOTE: It’s TWO -. Noticed on some web-browsers the — is appearing as 1. Derp.
…and this is what it looks like:
Winget Upgrade
If this is the first time you’ve run this process, you may be surprised by how many updates there are, so it could take a few minutes. When it’s done, you’re all up to date.
Backing up your packages
The process to backup your packages doesn’t actually backup the packages – what it does, is it makes a list of the packages you have installed, enabling re-installation on a new machine simple. Bear in mind not all packages will have an available source, but I find that most do. To backup the packages, again start an elevated command prompt, and use the command:
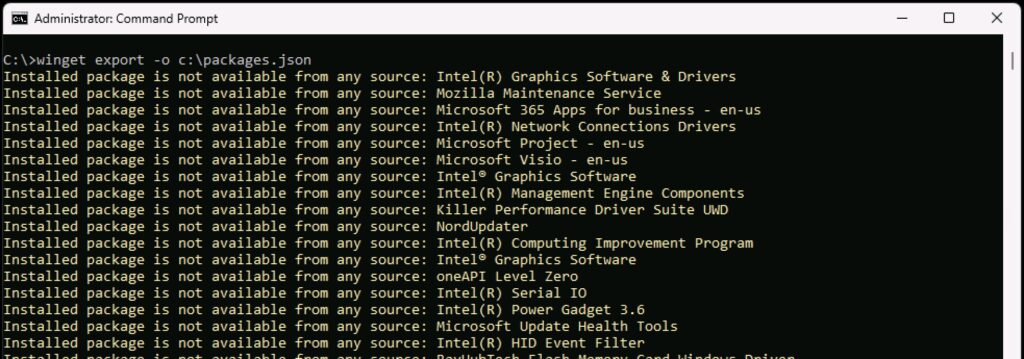
winget export -o c:\packages.json
You’ll see an output similar to this:
Winget Export
You will see a lot of entries stating packages were not available – for the most part, these seem to be system components, and for some versions of Microsoft Office (mine is quite highly customised for example).
The output is a single .JSON file – copy that off somewhere.
Reinstalling Your Packages
To use that .JSON to install on a new system, use the following command:
winget import - i c:\packages.json
This will import/install what it can, and get you far closer to a fully deployed system than doing everything manually.
It’s quite a powerful tool that WinGet, so worth the effort to get familiar with.
Getting remote access to some machines – headless servers for example – can sometimes be a challenge. Sure, there’s RDP or VNC, however that requires the machine to be up, on, and usable doesn’t it? What about those times you need to deal with machine that isn’t accessible for whatever reason? Or if you need to do something that requires a good old fashioned keyboard, monitor and mouse? BIOS/Service Pack upgrades for example.
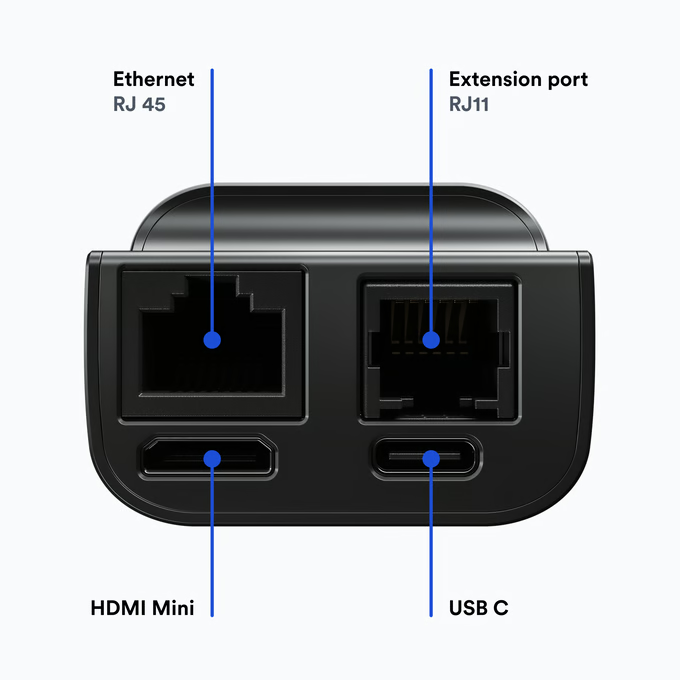
Well, that’s where these KVM units step in (Keyboard, Video, Mouse). Essentially they are devices that connect to the PC HDMI post, and provide a keyboard & mouse via USB. They then connect to your network allowing you to remote control that PC/Mac as if you were sat physically in front of it.
I tend to use Mac mini devices as my headless servers as they’re so capable, and use so little power. One challenge you have with those is that on a fresh reboot, if you have FileVault enabled (encryption), you must login with a physical keyboard at the device to get at the keys to unlock the drive for normal boot. This is a huge pain for a headless server.
I had taken to configuring a small boot OS that was not encrypted, and then having another encrypted partition with my ‘real’ user on. This would mean you would initially connect remotely and login as the unencrypted user over VNC, logout, and re-login as the user that has the encrypted partition. I’d move that user’s home folder to the encrypted drive too. A bit of an effort.
This unit solves this challenge as you’re effectively logging in from a local keyboard.
I’ve been through several KVM units like these over the years and never really found one that I got on with fully. Then I stumbled on the JetKVM on Kickstarter.
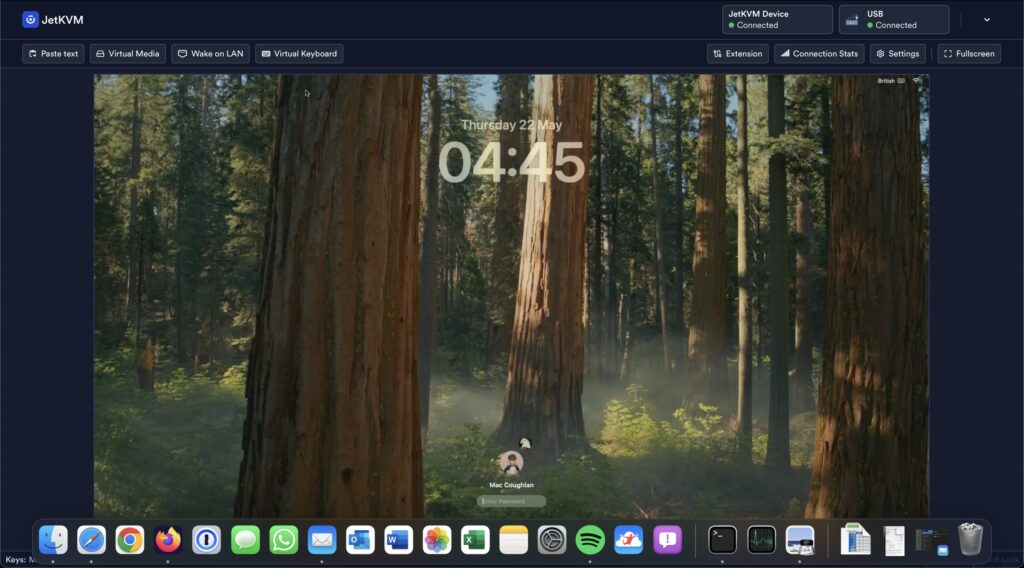
This is a small device that plugs in to your HDMI port, a USB port, and an Ethernet port on your network. It picks up its own IP Address (which it helpfully displays on the small screen), and you can then connect to the IP using a web-browser:
JetKVM Connected
It takes minutes to setup, and so far it’s been awesome. It’s done exactly what it said it would do. There are some considerations of course – a big one being power. If, when your machine goes to sleep, it stops powering your usb ports, then you could have an issue as the JetKVM gets its power from the USB Port. Fortunately, they provide a pass-through cable that allows you to power the JetKVM with a mobile-phone USB-C charger.
This was interesting as my observations with the Mac mini M4 have been that it does indeed power down the USB Ports on sleep…but, for some reason, the JetJVM maintains power. I know that Apple does use a low-power sleep system for keyboards and the like, so perhaps it’s through that mechanism? In any event, you can power it separately if you require. I also understand that a PoE version is in the works.
On the subject of power, the device doesn’t allow for physical power-down and re-start of the end-device. Not surprising if you think about it! I control that differently anyway, using Smart plugs. Depending on your use case however, help could also be coming for that….
There’s also an RJ11 Port (serial). All the software is Open Source and is up on GitHub – I’d expect to start seeing some cool extensions coming! Perhaps one of those extensions could deal with power?
JetKVM portsJetKVM Front View
They do provide a cloud-access model too, to allow remote-access. Currently, this requires authentication with Google. I’ve not tried the remote access element as I have my own mechanisms to provide remote-access where it’s needed, however it looks like a fairly decent offering.
I paid 68US$ + 19$US Shipping back at the beginning of April, with the unit turning up about 10 May. I suspect now they’re clear of the Kickstarter campaign these will start popping up on Amazon and the like – and I suspect, when they do, I’ll have some further ones to buy.
Very happy with the unit so far, it’s been really useful!
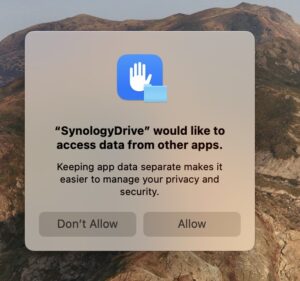
This is an irritating error message I seem to be getting from the Synology Drive App Recently:
SynologyDrive would like to access data from other apps
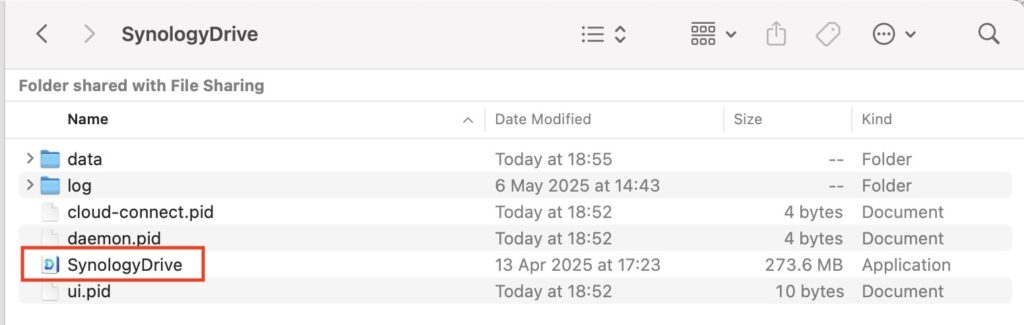
In a fit of boredom I thought I’d set out to search why this was so – I tried adding the Synology Drive app to full disk access however it didn’t help. Then I noticed the clue is in the error – ‘SynologyDrive’ – notice the lack of space. So, off I search for SynologyDrive…and you’ll find it here:
That’s the app we need to add to Full Disk Access. Now, this is usually hidden (the Library folder) – so we need to show hidden files. You can do this with CMD+Shift+. (That’s . at the end!). You can also do this in terminal:
defaults write com.apple.finder AppleShowAllFiles TRUE killall Finder # refreshes Finder
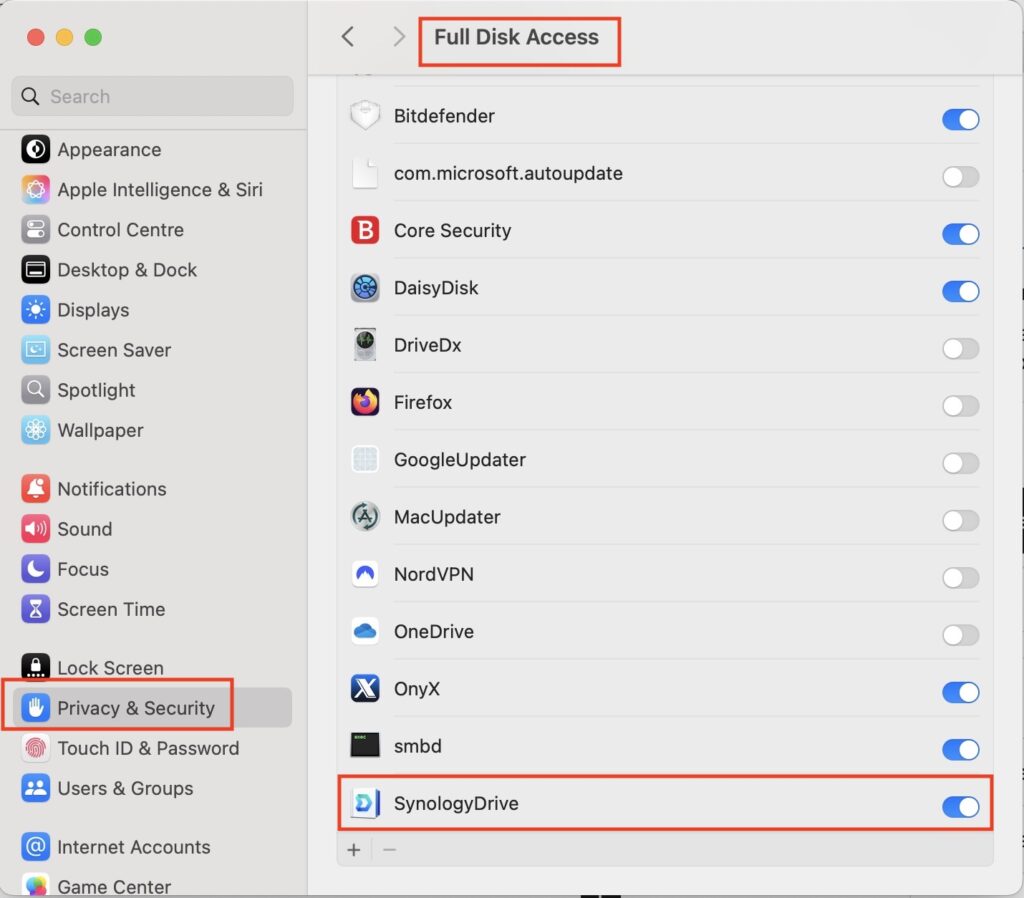
Browse to the location and make sure you can see the file. Next, open Preferences and go to ‘Privacy and Security’, followed by ‘Full Disk Access’.
What you now need to do is drag ‘SynologyDrive’ from Finder to the panel in preferences, and ensure it’s turned on:
Full Disk Access
You’ll be warned that you need to restart Synology Drive – do so, and you should see that message no longer pops up.
You can turn off showing hidden files using the same CMD+Shift+. or the following in Terminal:
defaults write com.apple.finder AppleShowAllFiles FALSE killall Finder # refreshes Finder
Yeah, that’s a silly, clickbaity headline. I’d never write something like that. WAIT.
Had a chat with a mate today — he’s a techy — about which chip to go for in his next MacBook. We went back and forth, compared specs, workloads, all that jazz. End result? He ordered a fully-loaded M4 Max MacBook Pro. Gangnam Style.
That convo got me thinking about modern Apple Silicon. Specifically, what you really get when you go all-in on the Max.
I’ve been daily driving a MacBook Air M4 (10-core CPU/10-core GPU/1TB), even though my main workhorse is a fully-spec’d M4 Max MacBook Pro (16-core CPU/40-core GPU/64GB RAM). And you know what? The Air is impressively good. I’m typing this on it right now — on low power mode — and it’s sailing through everything.
Let’s talk numbers:
👉 MacBook Pro — £4.2KGBP
👉 MacBook Air — £1.4KGBP
Big price difference. And yet… in day-to-day use? Not a huge gap.
Office apps, Remote Desktop, browsing, notes, light creative work — all feel the same. Seriously. But surely the Max must do something better, right?
Definitely. It wins in two areas:
👉 Speed — How quickly it chews through big tasks.
👉 Scale — How much I can do at once before things start lagging.
Not general responsiveness. That’s basically the same on both.
Speed sounds obvious, but it’s nuanced. Regular apps don’t push either machine, but batch export a few hundred 120MB RAW files from Lightroom? The Air does it (which is nuts in itself), but it’s noticeably slower. The Max flies through the job while I carry on doing other things.
Same deal with 4K video editing in Final Cut Pro. Editing is fine on the Air. Exporting is where the Max shines — especially with complex timelines.
Does it matter if an export takes 10 minutes or 30? Depends. If you’re doing it daily for work, then yeah, time is money. Otherwise? Probably not a big deal.
Scale is where the Max really stretches its legs. I can be exporting video, running Windows in Parallels, editing docs, tweaking photos — all at once — and the Pro just handles it. That’s the power of more RAM and more cores. The Air hits memory limits way before CPU limits from what I’ve observed so far.
How often am I doing all that simultaneously? When I’m in work mode — sure. But for general use? Rarely.
Truth is, the current Apple Silicon chips are phenomenally capable. Yeah, benchmarks show big leaps between M1 → M4, but in real-world use, most software hasn’t caught up. Outside of AI and Large Language Models, do we need this much power in a laptop? Maybe not.
Still, I know I’ll be eyeing the M5 Max Turbo Nutcase the second it drops.
There are practical differences too. My Pro runs three external 27″ monitors — the Air can’t. That matters to me. But otherwise? There’s not much I can’t do on the Air that I can only do on the Max.
Let’s talk Intel. I’ve got a Samsung Galaxy Book 5 Pro 360 — one of my favourite Windows laptops. Great battery life, and pretty decent performance… if it’s plugged in. Unplug it, and performance drops off a cliff. Classic Intel trade-off.
MaxTechOfficial just did a video comparing the M4 Air vs a new Intel Lunar Lake Zenbook S14:
Now look, MaxTech is basically sponsored by Cupertino, even if they pretend not to be. But still, the battery and performance gap is real. Intel’s still chasing.
No tidy wrap-up here, just a musing: maybe we’ve reached a point where hardware is sprinting ahead, and software needs to catch up.
Oh, and my video just finished exporting on the Air. While writing all this. Bonkers really. My old i9 MacBook Pro would’ve lit the desk on fire by now and probably have tried its best to crap its fans out.
I’ve done a bit of a derp, and it’s taken me way too long to work out such a simple derp. I use physical keys for logon to my MacOS devices, as well as passwords. I’ve been setting up a new MacBook Air today, and could I get my YubiKey to work?
I’ve factory reset it, I’ve been through the pin setups, all the certificates I configured manually and everything checked out – but could I get it to pair? Absolutely not. I was expecting the normal pairing prompt when you plug the device in:
SmartCard Pairing
I’m sure several of you are laughing already.
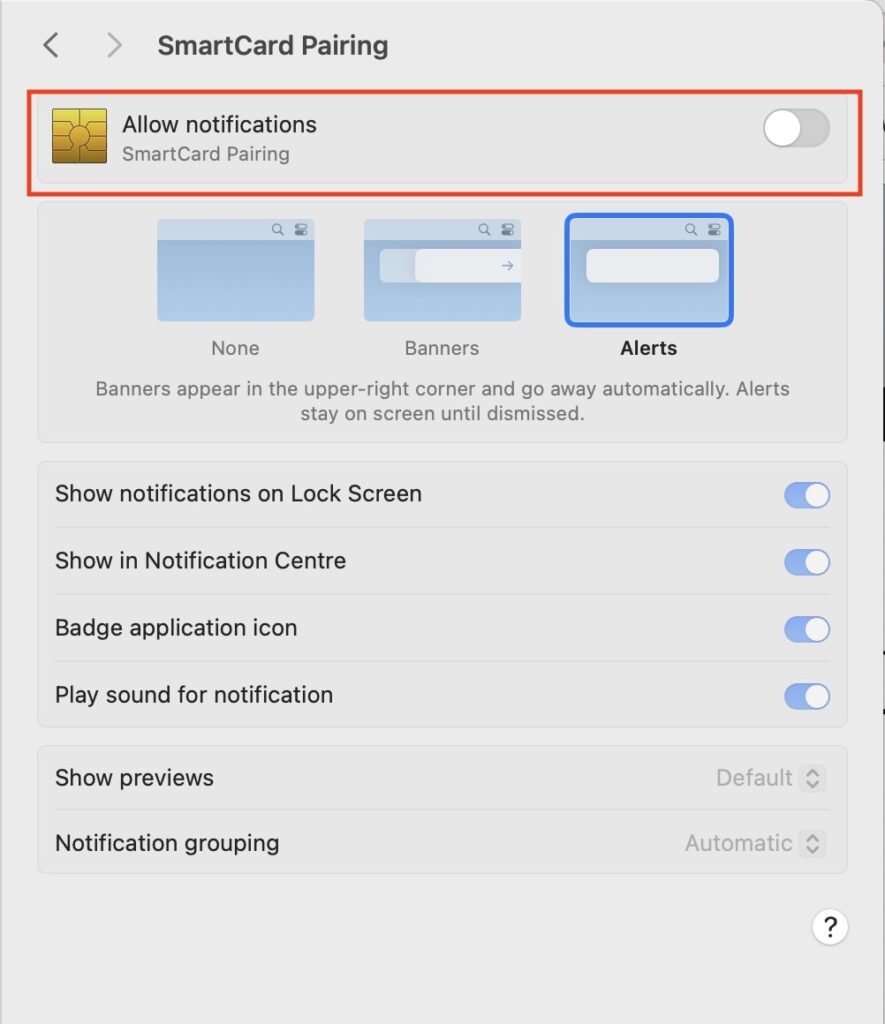
Try as I might, everything looked good, nothing worked. Why am I not getting the SmartCard pairing notification?! WAIT. Notification. Let’s check our MacOS notification configurations in Preferences:
SmartCard Pairing Notifications
Yeah, notifications were turned off. That’ll be it then. Somedays it’s the simple things that get you – and on those days I’m pleased I don’t operate heavy machinery.
This is quick addenda to my previous post on the PST Import Service. Sometimes you can run in to an issue where the import service says it cannot find the PST files – something like ‘The PST could not be found in the storage account’.
You can view the storage blob created during an import session – it’s a quick/handy way to be able to see why the import service is having the problem.
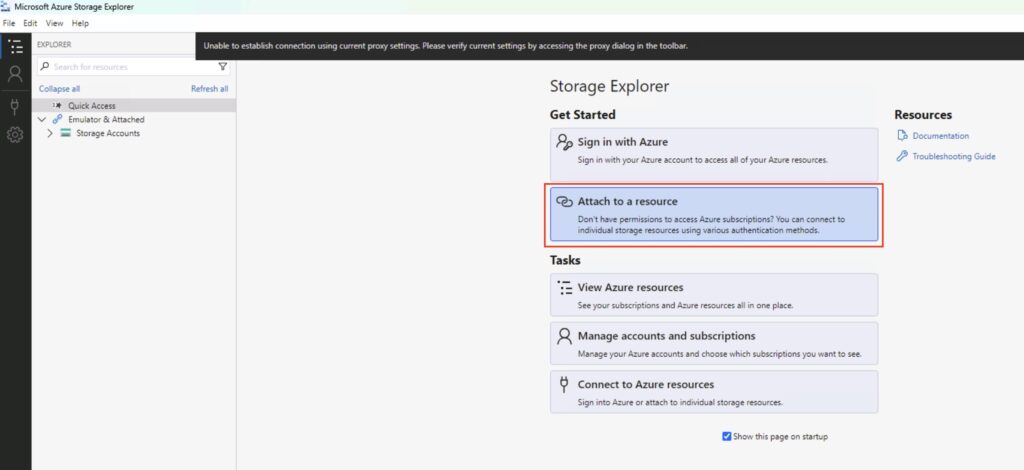
It’s pretty easy. Download and install the ‘Azure Storage Explorer’ from here:
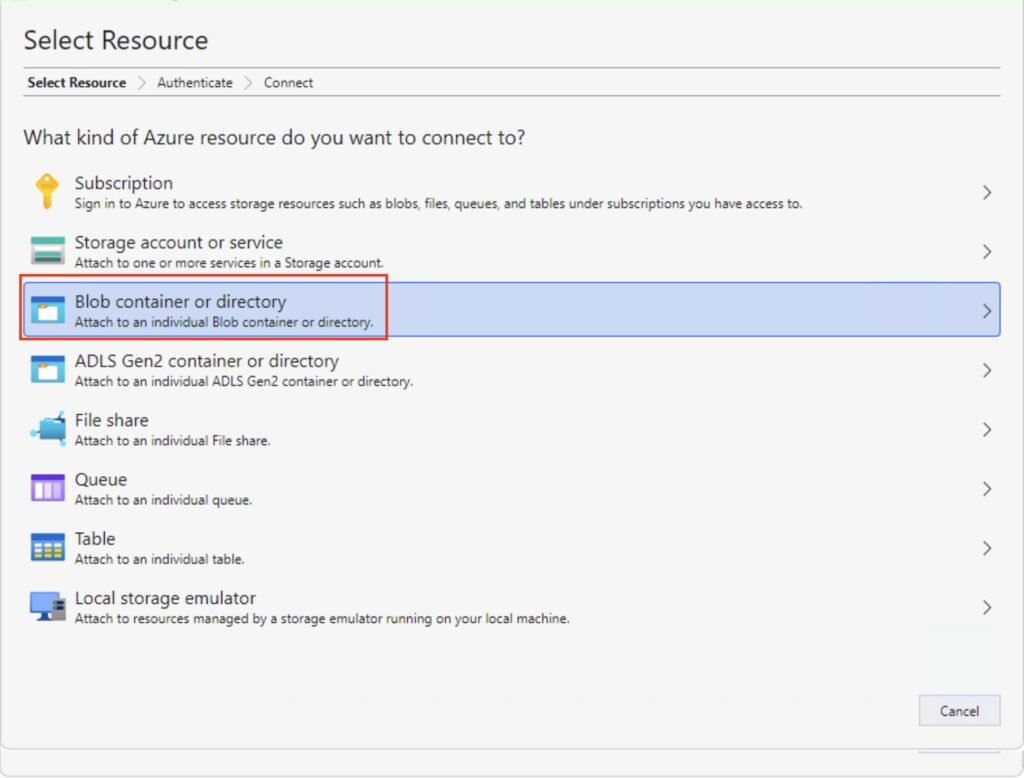
You now need to select ‘Blob container or directory’.
Select the blob
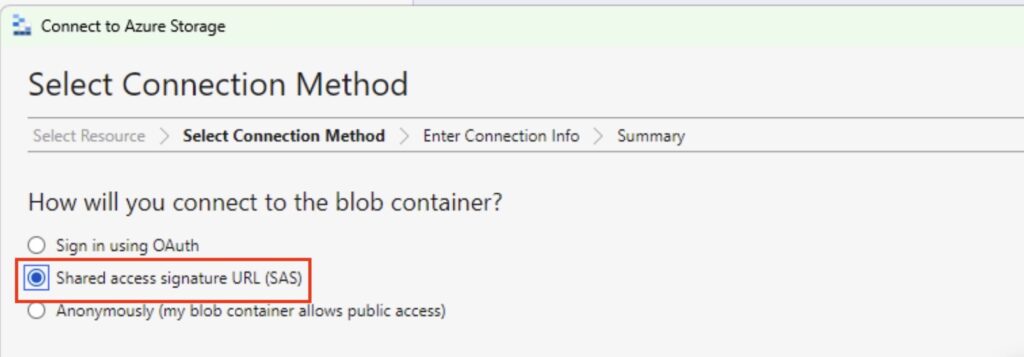
Next, select the ‘Shared Access Signature URL (SAS) option’:
SAS
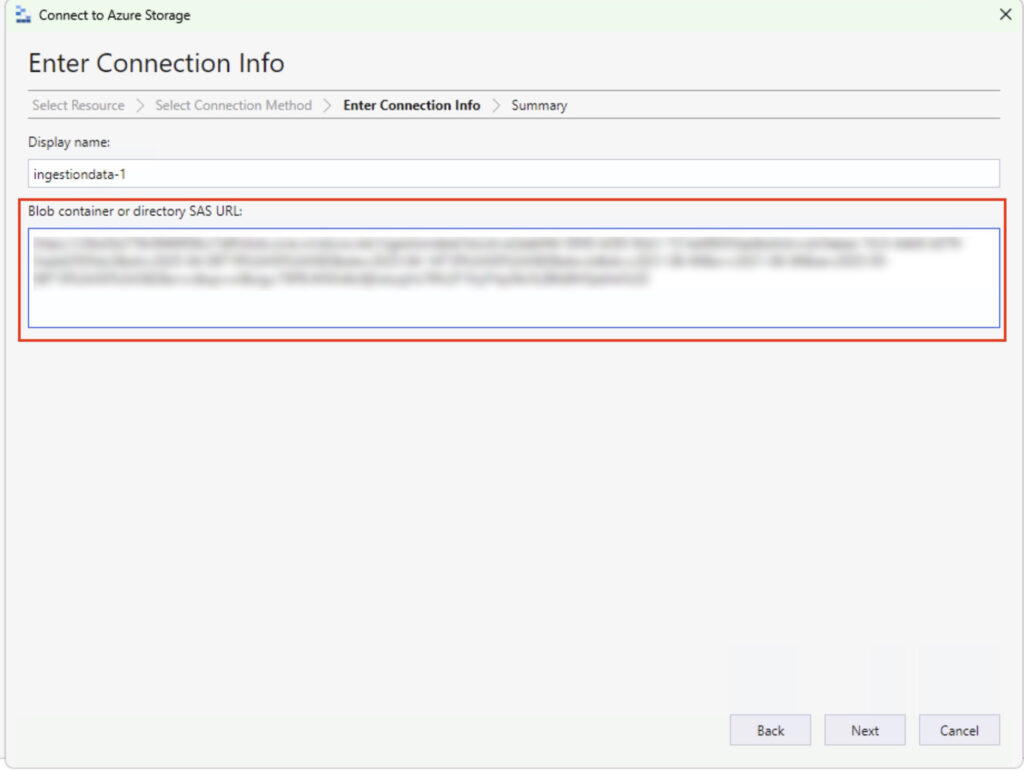
Now, paste in the HTTPS link to your blog – don’t worry about the display name, it will self populate:
Paste your blob
Click ‘Next’ and good things will probably happen. You’ll get a summary – which is good – followed by a ‘Connect’ button, which, if you’ve gotten things right, will also be a good thing:
Blob View
In the above you’ll see:
1: How I learned about the sub-folders meaning nothing works.
2: The PST files we have imported as part of this demo.
3: The PST file I’m currently running for an actual real person.
What the PST Import Service does is allow you to bulk-copy PST files to Azure and have Microsoft import those PST files to mailboxes – primary mailbox or to the online archives – to your mailboxes. It’s a very useful service, and I’ve lost track of how many times I’ve used it over the years. It’s also very easy to use – so let’s run through the process.
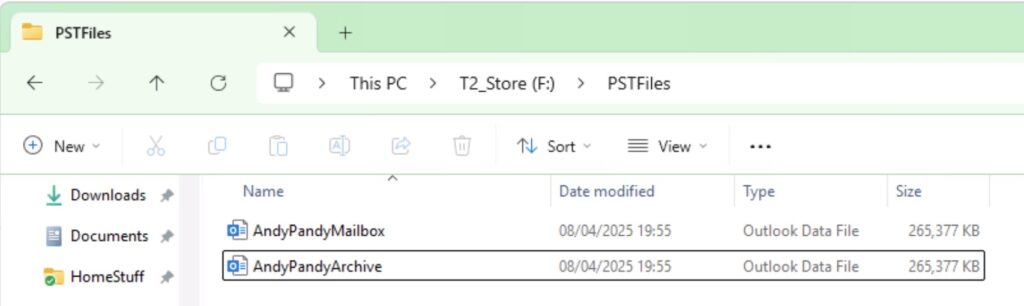
For the purposes of this demo I have a single user – Andy Pandy – and a couple of PST files. One I want land in his primary mailbox, and one I want to land in his archive:
PST files to import
You Need the Right Permissions!
This is a common issue when trying to use this service – the user you’re going to use for this must be assigned the Mailbox Import Export role in Exchange Online. What’s annoying is that while this is quick to add to a user, it’s slow to apply. You also need to be assigned the Mail Recipients role. By default, this role is assigned to the Organization Management and Recipient Management roles groups in Exchange Online.
I usually as an early on task create a role group that has the relevant rights – adding members to the group applies the permissions far faster than applying them to individual users.
Find the Import Service
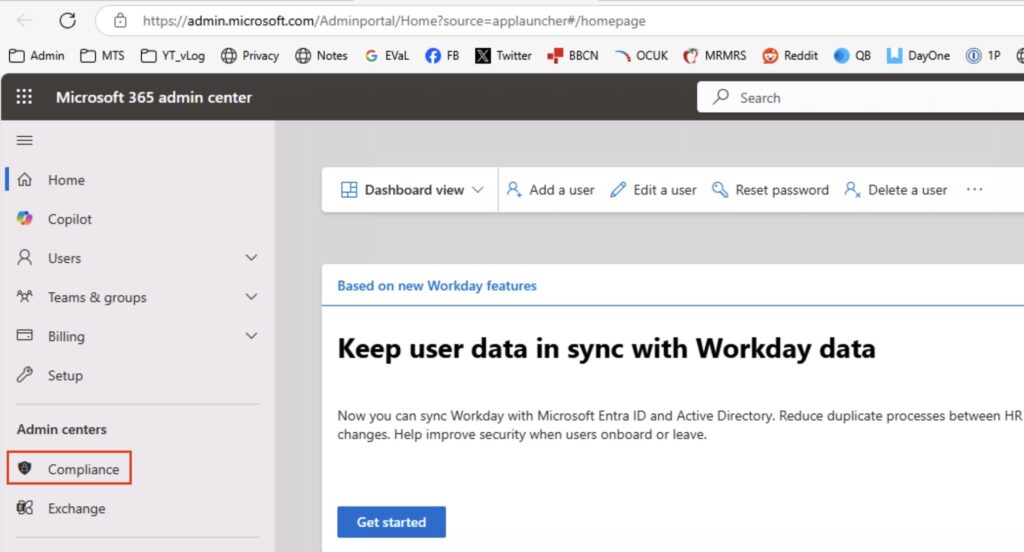
I’ll take you through the whole process. Firstly, logon to Microsoft 365, and go to the Admin Centre. You need the Compliance portal – or Purview.
Compliance Admin Center
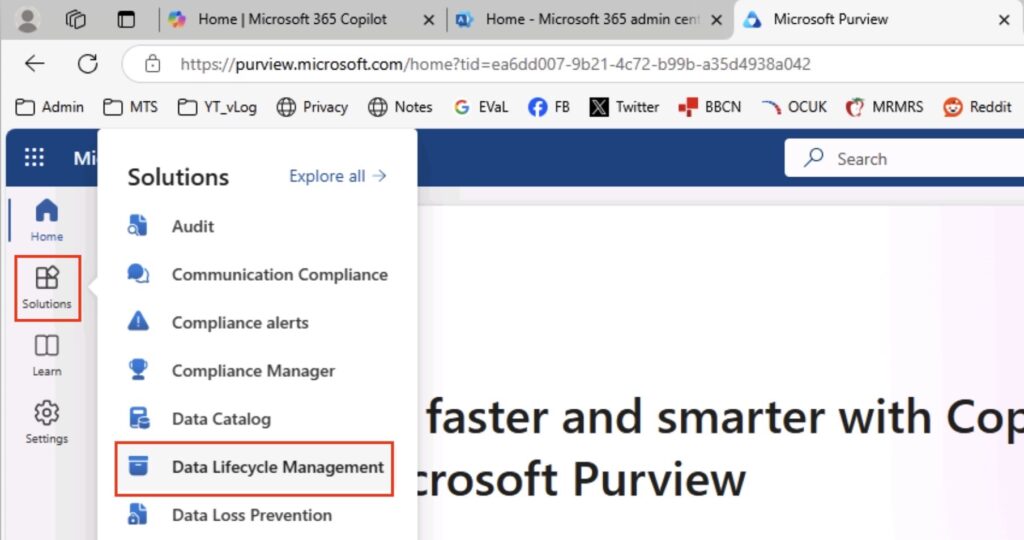
I’m going to assume that you’re using the new admin portal rather than the classic – the option is still easy to find in the classic portal however. The option you want to select is ‘Solutions’ in the left-hand menu bar, followed by ‘Data Lifecycle Management’.
Data Lifecycle Management
Create a new Import Job
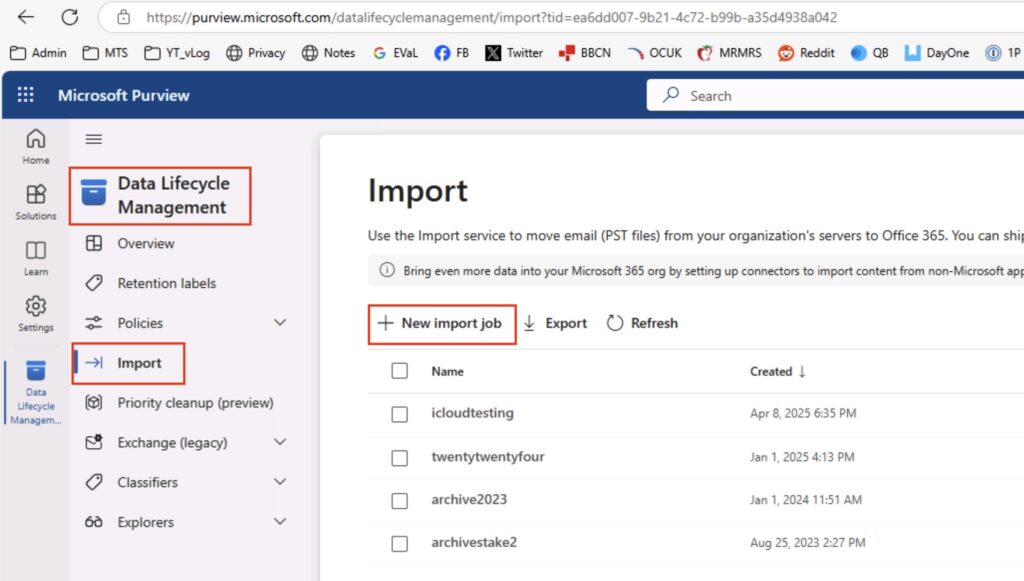
In that area, you will now see on the left the option to select ‘Import’ – do that, and the ‘+’ next to the ‘New Import Job’ in the menu – we’re going to start an import. You’ll see that I have several jobs in there already.
DLM: Import Process
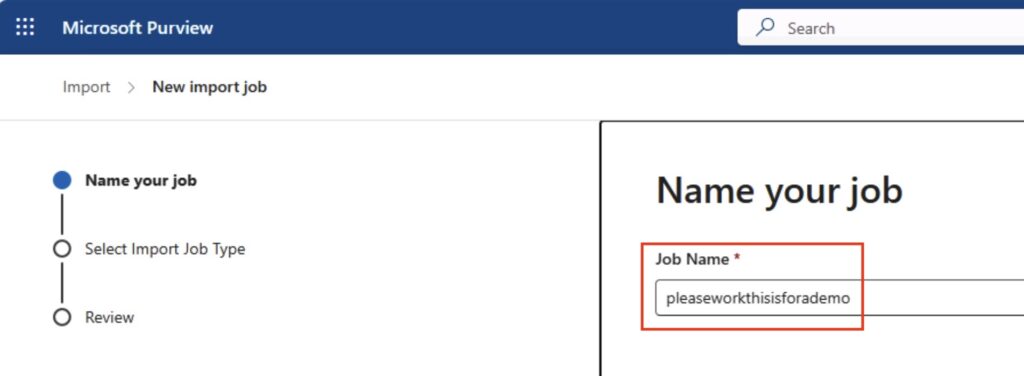
The first thing you will need to do is name your job. It’s quite fussy on the naming:
Job Name: 2-64 lowercase letters, numbers or hyphens, must start with a letter, no spaces
You can see that I have given mine a suitable demo name:
Name your job
Click ‘next’ right down the bottom of the screen – be careful with this, if you can’t see it, expand your browser window! It doesn’t always auto-scale, which can be irritating.
Selectyour import type
Next, we’re going to choose to upload our data. You can ship physical drives to Microsoft, however I’m not going to cover that process here. Select ‘Upload your data’, and click ‘next’ at the bottom.
Select your job type
Import Data
This is the interesting bit, and it can be quite fussy so you must be accurate with this items!
You will first need to download the ‘Azure AzCopy’ tool. You can get it here:
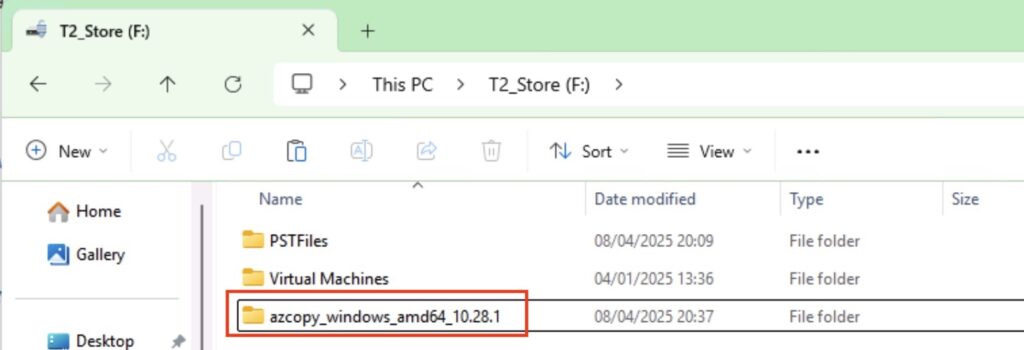
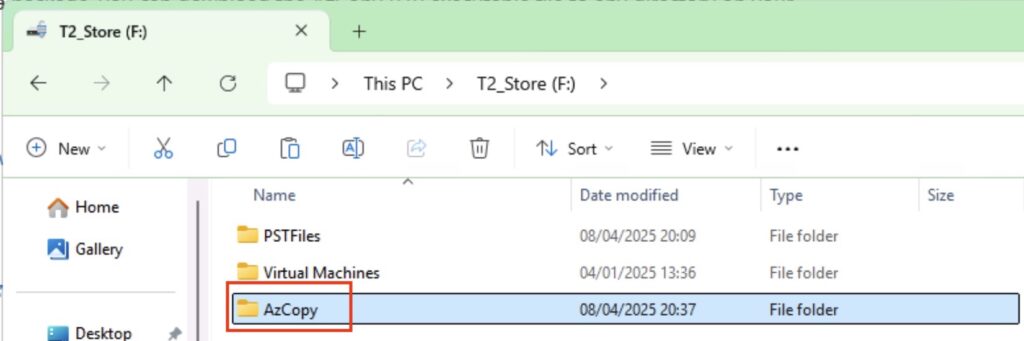
There are significant changes between earlier versions of AzCopy and later ones in terms of command line options, so I’m going to assume you have downloaded the latest version (as of 2025-04-08) and we’ll be using that. We’ll be doing this from the command line, so I tend to rename the directory after I’ve expanded it to make it easier – you can see below the original, and where I have renamed it:
AzCopy ModuleAzCopy Folder Renamed
Let’s Copy Our Data!
So let’s form our AzCopy command – fire up notepad as this may take you a couple of goes to get right ☺️ The command you want is:
NOTE: Make sure you put the target blob in quote – it often has syntax impacting characters in it that will cause you problems.
Let’s formulate the full command. What’s my ‘SourceDirectory’ – In my example, my PST files are in ‘F:\PSTFiles‘. So my source is ‘F:\PSTFiles\*“. The format with the trailing * is important! If you just do ‘F:\PSTFiles’ then you’ll end up with a folder called ‘PSTFiles’ and a complaint saying “the service cannot find your files – “The PST could not be found in the storage account” or similar.
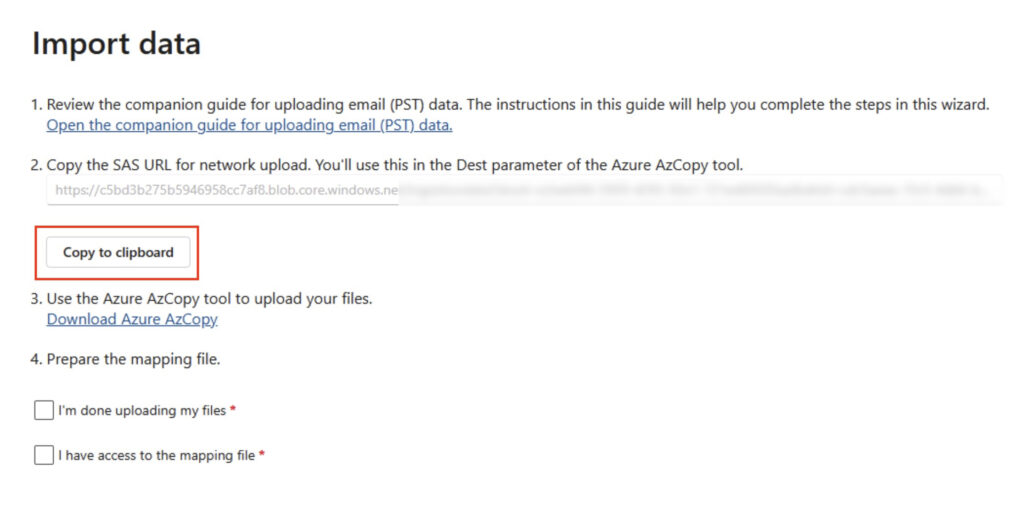
Next, the ‘TargetBlob’. You get this by clicking on the ‘Show Network Upload SAS URL’:
SAS URL
After a moment or two, the URL will be generated, and you will see the option to copy the URL to the clipboard – do that, and paste it into Notepad.
SAS URL Copy to Clipboard
So we now have the source and the target, so let’s formulate our command based on:
I’ve randomised the blob, so don’t even think about it 🤓 The item on the end ensure files can be overwritten if you get the command wrong and nee do re-run. You can see why I suggested copying it into Notepad.
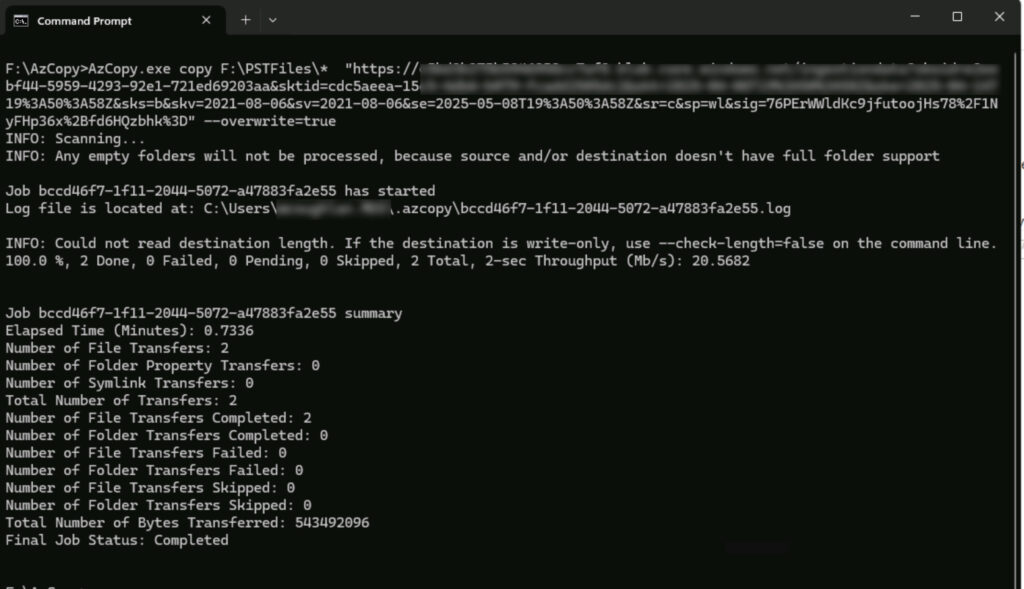
We now have our command, so let’s execute the copy. Fire up a DOS prompt, and go to the directory containing our AzCopy. Then, simply copy/paste in the command we have created above.
AzCopy Execution
Hopefully you’ll see your files have been copied, and at a decent throughput too! I can often exhaust my 1Gbps connection so it doesn’t appear to be highly throttled.
Prepare the Mapping File
Next, we need a CSV file that maps the various PST files to the right mailboxes and the location in that mailbox. You can download my example for this demo from here:
NOTE: Case is important for both the PST file and the Email Address. That second one surprised me – I don’t remember that being the case. I now copy the email from the Admin centre (for one or two accounts) or grab via PowerShell.
Mapping File
Upload the Mapping File
We have the mapping file, and we’re ready to continue. Select ‘I’m done uploading my files’ and ‘I have access to the mapping file’, followed by ‘Next’:
Ready to upload the mapping file
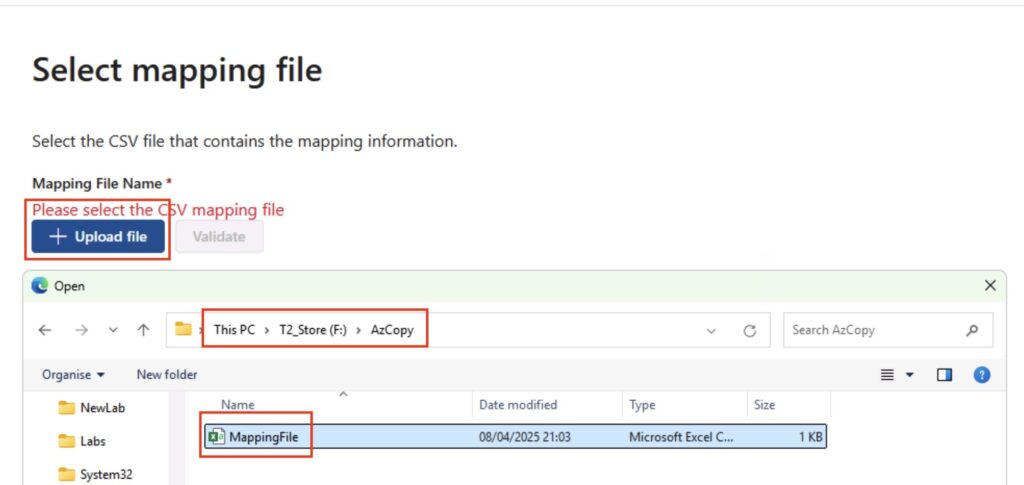
You will now be asked to upload your mapping file – hit that button, and select your mapping file:
Mapping File Upload
Once you have uploaded the mapping file, you will want to hit ‘Validate’ – it will check for common errors:
Mapping File Validation
Hopefully, your mapping file will show up green as in the above example. The most common error I see is ‘The PST could not be found in the storage account’ – this is because you’ve uploaded the directory, not the individual PSTs! Refer back to including the ‘*’ in the source path. You can of course include the path in the mapping file however I find that in itself can be quite fussy – stick everything in the root and you’ll be fine.
Assuming you’re all good – click ‘Next’. You will now receive a summary/review of the import job you have just created – you can click ‘Next’ on this one too, assuming everything looks OK.
Review of the import job
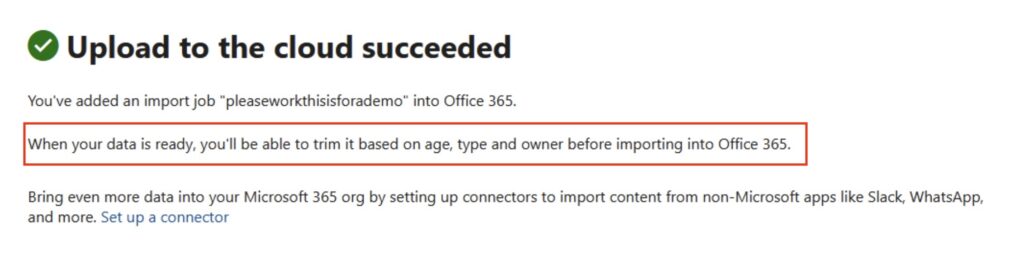
Click ‘Submit’ at the bottom. The Import Service will now examine the PST files – it has not yet started the importing!
Upload to the cloud succeeded
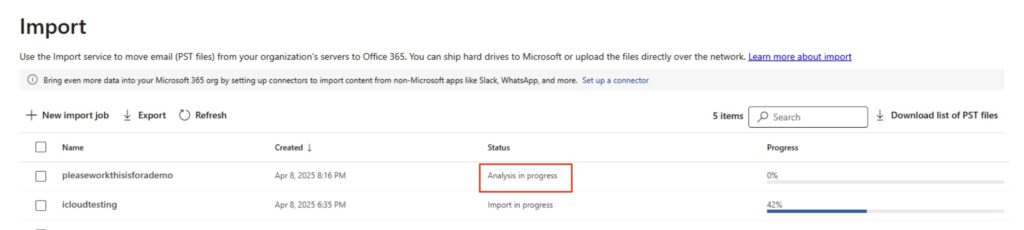
Click ‘Done’ and you will be taken back to the import screen – you will need to wait for the analysis phase of the import job to complete. Depending on the number of PST files and their size, this can take a little while.
Analysis in progress
Import Completed (Oh no it isn’t)
After a while, the import job will change to ‘Import Completed’ – don’t be fooled by this, the Import itself has NOT been done yet. Honest.
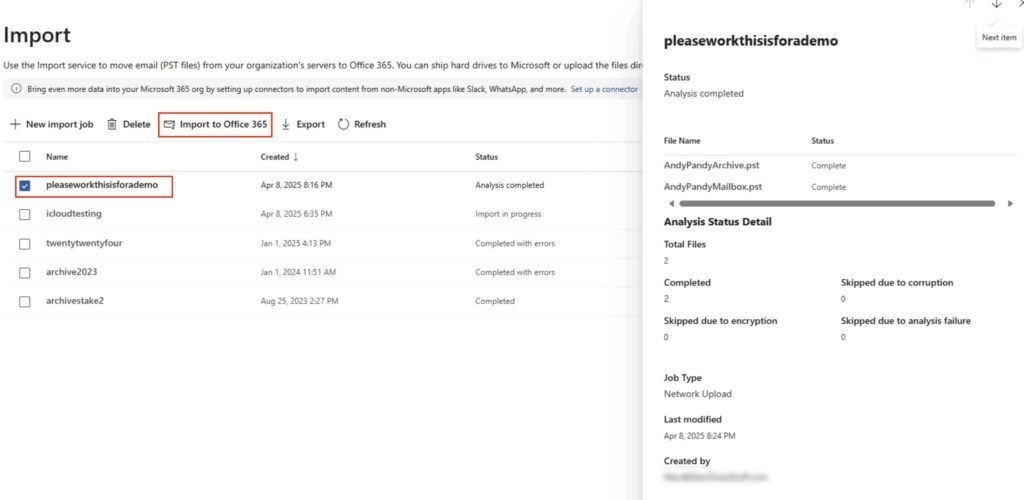
Import Analysis Completed
You want to select the job and make sure that the files have completed – none have been skipped etc. When you’re happy, hit that ‘Import to Office 365’ button. Interesting given it’s just said the import is done, right?
Import State
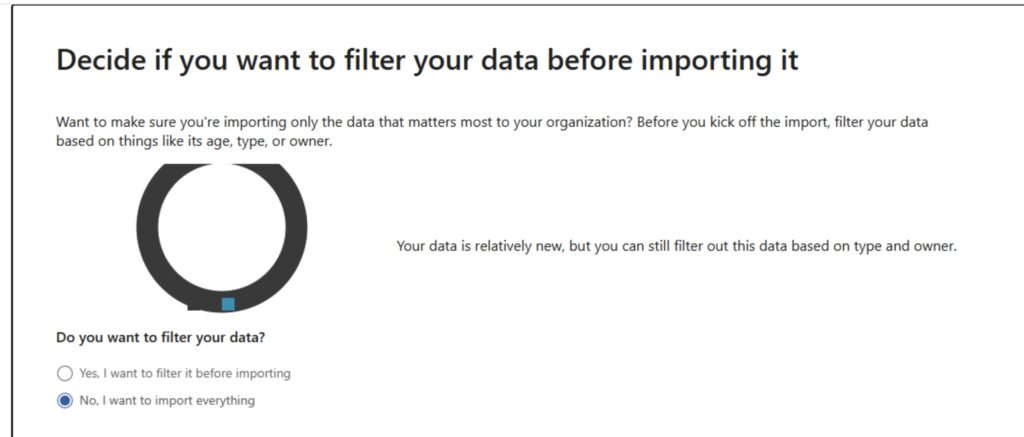
Filter Data
You can now, if you wish, filter the data. I’m not going to for the purpose of this demo however you can say for example to not import data over 2 years old.
Filter your data
Click ‘next’ after you have selected the right option for you. You’ll now be told what the import job is going to do.
Review of import
See now the cool stuff can start. Hit ‘Submit’ and hopefully off it will go!
Derp
Hopefully, off it goes! Once the job is going properly, you can monitor its progress:
Derp
How Fast Is It?
I find it sometimes difficult to fully ascertain overall ingestion performance for Microsoft 365. Trying to keep up with the developing throttling situation is sometimes challenging. Saying that, you can carry out some reasonable guesswork.
I typically see about 20-30GB/day ingestion rates per mailbox, which is fairly decent.
Common Gotchas?
There’s the permission thing I mentioned at the beginning – it’s an irritant realising you need to do this only to realise you have to wait a while for the permissions to apply.
Message Sizing
There’s a 150MB message size limit in Exchange Online – you cannot therefore import messages that are larger than 150MB.
The Online Archive
The Online Archive initially is 50GB or 100GB, however it can auto-expand up to 1.5TB. There are several things to consider around auto-expanding archives however the most relevant one to this conversation is around ingestion rate – the fast ingestion rate only works up to the 50GB or 100GB limit (I.e., whatever the license limit is that you have). Beyond that, you’re relying on the auto-expanding process and that’s limited to circa 1GB/day. Also, in my experience, the Import Service fails when it hits that auto-expanding limit. I’d investigate other options if that’s your use case.
As a quick side-note, if you have complex migration requirements – multi-terabyte mailboxes, Symantec eVault migrations etc. – one of my favourite vendors is Cloudficient. They have some very cool technology to deal with these complex scenarios.
Summary
It seems a complex process when I write all this down – it really isn’t however. Like I say, I use this process a lot. Make sure you’re fussy on case etc. and you’ll find this a really useful tool.
The First Refusal: When “Good Enough” Isn’t Enough
Lately, I’ve been taking on more work after a period of downtime. And a few days ago, I experienced something new – my first refusal. Someone approached me with an opportunity, and I simply turned it down with a polite “thanks, but no thanks.” It wasn’t a tough decision, but I found myself reflecting on why I said no.
I’ve worked with this company before. They’re just 10 minutes from my home, and with the flexibility of remote work, I could do the job from anywhere. Still, my instinct told me it wasn’t the right fit. So, why the sudden refusal? After some thought, I think I’ve figured it out.
A ‘Favour’ vs. a True Partnership
One of the first things that didn’t sit right with me was the tone of the request. The person I spoke with seemed to have the attitude that they were “doing me a favour” by offering the work. It’s a subtle but significant shift in perspective. It didn’t make me feel valued, and that always raises a red flag for me.
But there was a more fundamental reason for my refusal. Although the company is fairly large—around 6,000 employees across multiple countries—their approach to technology felt stuck in a “good enough” mindset. On the surface, that might sound fine. After all, many companies aim to deliver just what’s needed to move forward. But my experience with this company made it clear that this was more than just a strategy; it was a way of operating that left me frustrated and unfulfilled.
“Good Enough” Doesn’t Cut It
I’ve often said that I struggle to know when something is truly “done.” It’s a fine balance between perfection and completion, and I sometimes lean too far into perfection. It’s not a humble brag—anyone who’s seen my dial plans will understand. I can sometimes spend too long on that last 5% of tasks to get them ‘just right’, and it’s not always necessary.
This company, however, had an organisational mindset that leaned far too heavily on “done but not perfect.” It wasn’t just an occasional occurrence; it was the norm. The approach was one of constant compromise, and that’s not a place where I thrive. What made it worse was their frequent boast about being under-budget on projects. Yet, they had large product support teams that seemed to go unnoticed—a case of neglecting the quality of the output while claiming to save money perhaps?
The result? A lot of patching over previous decisions that were made too hastily, leading to more work down the line. For an architecture role, it felt more like 60% architecture and 40% cleaning up past mistakes. Much of my time was spent deciphering old PowerShell scripts that were meant to “quickly resolve” issues. I remember the first time I used ChatGPT to summarise a script—it felt like I had found a godsend.
The “Test System” Debacle
One particularly memorable example was a core business platform upgrade. The team had run out of VMWare capacity, and they couldn’t wait for the upgrade timelines. So what did they do? They dropped the requirement for a Test System. While that might sound like a small change, the reality was that they had actually dropped the need for a live system. All users were now effectively working in the test environment. As you can imagine, chaos ensued.
This situation raises an interesting question: when do we hit the point of diminishing returns in terms of effort versus value? When is something “good enough”? We all set our own boundaries in these matters, but within organisations, some people have more influence over where those boundaries lie than others.
For me, that drive to finish things properly is essential. It’s not about making something “work”—it’s about making something work right. A job well done leads to a deeper understanding of the platform I’m working with, and it’s far more satisfying than merely “making it do stuff”.
The Impact of Mediocrity
The real issue with a “good enough” culture is that it leads to mediocrity. If you’re constantly being asked to deliver work that’s average, you start to deliver average work. This affects motivation and, over time, can feel demoralising. Mediocre work starts to feel like a norm, and it’s easy to slip into that mindset across a wider array of tasks. It feels defeating.
Another practical issue I encountered at this company was the constant requirement for unexpected, unplanned work outside regular hours. Incident management calls at odd hours were the norm. Now, I know correlation doesn’t equal causation, but after experiencing this regularly, I couldn’t help but notice the pattern.
The Hidden Costs of “Good Enough”
When we talk about the point of diminishing returns, most people focus on the practical side of things—the time, effort, and resources required to finish a task. I however think we often overlook the broader impact. What about the toll it takes on our work culture, our personal time, and even our self-esteem? Delivering “good enough” feels like accepting mediocrity, and who wants to settle for that?
Over time, this affects your confidence in your abilities, and that, in turn, shapes how much influence and success you can achieve in your career. Constantly being asked to settle for less doesn’t just impact the work—it impacts the worker.
In Conclusion
After some reflection, I can see why I turned down that opportunity. It wasn’t just about the work itself, but the company’s approach to delivering quality and the impact it had on their team. I’ve learned that striving for more than “good enough” isn’t just beneficial for the projects I work on—it’s essential for my own growth, motivation, and satisfaction.
Now, I think I’ll go have an argument with a PowerShell script. It’s been a while.
If like me you swap between operating systems for external drives you can sometimes find yourself in the situation where – for whatever reason – you can’t partition a drive how you want. Usually it’s if I’ve been swapping between Linux/Windows etc. and have been doing unusual things.
Anyway, it’s real easy to clear down that partition table on a drive in Windows using something called DiskPart.
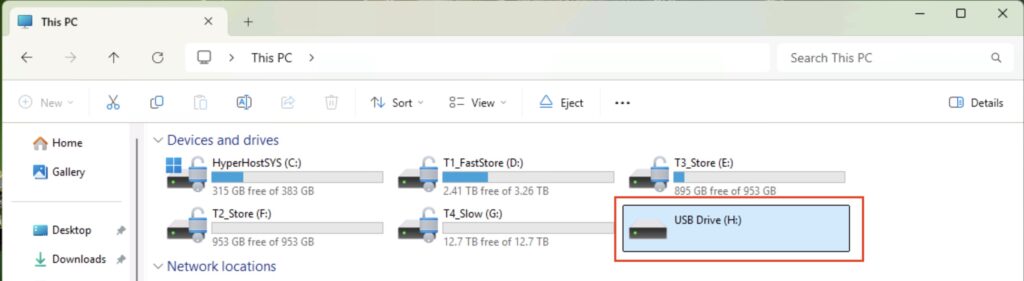
In my example below, I have a USB stick that’s not behaving. It could be any type of drive I believe.
Windows Explorer
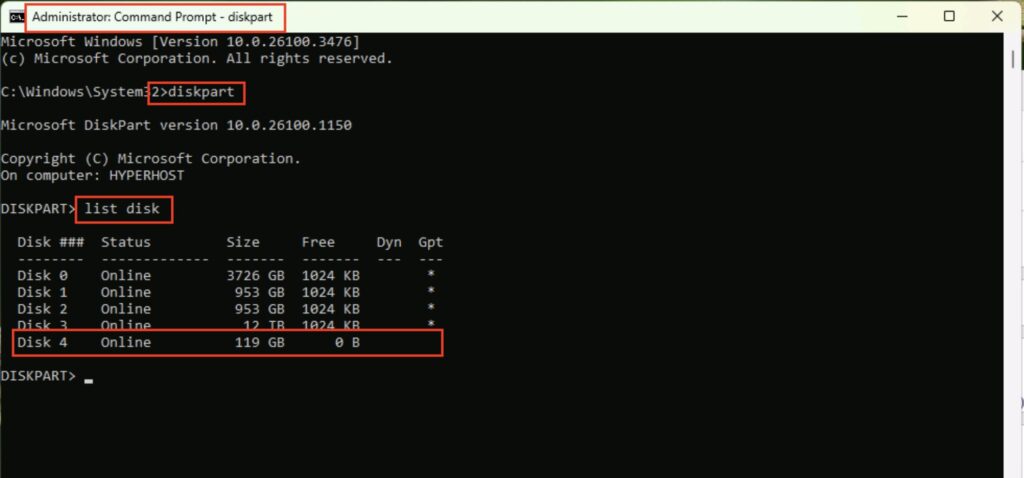
Let’s clear down that USB stick. First, start a DOS prompt as Administrator, and then run the program ‘DiskPart’. Next, type ‘list disk’, and you will see a list of your drives. Make sure you select the right drive! You do not want to be wiping the wrong one…. In my example, it’s the 119GB USB Stick, Disk 4.
DiskPart
Next, we’re going to select that drive, and clean it. To do that, you use the command:
select disk 4
clean
Again, be extra careful and make sure you’ve selected the right drive!
DiskPart Clean
That drive is now sparky new and you can go off and do what you want with it.
Since upgrading to MacOS Sequoia I noticed backups of my machines that had a lot of small files were either taking an age or failing. I also noticed that large transfers would slow down significantly after a while.
After thinking this was an issue with my networking…and finding it wasn’t, I managed to narrow it down to Sequoia – the issue wasn’t experienced on previous versions of MacOS or Windows. How odd.
Anyway, this setting on the Synology NAS seems to resolve the issue:
Do not reserve disk space when creating files
To configure it, go into ‘Control Panel’ on the Synology, and select ‘File Services’:
File Services
From the ‘Advanced Settings’ menu, you want to select ‘Others’ at the top, and turn on ‘Do not reserve disk space when creating files’:
Do not reserve disk space when creating files
NOTE: This will reset the SMB Service so if you have any active connections they may disconnect and re-connect.
Anyway, after I’ve done that, those weird little problems seem to have gone away. For the more technically minded, there’s a description of what this does below:
strict allocate (S) This is a boolean that controls the handling of disk space allocation in the server. When this is set to yes the server will change from UNIX behaviour of not committing real disk storage blocks when a file is extended to the Windows behaviour of actually forcing the disk system to allocate real storage blocks when a file is created or extended to be a given size. In UNIX terminology this means that Samba will stop creating sparse files.
This option is really designed for file systems that support fast allocation of large numbers of blocks such as extent-based file systems. On file systems that don’t support extents (most notably ext3) this can make Samba slower. When you work with large files over >100MB on file systems without extents you may even run into problems with clients running into timeouts.
When you have an extent based filesystem it’s likely that we can make use of unwritten extents which allows Samba to allocate even large amounts of space very fast and you will not see any timeout problems caused by strict allocate. With strict allocate in use you will also get much better out of quota messages in case you use quotas. Another advantage of activating this setting is that it will help to reduce file fragmentation.
To give you an idea on which filesystems this setting might currently be a good option for you: XFS, ext4, btrfs, ocfs2 on Linux and JFS2 on AIX support unwritten extents. On Filesystems that do not support it, preallocation is probably an expensive operation where you will see reduced performance and risk to let clients run into timeouts when creating large files. Examples are ext3, ZFS, HFS+ and most others, so be aware if you activate this setting on those filesystems.
I’m feeling a bit … lost. For some reason on one particular machine I don’t seem to be able to rename any Network Interface on Windows 11:
NIC Rename Screenshot
I’ve just tried it on another couple of machines and it’s worked fine – and I’ve obviously managed to rename some previously! So, anyone any idea what’s going on here? I’m sure we can do this with PowerShell though, so let’s do that.
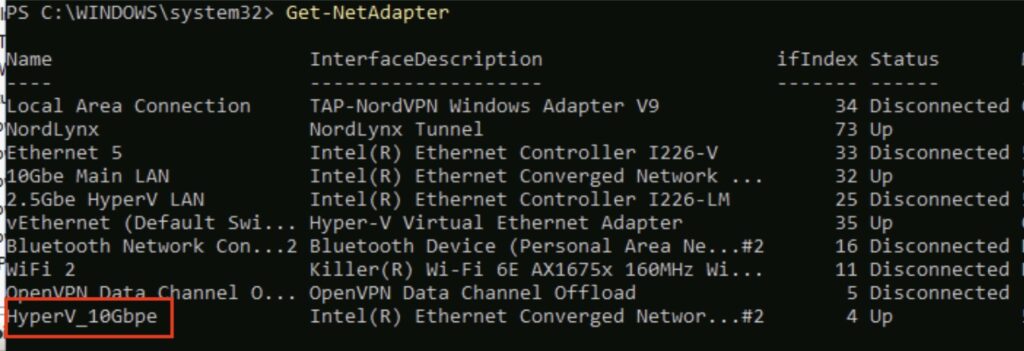
Fire up PowerShell as an Administrator and use the following command to get a list of your adapters:
Get-NetAdapter
Get-NetAdapter
You can see my output above. Next, rename the adapter using the following command:
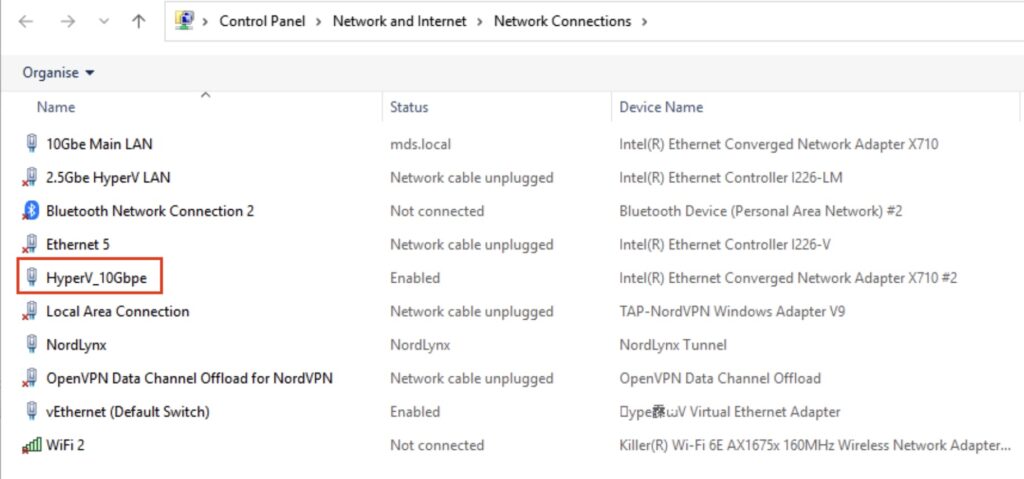
…obviously use the name of the interface you want to change, and what you want to change it to. Nothing appears to happen, but if you run the get-netadapter again you should see your changes:
Get-NetAdapterNetwork Connections
If anyone knows why I’ve lost the ability to do this in the GUI I’m all ears – I’ve tried removing all the HyperV vSwitch configuration but that didn’t seem to make any difference.
I recently wrote about how the UK government had demanded access to user data worldwide, and things have since moved on. Apple, as far as I can tell, has not fully complied with the order—remember, this demand applies globally, not just to UK citizens. What Apple has done is remove the general end-to-end encryption tool known as Advanced Data Protection (ADP) for UK users. But that’s it.
From a quick straw poll of several iPhone users, I found that most (around 95%) hadn’t even turned on ADP. So how big an issue is this really?
The Bigger Picture
I think the wider issue is a little misunderstood, but to be fair, it’s a complex one. Essentially, if you use a cloud service that isn’t end-to-end encrypted, the provider has access to your data. This means they can be compelled to hand it over to governments when legally requested. That’s not new.
What is murkier is the growing suspicion that even providers of end-to-end encrypted services may have been forced to insert backdoors—and legally, they can’t disclose it. That, I find horrific.
Why Apple, and Why Now?
It’s interesting how many people think this is just an “Apple issue.” I’ve seen people say, “I don’t use an iPhone, so this doesn’t affect me.” That’s not true. Apple just happens to be at the center of this particular story. Other tech giants likely face similar requests, but due to legal gag orders, they cannot disclose whether they’ve complied. Does that make anyone else uncomfortable?
Apple has said little publicly, but the removal of ADP in the UK seems to confirm compliance, at least partially.
If you back up your Android phone to Google, those backups are not end-to-end encrypted. If you store data in Microsoft 365 (Office 365), that’s not end-to-end encrypted either. What does this mean? It means the government can request your data, and Microsoft or Google can legally access and hand it over. Even Microsoft 365 Customer Lockbox doesn’t prevent this—it’s merely an administrative control, not a security barrier.
The Real Issue: End-to-End Encryption
So why the uproar over Apple’s ADP? The key issue is end-to-end encryption. When enabled, even Apple cannot access the data you store on iCloud, meaning they cannot comply with data access requests. Now, with ADP revoked for UK users, a significant portion of that data is once again accessible to Apple—and, by extension, to governments that request it.
What’s Still Encrypted?
To clarify, ADP encrypts everything a user stores in iCloud with end-to-end encryption. Without it, data is still encrypted, but Apple retains the encryption keys—meaning they can access and disclose it if required. However, some iCloud services remain end-to-end encrypted, even without ADP:
Passwords & Keychain
Health data
Journals
iMessage (not including cloud backups)
For a full list, check out Apple’s iCloud Data Security Overview. Anything labeled “end-to-end” means Apple has no access.
NOTE: If you backup your iPhone to iCloud, messages are included in those backups, which makes them accessible.
The Trust Issue
What really concerns me is how many other providers have been forced to weaken end-to-end encryption — and have complied without anyone knowing. WhatsApp is supposedly end-to-end encrypted, as is Facebook Messenger, but do we trust that there isn’t now a backdoor?
I suspect several MPs are quietly backing away from their WhatsApp groups as we speak.
What Happens Next?
This story isn’t going away anytime soon. Apple hasn’t fully complied—can you seriously imagine they would? The UK government demanding access to a US citizen’s iCloud backup would be a legal minefield. Can you picture Apple’s response to that?
I’ve also seen a lot of “I’ve got nothing to hide” responses. That’s a flawed stance—it even has a name: The “Nothing to Hide” Argument. Privacy isn’t just about secrecy; it’s about maintaining control over personal information.
So where does this leave us? If end-to-end encryption can be quietly removed or bypassed, is any cloud data truly private anymore? I’ll be watching closely to see what happens next….while also privately encrypting my own stuff.
I little while ago I was moaning on the Internet (shocked you are, I’m sure) about how I keep leaving half drunk cold cups of tea/coffee everywhere…anyway, somebody took some pity on me and told me they were sending me a little gift. What turns up but an Ember Heated Coffee Mug in stainless steel.
When I took this out of the box I couldn’t work out whether I thought this was the stupidest idea since the invention of stupid ideas, or whether it was going to be the best thing ever. That’s not something that often happens to me and tech, I usually know pretty quickly how I’m going to feel about something.
Fundamentally, all this thing does is allow you to set a temperature for your drink, and the mug will keep the drink at that temperature. For example, I like tea/coffee at about 57/58 Celsius. I connect the mug to my phone, use the app to set the temperature to the one I like, and then fill it with my drink. If the drink is less than the temperature I want, it heats it up. If it’s hotter, it lets it cool until it hits that temperature, and then it maintains it at that temperature. All rechargeable battery powered by a funky desk charger (more on that shortly).
Ember Application
So, either the stupidest thing ever, or brilliant. Which is it? We’ll get to that.
Does it work? Fundamentally, absolutely yes. If I make say a mug of tea it’ll keep it around 57 degree for a good 90 to 120 minutes, which is more than enough time for me to find it cold four hours later, but to get the odd hot mouthful along the way. From that perspective it works really well.
Let’s get back to those charging pads – they are not standard wireless charging pads – they’re unique to the Ember mugs. From a low charge the units take about 2 to 2.5 hours to fully charge – that’s quite a long time, however I found it’s never a problem as I tend to top them up as and when I’m using them – I.e., there’s a pad on my desk that I tend to use. In addition, whereas are you going to keep it other than on its charging pad?
The stainless steel looks good too – it’s a very nice finish and very easy to keep clean. It’s not however very big at 295ml in volume.
So was it the stupidest thing in the history of stupid or…? Well, given that 295ml was a little small for me I now have another one, bought with my own money. This one is in black and is a larger 414ml volume unit, rather than 295ml so some 40% larger by volume. So yeah, I’ve learned to really like the thing, and I absolutely must do to have spent 150 GREAT BRITISH EARTH POUNDS on one. Yeah. They’re expensive – real expensive.
They do however fulfil their function, and they do it well.
It’s not all joyous however, there are some things that bothered me – and I’ve managed to resolve most of them. So let’s look at those annoyances.
The Charging Pad Uses a Barrel Connector
Why for the love of everything USBC-C is the charging pad provided with a plug with a barrel connector. That’s really, really annoying. I don’t want to be carrying another plug about if I don’t need to, or having to plug something it for some non-standard device. Boo Ember, BOOOO. Saying that, I did find a solution – and it cost me a fiver. The solution is a Type C USB-C Female Input to DC 5.5 * 2.1mm Power PD Charge Cable fit for Laptop 18-20V from Amazon. This cable has USB-C on one end, and the correct barrel connector on the other. A little caveat however – I had to trim down the plastic sheathing on the barrel connector to allow it to fit properly on the charging pad. Once I’d done that, it works fine.
Some other observations with charging. It must be connected to a USB-C PD port. Interestingly, from a consumption point of view, you’ll see the unit peak at about 30-35w charging for a few minutes, before dropping back to circa 2-10 watts during the charge. It then seems to short-burst charge rather than constant trickle – that’s a bit odd. It’s a shame it’s so low as that’s why it takes so long to charge – although like I say, I’ve not noticed it being a problem, and I’ve rarely found it without charge.
Ember Mug Charging Power Consumption
A lid!
I don’t like having open tea/coffee mugs sitting about, they’re too easy to spill and I always have tech stuff about. Nobody wants to be in an episode of Chris Shaw and the Drowned Laptop. The units are fairly base heavy – the 295ml unit is about 400grams, with the 414ml one about 457grams – but they’re still full of liquid.
Fortunately however you can get lids – just be careful that you get the right lid for the right mug size!
Each is another 15GBP of course – the price of being into consumer tech can be uncomfortable.
The App
Ah, the app. Now initially this went pretty well. Setup was easy, it found the mug, it did a firmware update (on a mug – what a time to be alive). Admittedly I didn’t need to use the app very often. I have the same temperature for tea & coffee, so I set it, and forget it. The only time I need to use the app is to change the temperature or if I’m curious about the charge state.
Then, I imagine the Ember Software Development Team spent a little too long attending classes on Software Design run by Sonos. For a few months the app was buggy, and a huge pain in the backside. It would often lose your config requiring you to login in again, or lose the mug completely requiring a complete reset, or completely ignoring whatever you set in the app etc. Yeah, a complete Sonos.
Fortunately they do seem to have resolved that now. The app now (on Android at least, I haven’t really tried it on my iPhone) seems fairly stable and it’s rare I have a problem with it.
Ember App
Summary
So should you buy one? Absolutely not, unless you like the idea and the amount of money involved won’t stop you paying your mortgage. If that’s the case, get one immediately. I think they’re ace! I’d be bit wary of the Ember travel mug however. My travels around the various Reddit forums seem to indicate those units are not well liked – although to be fair here this is an anecdote not based on any real data.
They’re now in regular use in my house, and I rarely have a drink in anything else. I have several drink mugs – things like the Yeti Mug – and while they’d good, they offer a different problem. Often with those the drinks are still too hot for quite a while after you’ve made them! With the Ember they seem to cool at a reasonable rate, they just maintain the temperature you set.
I do wonder how long the battery will last (in terms of lifetime resilience), but again I’ve no real data on that. Would I be happy if they lasted say 3 years? I’d hope to get longer, but I’d imagine that’s a reasonable timescale for them.
Anyway, if this is coming across as a confused tech review, it’s because I’m slightly confused by the product. Love what it does, don’t like the barrel charger, and more importantly the stupid cost.
I know some of you may find this a bit of a shock but I think I got a bit carried away with the smart home thing. For a while there you could only really turn on any lights, or use any of the several kitchen appliances, by shouting at another appliance to turn the ****ing thing on. I could often be heard arguing with my kitchen when all I wanted was a bacon sandwich.
The idea is THE dream though, isn’t it? So Back to the Future – ‘Turn on the Lights!’.
Anyway, while I can still control most things in my house by voice, I rarely do. One thing that has survived the smart home cull however are the smart plugs.
There’s a few reasons for that:
-> I use a lot of power. My home labs cost a bit to run, so I try now to turn off what I can when it’s not in use.
-> I want to know what power I use. I need to expense some.
So I have ended up with two types of smart plugs – there’s the original ones that I bought which were single plugs that either could control one device, or of course could connect to an extension lead. The ones I used were the Meross MSS310 units. These have proven very reliable with a decent app. I can of course turn them on/off by voice – ‘Turn off the TV’ for example – and I do still do that sometimes. You can also setup routines so ‘Leaving the house’ turns off everything you’d not want on when you’re not there for example. That hasn’t had a lot of use, as I just don’t go anywhere.
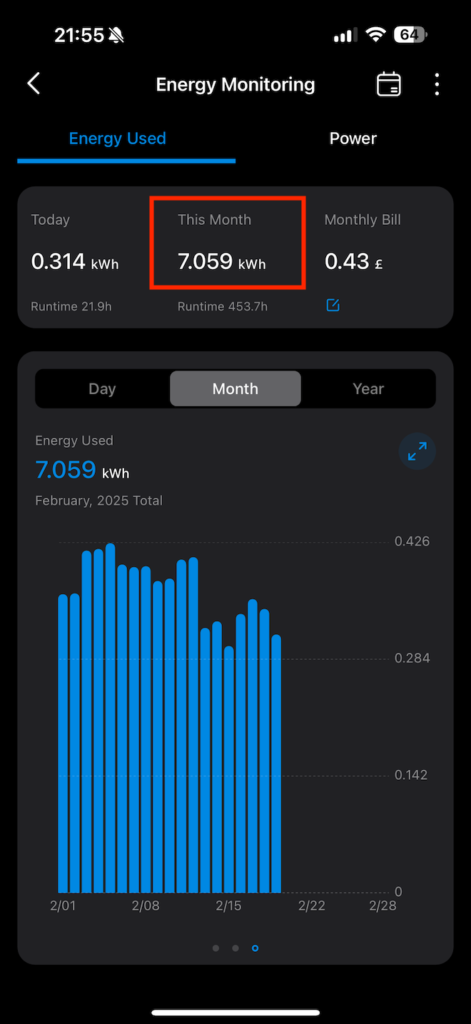
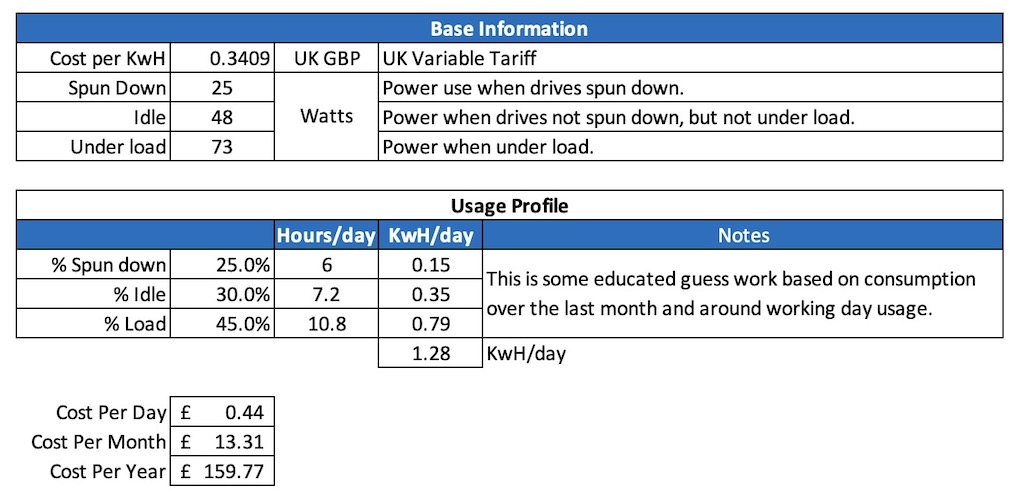
More importantly however the power tracking from these has proven really insightful and useful. The following for example shows the current power draw (1) of my core lab, and its power-usage for last month(2), and the cost for last month (3). Yes, the cost. I can tell it the cost per KwH and it works it all out for you.
Core Hub Power Draw
I’ve found this really useful. Can you see the trap coming yet?!
Knowing the power consumption of things has helped me knock about a third off of my power bill. That’s mad. There’s also environmental benefits to that too of course. I just no longer leave things running. My backup NAS only backs stuff up at night for example, there was absolutely no reason for it to be on for the other 22 hours of the day. The power analysis helped me work out that stuff.
This has however led me on to wanting to understand more. (The trap, it’s coming). So I looked into and invested into smart power strips. These are similar devices but essentially each plug on the power strip is its own smart plug. The ones I opted for were the TP-Link TAPO P304M. They cost me about 25 quid on Amazon, and are very easy to setup.
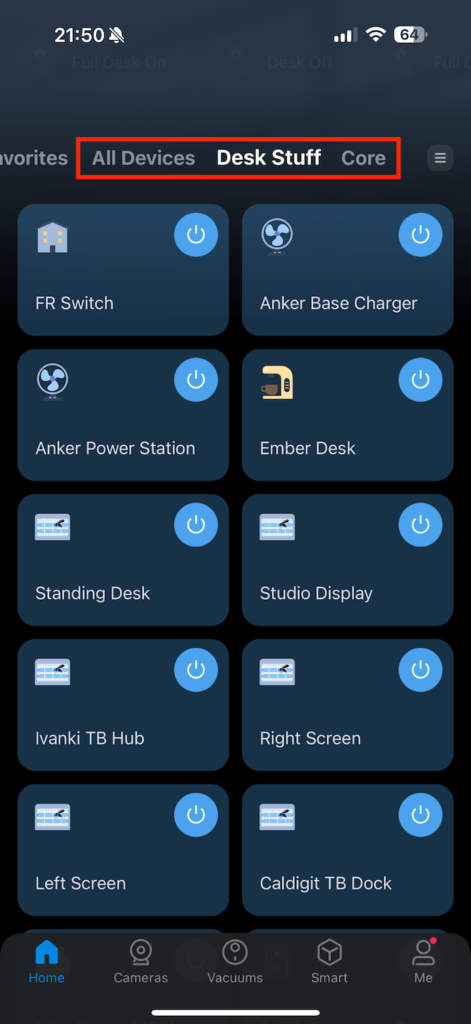
What these give you is the ability to setup collections of devices, and of course to setup automations. My real power users are my ‘core’ – which is my lab/storage etc. – and my desk. So I have fully configured both with these power strips. The app you can see all of the plugs – I.e., all of them, everywhere, or by collection – in my example, by ‘Desk Stuff’ or ‘Core’.
TAPO App
Now I can both control each individual plug on those strips each by having an automation process, or individually. So for example I have ‘Full Desk Off’ that turns off absolutely everything on my desk, and just a normal ‘Desk Off’ that turns off everything while leaving my charging ports for phones etc. all live.
Power Shortcuts
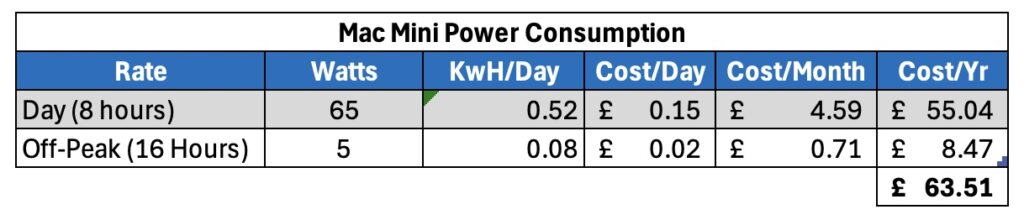
You also get a significant amount of power information for each plug on each and every strip. Oh my word, my advice is you need to be careful with this. If you’re not careful there will be SPREADSHEETS. This for example is the power consumption of my Mac mini M4 Server – this is on 24×7 and runs my Plex, and some other automation processes.
Single Power Energy Consumption
As a quick sidenote, those M4 Minis are fab low power units for Plex and general automation type stuff. Mine is only the base model 256GB/16GB unit, however it handles everything I’ve thrown at it, including a couple of VMs, just fine – while absolutely sipping on power:
M4 Power ConsumptionScreenshot
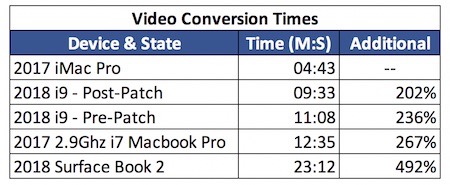
It’s usually lower than 15w – the above is when it’s busy! I also run it in low-power mode too as I rarely need its full performance. I mean the toughest thing I ask it to do is some video conversions and for those I don’t really care if it takes 2 hours or 5.
The Trap
The trap with this stuff is that you can, if you’re not careful, become slightly obsessive about power monitoring! Like I say, I have full costs now on my always-on stack etc.
Cost Analysis
Summary
I’m really happy with both the Meross plugs and the TP-Link power strips. They both seem to be fairly accurate on the power calculations – I’ve plugged one into the other to compare – and they’re within 2-3% of each other. I like the apps. The Meross app is arguably slightly nicer to look at and simpler to view, but it’s not a huge gap. Would I prefer them to be the same app…? Of course. I made the mistake however of having a power strip given to me to play with….so then ended up investing in the TP-Link ones myself, hence the two apps. It’s not a problem though, as I tend to use them for different things.
The Meross single plugs I use for measuring and controlling collections of devices, whereas the TP-Link ones I’m interested in measuring and controlling individual items. It works brilliantly for this purpose.
Like I say, I’ve stepped back a little from fully voice-automating stuff. The lights thing and controlling the kitchen were particularly challenging on that front – but both apps fully integrate to most voice services such as Alexa etc. so you can do that if you want.
Most of the automations I use are on my phone and from the Tapo app, and they work really well.
Now all I need to do is ween myself off obsessing about the numbers. I like numbers, they’re pretty!
I was re-installing my Minisforum MS-01 recently as all the stuff I’d been testing on it meant it wasn’t really setup any more how I liked it. Anyway, one of the handy tips I’ve obtained from who knows where is a way to backup all of your device drivers before re-installing, helping to avoid the missing drivers thing in Device Manager.
It’s pretty easy too. All you need do is:
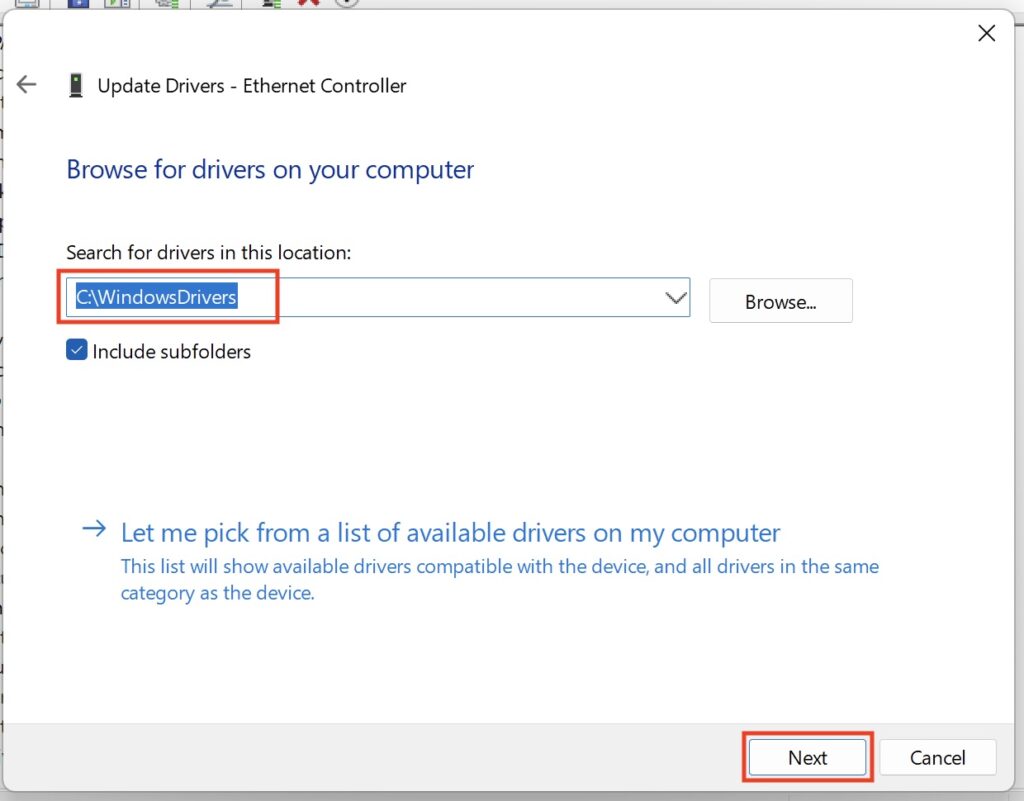
-> Create a directory for all your drivers ‘C:\WindowsDrivers’ for example.
This will then go and export all your drivers for you. You can see the process and the output below.
If you look in the directory, you’ll now see all your drivers.
Copy that directory off somewhere else, and you have a copy of all your drivers.
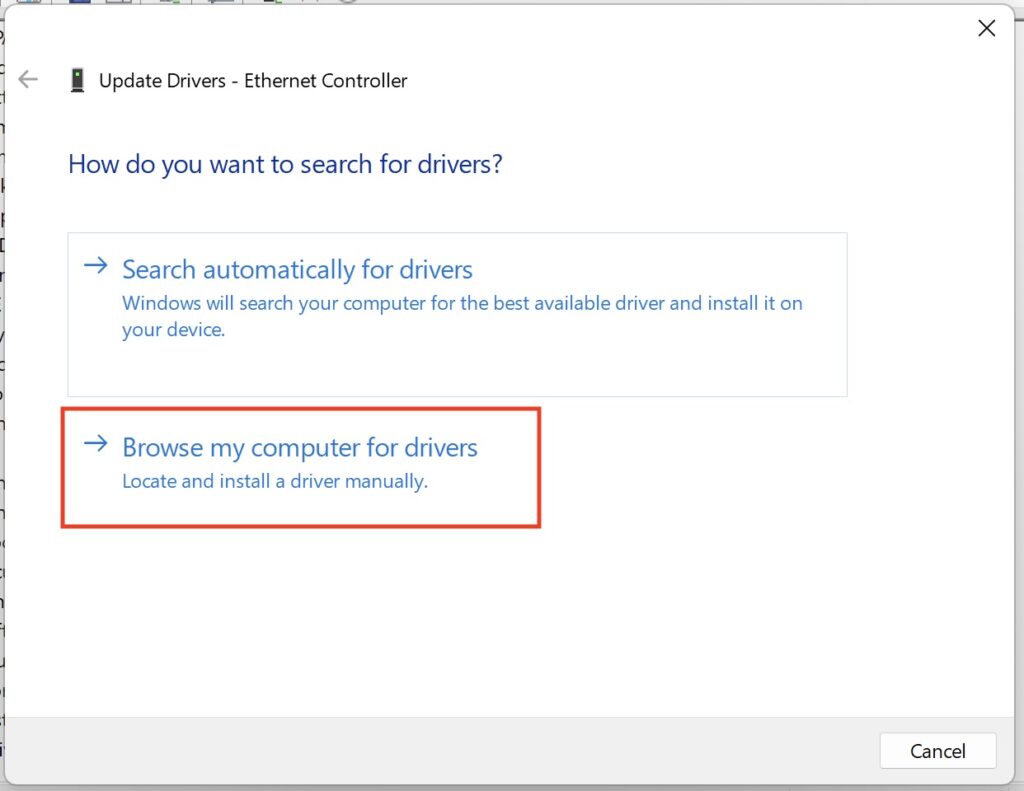
Now, when you go to re-install the machine, if any drivers are missing you can point Device Manager back to that directory or from a USB stick. In my example below, you can see that my device driver for my network card is missing (this example is from a Windows machine running on Parallels Desktop):
You can right click on that ‘Ethernet Controller’ and select ‘Update Driver’ – and from the screen that’s presented, select ‘Browse my computer for drivers’:
What you want to do now is select the folder where you have those exported drivers – or a USB of course. Make sure ‘Include subfolders’ is selected that way you don’t have to find the right specific directory. Then click ‘Next’.
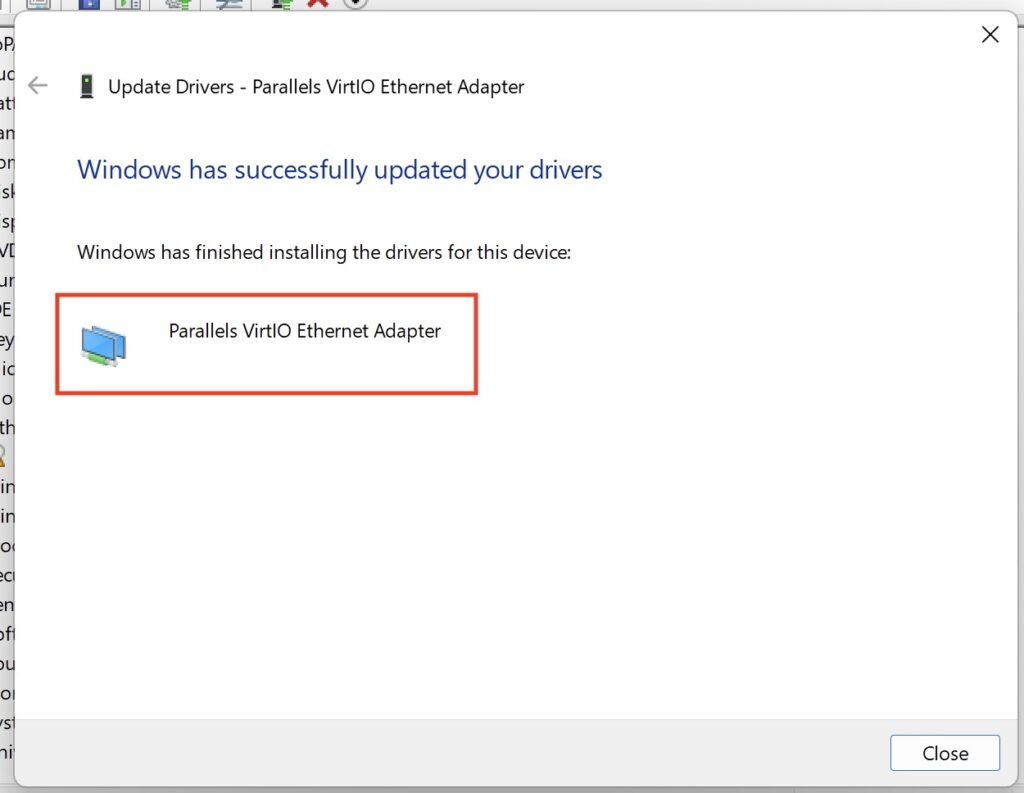
What you should see now is that the process has located the driver and installed it for you.
Now, if we look back in Device Manager, we should see the triangle/exclamation error has now gone.
Quite a handy thing that. I backup my drivers ever so often on my machines really to avoid having to hunt around for things. Anyway, you can also see a video run through here:
This story has been doing the rounds this week, and it’s blowing my mind that there isn’t more noise about it.
News headlineScreenshot
The UK is demanding that Apple put in a back-door to their encryption system that would allow the government to view anyone’s data held in iCloud. Not only that, Apple are, by law, not allowed do tell us that’s what the government is doing. I could not be more WTF without turning myself inside out.
The scope of this is also huge – it’s access to encrypted data worldwide, not just for people in the UK. I mean, come on. I see the US has already started to kick off about it.
Screenshot of BBC News
I can partially – I think, so far – accept that the government’s intentions are not to generally search and analyse people’s data through some form of mass surveillance…but I can’t imagine that conversation hasn’t come up. No doubt using the ‘won’t you think of the children‘ defence.
This idea of opening up a back-door into end-to-end encrypted services is a bit terrifying from a technical perspective and from a general understanding point of view. Do you genuinely think that it’s beyond the realms of thought that a method to exploit that back-door wouldn’t be found…? Or do you think it would only ever be used by the good guys.
I was having this conversation with a few non-techie friends recently (I have some), and they didn’t see the problem. Here’s the thing though, it would mean the government could see their data, but any bad-actor with half a brain would still easily be able to protect their stuff.
The only data this gives the government access to are idiot criminals and every member of the public. Let me explain.
Let’s say I’m a bad guy, and I want to have a conversation with another bad guy – let’s call him Donald. Now, I want to use publicly available end-to-end encrypted services such as WhatsApp or iMessage, but I know the government has access to that data via their back-door (fnarr).
Oh my! What do I do! Well, I do what any sane person would do and encrypt my data using my own keys before I used that service that the government has access to. Hell, I could use far stronger encryption than was originally implemented in WhatsApp or iCloud anyway.
So where are now in that scenario? The bad guys have secure comms, and everyone else’s data is exposed to the government. I suppose there’s an argument that if the government saw you were using private encryption that you’d stand out, but what are they going to do…outlaw the use of encryption?
This is such a bizarre and unnecessary attack on public privacy, obviously designed and implemented by people who have little idea of how encrypted communications work.
Imagine what other back-doors they’ve asked for – HTTPS for example, for your banking apps or everything else?
I’ve been in the hunt for new home-lab virtualisation servers. I previously used two 2018 Mac mini i7/64GB units. They have been solid units, and have served me well. I used Parallels Desktop for 90% of the virtualisation, with some VMWare Fusion in there too. They’ve lasted YEARS and have been rock-solid…but, their performance against their power consumption has been lacking compared to current offerings.
So I took a dual approach – for my constant stuff that needed to be on all the time (backups, some video conversion automation, AdGuard type stuff) I bought an Apple M4 Mini. More on this in another article, however it sips power while also being highly capable.
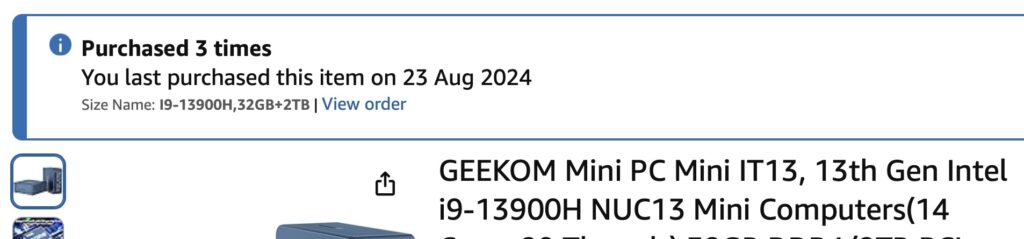
For my lab stuff – think 90% Windows, 10% Linux – I needed something x86. First, I looked at Geekom and their Mini IT13, and it was disastrous. I actually bought one direct from Geekom, and three from Amazon. All of them after a week or two just wouldn’t turn on.
Amazon Geekom Orders
I returned them all – so much so Amazon put me on the returns naughty step so I had to get AmEx involved, who were, as usual, absolutely badass at getting my money back.
This is when I stumbled on the Minisforum MS-01. The specs on this thing seemed out of this world.
-> Intel i9 13900H
-> Dual DDR5-5200 up to 96GB
-> 2 x USB4
-> 2 x 2.5Gb Ethernet
-> 2 x 10Gb Ethernet
-> HDMI
Have a look for yourself at all these ports – absolutely mad.
MS-01 Rear
Internally, the unit supports up to three NVMe slots. THREE. 1 PCIe 4×4, one 3×4 and one 3×2. Additionally slot 1 can be configured to use a U.2 NVMe too. The graphics are integrated UDH750 I think, but – and here’s something else that amazed me about this unit – it also comes with a half-length PCIe 3×4 slot! With it being half-length you’re limited by what you can put in there, but there’s certainly options out there.
I was quite blown away when I saw the specs of these units, and couldn’t order one fast enough, and to spec it out. The spec I’ve gone for is:
-> 96GB RAM
-> 1 x 4TB NVMe
-> 2 x 1TB NVMe
This is connected now over 10Gbe for the main LAN, and 2.5Gb for my HyperV machines. Absolutely bonkers considering its size.
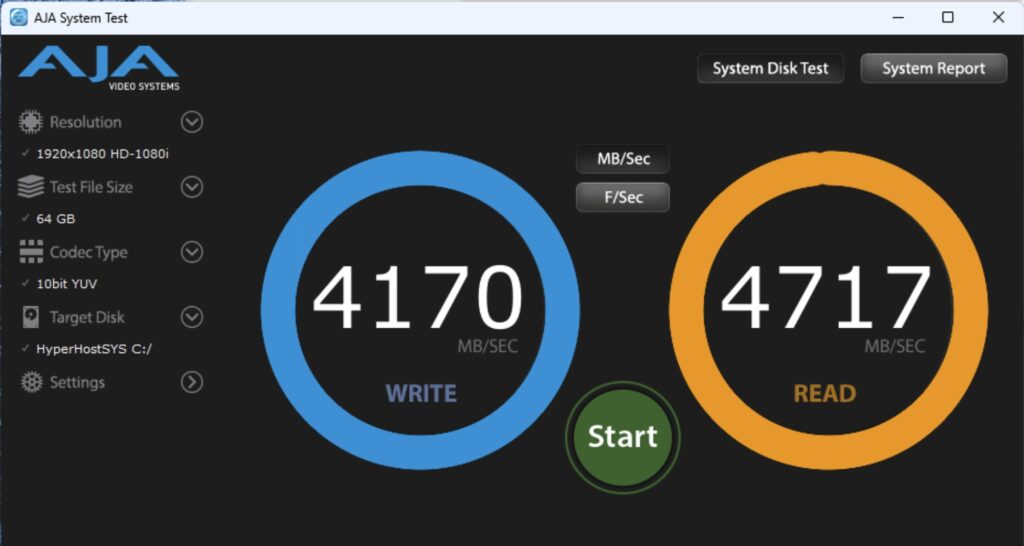
What’s the performance like? Well, let’s look at the primary SSD to start. This is a Lexar 4TB 4×4 that I already had.
SSD Performance
That’ll do. The other two SSD are a bit slower at about 2200MB/s read/write, still really acceptable.
The Intel 13900H in the MS-01 has a base TDP of 45watts but apparently can boost up to 115watts – it’s a mobile processor of course. By way of example, the desktop i-13900 has a base of 65W and boosts to 219W…but requires significantly more cooling.
You can see the Geekbench benchmarks for the 13900H here. If you want a bit of a giggle here’s the comparison between the 13900H and the binned M4 Max (I have the unbinned M4 Max). So processor performance is pretty good too – certainly good enough for what I need it for.
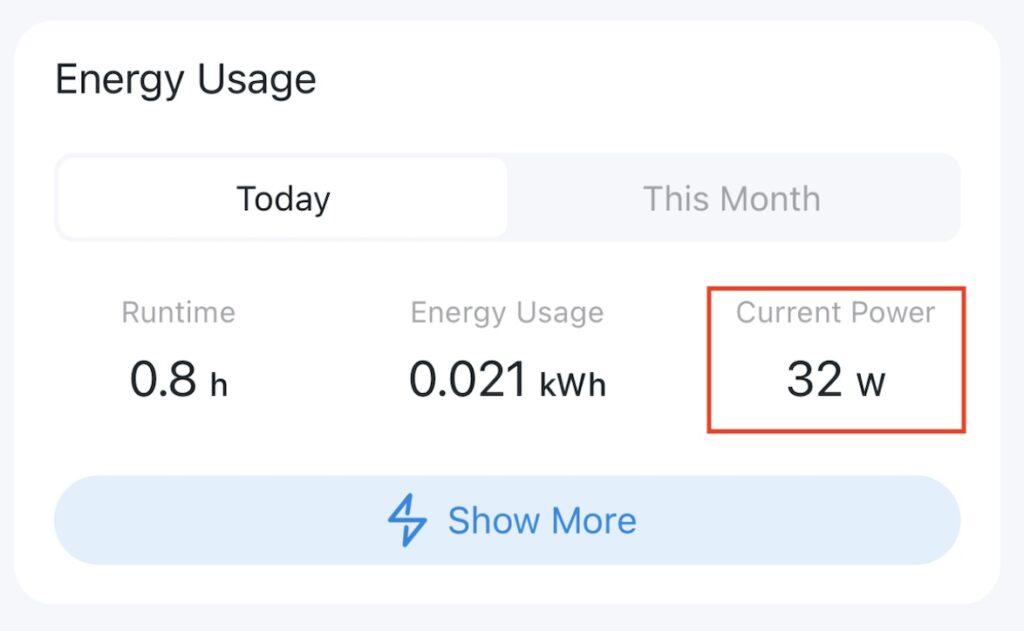
What about power consumption? At idle, the unit seems to average between 25 and 33watts, which is 0.6KwH to 0.8KwH per day.
MS-01 Power ConsumptionScreenshot
This does seem a little high compared to what some other people are reporting – several are reporting idle figures of 15-30 watts, but I’ve not seen it go that low. Perhaps it’s the spec and of course I have the 10Gbe interface in use.
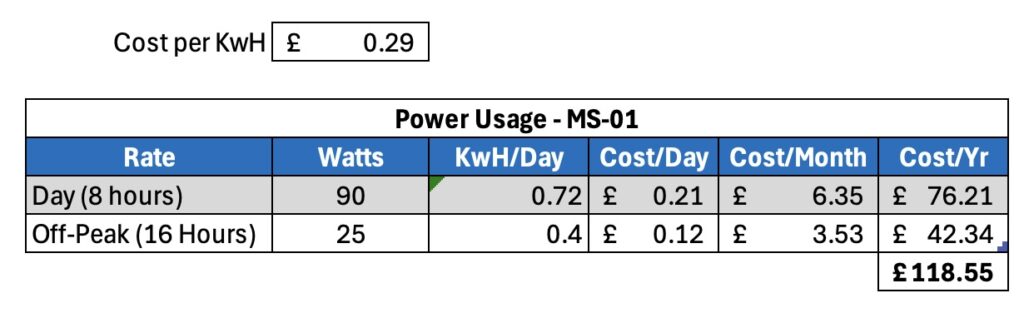
What about under load? It seems to peak at about 115-120w but then settles in to about 90w. Assuming 90w consumption that’s 2.2KwH/day (rounded up), which isn’t insignificant, but then how often are you going to have it flat out..?
Assuming you work it hard for 8 hours a day, but the rest it’s fairly idle, running costs at GBP0.29/KwH would be as follows.]
MS-01 Power Consumption
Just for the purposes of comparison – the M4 Mini I bought for my 24×7 automation stuff (Plex, backups etc.) averages about 5w at idle, and uses 65watts under full load.
M4 Mini Power Consumption
It’s a fairly decent difference isn’t it? Saying that, the M4 Mini can’t do all the x86 virtualisation that I need, but it’s still a reasonable comparison.
So what do we have at this point? Well, we have a small, powerful PC, with great networking, internal storage, and reasonable power consumption. There must be some downsides, right?
Well, so far, not too many. I do have some observations however. Firstly, noise. If these units are next to you, you will hear the fans. They seem to spin up even with the slightest of activity. They’re not particularly loud however you will hear them. They don’t bother me at all.
I also have a weird issue with the networking. Firstly, those two 10Gbe SFP+ ports. If I try use both of them they work for a little while but eventually I start to get problems with disconnections and the performance plummeting. If I had to guess, it’s because I’m using SFP+ to RJ45 connectors in there, and they’re getting heat soaked – so in effect, I can’t use both SFP+ 10Gbe connections at the same time. Not a huge issue given it also has two 2.5Gb ports.
Next is a weird one, and it sounds like a configuration bottle neck I’m hitting rather than an actual problem with the unit. With HyperV configured to use the 2.5Gbe interface only, and with management etc. on the 10Gbe port, I only get circa 2.5Gb performance not the 10Gbe port. In fact it’s so close to 2.5Gbe it makes me think this is a config issue. If I remove the HyperV configuration I get nearer the 10Gbpe. Something I’ll look into in the future I think, however it’s not that big a deal to me in reality.
2025-02-25 20:32:04: I’ve now resolved this – it wasn’t just suspiciously close to 2.5Gbps it was 2.5Gbps…but it was reporting as 10Gbps. Essentially I was using a cheap non-managed 10Gb/2.5Gb switch, and an SFP+ to RJ45 converter on the MS-01. I swapped the switch for a 10Gbps QNAP managed switch and what do I see… the port running at 2.5Gbps. Swapping out the SFP+ to RJ45 connector and just using a straight fibre connection I now not only have the 10Gbps connection, it’s also running a lot cooler. I’ll test both 10Gbps connections shortly and see if running them both is workable.
10Gbps File Copy
What am I running on it? Well, my longer term plan is to configure it as ProxMox unit, for now however it’s running Windows 11 and HyperV. Not a great combination, but good enough for something I’m working on. I mean look what it’s running right now:
HyperV
That’s not too shabby is it?
Oh while I remember, the unit also supports Intel vPro for remote management – this allows for remote control, including BIOS level KVM access. How cool is that? Very useful for when trying to manage the unit remotely, and far more like grown up server solutions. It’s pretty impressive.
Costs
Now on to the thorny issue of costs. These are not particularly cheap units. Let’s look at this build – although I did have the SSD kicking about already.
Lab Build
NOTE: For my US readers, the above costs include our sales tax (VAT) at 20%.
So the cost isn’t insignificant, but for the capability I think it’s a bargain?!
Support
Now, this is worth being aware of. I’ve seen a few horror stories about dealing direct with Minisforum, and if it was anything like my experience dealing with Geekom I’d be very nervous about buying direct. Buy from Amazon however and any problems you can make their problem, and their returns process is usually excellent.
What’s Coming
It’s also worth being aware of the Minisforum MS-A2 that’s due for release circa April 2025. This has an AMND Ryzen 9 9 9955HX Core/32 Thread processor in it which will be even faster than the i9-13900H, so perhaps it may be worth waiting for that?
Then again if you’re always waiting for what’s around the corner you’d always be waiting for what’s around the corner.
Summary
I’m very happy with this Minisforum unit. The connectivity is bonkers, its power consumption reasonable, and its performance is certainly good enough for my purposes as a virtualisation lab host. I’d go as far to say as I’d be happy to use it as my every day machine should needs be, it’s that capable. It’s a little pricey – certainly compared to the Geekom, but then so far it hasn’t decided to become a paperweight – and there’s some concern about direct support from Minisforum, but so far, everything has been rosey and I suspect I’ll end up buying another one.
A friend of mine asked me to check over a spec of a Network Attached Storage (NAS) device he was buying for home. Mostly for media, backups, and general storage, and a light bit of work use. The spec he sent me bothered me a bit, and I gave it some thought before replying. The spec he’d chosen was:
-> 4 x 24TB Hard Drives
-> 32GB RAM
-> 10Gbe Upgrade
The main thing that bothered me was the upgrade to 10Gbe when only using 4 drives, shortly followed by the thought of 24TB drives simply being too big – my preference would be for more, smaller, drivers. Let’s say 8 x 12TB in this instance, to give the same available storage.
Let’s talk through this logic – I’d be interested in your views.
Recovery Time
This is probably my key observation when choosing larger drives – recovery times become uncomfortable. Let’s imagine you have a four drive NAS consisting of those 4 x 24TB drives, and one of them fails. You order another one, and pop in the new drive – all good, right? No data lost.
Well, consider how long it is going to take your NAS to rebuild that array back to the point that you have some high availability again. Assuming a fast spinning drive (I use these) they’ll average perhaps 125-150MB/s during a RAID rebuild. That means it’s going to take 2-3 days for your RAID to rebuild. During that time your data is exposed, and the performance of your NAS will be severely impacted.
Assuming smaller drives – say 12TB – that recovery will take just over a day. Still a significant amount of time.
Performance
Back in the day when I was designing large Microsoft Exchange on-premises stuff, we always went for more drives. This was for the performance requirements. You could often end up with a lot more physical space than you needed, in order to achieve the performance throughput you required. Let’s consider the 4 x 24TB and a 10Gbe upgrade – you’re not going to see all of the benefit of the 10Gbe upgrade. One of the fastest spinning drives I have is an Enterprise Toshiba 16TB drive – here is its performance in a Thunderbolt chassis:
Screenshot
Even with four of those in your NAS, you’re not going to see more than 600MB/s across them (assuming one is for parity/high availability), despite having approximately 800MB/s of raw performance. Sure, it’s still loads better than your 110MB/s you’d get over 1Gbe.
If however you used 8 x 12TB drives, assuming they offered similar 200MB/s performance per drive, you’d get approximately 1600MB/s (raw). Even dropping a single drive for parity gives you 1400MB/s, which means you would get the benefit of the 10Gbe upgrade. You should get your 1-1.1Gb/s performance.
High Availability
This ties back to the recovery time I mentioned earlier—more drives allow for more robust availability models. Take RAID 5, for example, or Synology’s equivalent, SHR. In a four-drive setup, one drive is dedicated to redundancy, meaning you can lose a single drive without losing data.
With an eight-drive setup, you could opt for RAID 6, which provides even greater protection. In this model, two drives are used for parity, allowing you to sustain up to two drive failures before data loss becomes a risk. Think of it this way: if a drive fails, you can replace it while still maintaining redundancy during the rebuild process. However, you wouldn’t want to wait for a second failure!
Anecdotally (though anecdotes ≠ data), drives purchased together often come from the same batch, and rebuilds place significant stress on remaining drives. I’ll let you draw your own conclusions on that…
Space Availability
Next, let’s look at usable space – best demonstrated below.
RAID & Space AnalysisScreenshot
A 4 drive 24TB RAID 5 array gives you 72TB of available space, with 1 drive used for parity.
If you went with 8 x 12TB you’d better performance, and 84TB of usable space with a single drive for parity. I wouldn’t though, I would go with 8 x 12TB drives, in RAID 6 – in this model, you get the performance, the same usable space (72TB) as the 4 drive RAID 5, as well as two drives used for party.
Seems obvious to me!
Downsides of more drives?
It’s not all sunshine of course, there are some things to consider. Firstly – power consumption – 8 x 12TB drives will use about 1KwH of power a day (assuming about 5w/drive). 4 x 24TB will use half of that – a difference of 183KwH over a year. In real money – well, GBP – that’s about 50GBP in extra power used by the 8 drives over the 4, over the 4. Not so terrible when you look at it like that?
Cost of power 8 drives compared to 4.
The other thing of course is that 8 bay NAS chassis cost more. A Synology DS923+ for example is about 500GBP, whereas an 8-bay Synology like the DS1821+ is nearer GBP950.
Let’s work out the costs, ignoring the RAM/10Gbe upgrade.
Cost ComparisonScreenshot
(For my American friends, in the UK our prices include VAT/Sales Tax – currently 20%).
Closer than you’d think isn’t it? The only downsides from what I can see are the increases in operational power costs, with the upsides being performance and data protection.
Summary
Personally, I’d go for more drives simply from the recovery time and data protection perspective – the increased performance is an added bonus.
I’ve recently been working with a client migrating to Microsoft Teams, including the deployment of physical phones.
Interestingly, while their organisation has a strong focus on data compliance, little attention had been given to the compliance risks of their existing traditional handset-based phone system. With the Teams rollout, we opened up important conversations around compliance and security.
A full breakdown of Teams compliance requirements is beyond the scope of this short post, but I’ll share some of the basic templates and considerations we use when deploying physical phones—especially in environments subject to standards like ISO 27001 and UK GDPR.
If you’re interested in specific mapping to those standards, I’ve compiled a reference spreadsheet:
Note: This is based on my own internal notes and not exhaustive— please validate against your own requirements.
Anyway, let’s look at phones. Typically, you have two types of phones in use in your estate:
Common Area or Shared Phones. These devices are typically used in shared spaces such as reception, lobbies, hallways etc. Meeting room phones are often included in the ‘common area’ name as well, from a structural perspective.
Personal Phones. These are phones dedicated to a single user – sometimes, they will be used in shared-desk spaces so that different users can logon at different times (traditionally referred to as ‘extension mobility’).
Each of these usage models requires different considerations when it comes to data compliance, so let’s look at them both.
Common Area/Shared Phones
Licensing. The appropriate licenses should be used instead of ‘full’ user accounts. These should be secured appropriately, and their credentials stored securely.
User Sign-In to Shared Devices. This should be prevented given that users typically have less restrictive policies. Sign-in can be further restricted using conditional-access type policies to locations (for example) to further ensure the security health of the devices.
Voicemail. Typically, voice-mail is disabled for these phone devices. Care should be taken enabling voicemail as it would allow any user to access those messages.
Call History. Most phones will, by default, allow you to view the call history of the phones. This may not be a wanted behaviour – many phone devices will allow this functionality to be disabled.
Calendar Access. Many modern phones will allow viewing of calendars associated with the room or phone. This may not be wanted behaviour – in a shared meeting room for example, you may not wish people to be able to browse to see who else has been using the meeting room. Many phones allow the disabling of this functionality.
Directory Search. You may not wish to allow the searching of the corporate directory. You can, in many instances, assign fast dials to common numbers such as reception or media-room assistance for example.
Class of Service. You may wish to restrict where certain phones can call. All phones should be able to make emergency services calls, however all calling ranges are optional: Internal, national, international, premium rate etc. Some consideration to the dial spaces permissible is required. Class of Service is effectively ‘who can call who’. You will also want to restrict call-forwarding or simultaneous ringing capabilities.
Call Detail Records (I.e., who calls who, and how) and if required, external Voice Recording. These practices should be enforced so that the full usage of the phones is qualified. Some industries/sectors require full voice-recording of external calls for example, whereas in several environments CDR is often enough.
The above elements can be implemented with most phones such as the Poly devices common within the Microsoft Teams world.
From a general approach, you’re aiming to follow the ISO27001/UK GDPR data-minimization principles.
Personal Phones
User personal devices tend to be used in a different way to common area and will often be placed in dedicated offices or on hot-desk type environments. There are, however, still best-practices to consider when securing the devices. The items you should consider include:
Conditional Access. This can be used to restrict sign in by location, device compliance, enforce MFA etc.
First Time Sign-In should enforce MFA.
Shared Sign-Ins on user devices should be disabled.
Auto–Lock and PIN. When a user first sets up their phone, they must set a PIN. The phone should also be configured to auto-lock after a period of non-use – this is typically circa 5 minutes for user phones.
Call Detail Records (I.e., who calls who, and how) and if required, external Voice Recording. These practices should be enforced so that the full usage of the phones is qualified. Some industries/sectors require full voice-recording of external calls for example, whereas in several environments CDR is often enough.
Contact & Calendar Access Considerations. It is usual to allow access to the user’s contacts and calendar information on personal phones, for both calling and access to meetings etc. This of course offers compliance risks around data access due to unauthorised access etc. This is the key driver around the enabling of the auto-lock/PIN enablement, and conditional access.
Class of Service. It is becoming less common to restrict the class of service of user based phones, however this may still be a consideration. All phones should be able to make emergency services calls, however all calling ranges are optional: Internal, national, international, premium rate etc. Some consideration to the dial spaces permissible is required. Class of Service is effectively ‘who can call who’. You will also want to restrict call-forwarding or simultaneous ringing capabilities.
Summary
The above is just a brief summary of the items to consider when deploying physical phones in a Unified Communications environment.
Toward the end of 2022 I was finishing up a reasonably sized global project in Unified Comms – one that I’d been involved in (or around) since its inception. Looking back, I think earlier in 2022 I was feeling fairly burnt out by this project. I cover most timezones as I’m fortunate enough to be one of those people who doesn’t sleep that much, so I’d happily pick up the things I knew others would find difficult to accommodate. There was also a lot of detailed – but very cool – stuff that had to be done. Most tasks required input from several areas, all with shared but different priorities. Nothing new there – that’s just how mid to large businesses are, and knowing how to negotiate them is part of the experience.
You know that phase you go through – the stage where the cool stuff is done (The why, how, what with, what’s our dangers/risks, how do we mitigate etc.) …you’re now just focusing on finishing up the project control items, and those less interesting but yet part of your deliverable elements. They’re important – I’m not suggesting anything else – but it’s the clear up after a job well done. It doesn’t feel quite as satisfying.
I’ve experienced this throughout my career, so have personal mechanisms to deal with it and keep things interesting. I do so by considering what I’m doing today and then thinking about how I could do it better. Also, I try and think how can I make this reusable. In this particular project I’ve ended up writing a few tools that I’ll certainly be using elsewhere. I’ve a decent library of reusable stuff stretching all the way back to …Netware. Wow. Automated Netware 4.11 Server Deployment anyone? Even has login scripts. That’s not really the point of this blog though.
I’d decided that when this project finished toward the end of the 2022 I was going to give myself a few months off. I don’t mean a few months off doing nothing, I just mean stepping back from the usual level of effort and intensity to give myself some time to regroup, and to get ready for The Next Cool Thing. There’s always more cool things.
It’s the bit that happens after the project completion, when you’ve finished those line items. It’s the post-project ‘just one more thing’. I’ve realised how immensely rewarding it can be. I’ve always been aware of this, but never really given it a lot of thought – until now.
Those ‘just one more thing’ items tend to be advice and sometimes interesting left field bits of work. How would you deal with this? We have this weird issue any ideas? Hey, have you some pointers how we can get started with ….? Could you give us a hand with…?
I think I’ve worked out why I like that part of a project so much; it’s because it makes you feel valued. Now, I’m sure many of you have already come to this conclusion however for people like me it’s a little bit of a surprise. I’ve never really been one to need positive affirmations or feedback at work – I’m freelance after all, and you’re judged by your work and I suppose by how much work you have. I prefer the delegation element of situational leadership rather than the supporting (as a team-worker) – tell me what you need, I’ll get it done. Negative stuff of course feedback is welcome – it helps us work better, and it gets us both better results. I may even agree with you. If I’m honest about such things however, I am the worst critic of my own work. The struggle between ‘perfect but not done’ or ‘done but not perfect’ is real – and perhaps a subject for another day. I’ve re-written that sentence several times as it sounds like a humble-brag – it’s genuinely not. I like things to be accurate. Anyone who has seen my dial-plans will understand this. There’s ‘works’ and there’s ‘right’. Sometimes ‘works’ is enough.
Paradoxically I can find the 3 months or so post the closure of a larger project thoroughly enjoyable and rewarding. It’s the ‘just one more thing’.
That one more thing is ‘we value your input’.
I’ve been involved with companies that are so invested in their feedback cycle and reviews that they don’t often see that they could do all that stuff – and get better results – by working on their day to day, rather than formal reviews. That isn’t my area however, so I’ll not offer much of an opinion there. I’m sure those formal reviews have their place, I just think those same companies are missing a trick by thinking they’re all there is.
Anyway, I’m getting to the end of January and I’m now looking forward to The Next Cool Thing. My couple of months off didn’t really materialise although I did get a decent amount of down-time to regroup. I even got half-way through sorting out the hallway cupboard.
I recently made the mistake of having the opportunity to play with some enterprise storage – lots of glorious NVMe etc. – and it got me eyeing my main storage NAS with disdain. WHY. I was happy with it before I started playing with the enterprise stuff….Anyway, I’ve got my hands on a Synology DS923+ unit with the following specifications:
-> Synology DS923+
-> 32GB RAM (Non-Synology)
-> 4 x 16TB Toshiba ENT Drives
-> 2 x Crucial 2TB NVMe SSD (Configured as a storage pool – more on that in a minute)
-> 10Gbe NIC
I’ve had some time with the unit and have now been able to test its performance, and assess its power usage. I’ve put it all together in a spreadsheet (because of course I have), and you can see that spreadsheet at the following link, including costs (and links to suppliers), performance, and power consumption.
There are no great surprises in there – the unit nearly maxes out the 10Gbe connection on reads, and is about 80% of the way there on writes – that’s on both the NVMe Storage Pool and the spinning drives. On my previous QNAP unit over 10Gbe I was getting in the region of 3-400MB/s mainly due to the PCIe interface on the QNAP being a slower type than that on the Synology. So the performance is a fab upgrade for my usage scenarios. Even if you don’t have a 10Gbe connection, the units will easily max out the cheaper 2.5Gbe interfaces. It’s a little disappointing I think that even in today’s market Synology are providing the units as default with 2 x 1Gbe connections. You’d imagine 2.5Gbe would be becoming the norm now? The added E10G22-T1-Mini RJ45 10Gbe E (catchy name) adapter is another 150-200GBP but it does perform, and it supports 2.5Gbe & 10Gbe over RJ45. Note it’s a proprietary slot too so you can’t just pick up any 10Gbe Interface.
I also tested the encrypted shares – as you can see, write performance is significantly impacted with an encrypted folder. Roughly there’s a 45-50% performance penalty when writing to encrypted shares. That doesn’t bother me too much, however bear that in mind if you want to encrypt everything.
Another surprise was the support for storage pools on NVMe. There is however a huge catch – it’s only properly supported on Synology provided NVMe drives. I don’t have any of those, and they’re expensive and small, so wasn’t getting any either! Fortunately, there’s a way of configuring the storage pool with non-Synology NVMe via SSH. It’s not that hard, and I’ll write up shortly how to do it. The only downside I have seen so far is that if you lose a SSD to failure you have to reconfigure the whole RAID again via the command line. That’s one of the reasons I’m using RAID 0 (with no protection) – I figure if I’m going to do it anyway in a failure scenario then I’ll just recreate. I protect the contents by using snapshot replication to the spinning drives anyway, and there’s nothing time-critical on those units, so it’s all good. One thing to be aware of though!
Similar with the RAM – I’ve used third-party Kingston RAM as it’s cheaper than Synology (and I could get hold of some). It works just fine, however you do get a warning that you’re using non-Synology RAM. A little annoying but hardly earth shattering. It’s interesting that they’re now going with the ‘supported’ devices approach – the drives I have aren’t on their list either, but of course work just fine.
So far I’m impressed with the unit. It’s quiet, fast, and the power usage is acceptable. Spin down on the Toshiba units works as expected – I’ve moved most apps that would be ‘live’ to the SSD to reduce dependency on the spinners unless I’m using them.
How much do they cost to run? Well, I’ve worked that out for you too. Have a look in the spreadsheet above on the ‘Operational Costs’ sheet. Snapshot below – click on it for a bigger version.
DS923+ Running Costs
Based on my usage profile and electricity tariff the unit costs about GBP14/month to run, or GBP168 a year. Considering everything I get the unit to do – it’s got a ton of apps on including a couple of virtual machines, my media storage, cloud sync and my backups – that’s pretty reasonable. You can adjust the percentage spun down, idle and under load to get figures nearer what you’d expect for a consumer unit – from what I’ve read, consumer numbers are nearer 40% spin down, 40% idle, and 20% load. Apparently – that sounds low to me? If your usage is that low why would you have one?!
Anyway, any issues? Well, transcoding Plex is problematic on these due to the lack of hardware encoding and Quicksync. Fortunately I don’t do that – my Plex is on an older Mac mini that does several other things and that handles Plex just fine. If you have a dependency on Plex, perhaps consider a unit more suitable.
So far however, this unit is an absolute flyer. Fast, and that DSM OS is a joy to use. It is annoying you have to pay extra for the faster ports (10Gbe), the lack of support for storage pools unless you’re using Synology SSD, and the annoying message about the drives not being on the supported list….The ports they definitely should address – 1Gbe in today’s market just doesn’t cut it in my opinion.
There’s a question I’ve come to dread: ‘Why do you use a Mac?’. It’s always centred on the fact that probably 90% plus of my work is on Windows + networking infrastructure. Very few bits of infrastructure are MacOS based.
Why do I avoid it? Well, mostly because the person asking it usually has a predetermined position and they’re itching to give it to you. It’s rarely interesting.
Objectively though – why? Well, my opinion is changing, and my choices are evolving. That is interesting. First, let’s cover why it wasn’t interesting before.
Primarily it’s because there was nothing you can do on Windows that I couldn’t typically do on my Mac. WAIT you say – Visio? Microsoft PROJECT? OMG OMG. Well. Virtualised I can run both of those things, as well as much other Windows software. It isn’t a key decision point for me.
What this means is that my reason for using a Mac was subjective. I just liked the operating environment more. Did it make it more productive….? Arguable as to whether it does or not. I just preferred the look/feel and how the apps worked.
What about hardware? Well, I’m sure there were many better hardware platforms out there – Dell XPS came pretty close for me for example. Again though it’s subjective. I get to use several Windows machines and they’re very capable, and they could have done the day Job. I just subjectively preferred the MacOS environemnt.
One of the absolute key strengths I really embraced with my Mac was the ability to virtualise so much stuff, so quickly. I would have separate environments on a drive and I could quickly power up Skype or Exchange or many standard environments. On my laptop. It was hugely capable. Was.
Wait you may think – what about Hyper-V? Or VMWare Workstation? You can do that on Windows. You can, and I’d refer you back to my previous point about subjective preference over actual real objective points. I just preferred it in MacOS. Hyper-V was particularly irritating – it didn’t scale as well on my local machines and I’d often run in to odd issues usually to do with networking. I’d rarely run in to stuff like that on my Mac.
I ended up using my Mac more like I would an appliance – I just didn’t really get involved in tweaking it, or fighting to get bits working. That sometimes wasn’t my experience on my Windows equivalents. It was a preference choice though – not one that would fundamentally affect my ability to do stuff.
Now though – well, it’s all change. The Apple move to ARM has removed a big key point of my preference – virtualisation. I’m finding that I’m running stuff on my home systems and connecting to it remotely – which is fine of course, but it’s an extra step and requires planning. I miss being able to quickly just fire up an environment.
I was today trying to think about then why am I still on a Mac? My main laptop for example is a 10 core 64GB/2TB 16″ ARM MacBook Pro. It absolutely flies. I’ve not got close to using that RAM simply because of the virtualisation restrictions. I don’t think I’ve used such a capable machine with simply ridiculous battery life. There’s an issue though – it no longer really does enough. In reality the real reason I’m still using my Mac laptop rather than switching back to say an XPS, is really Apple Photos, Final Cut Pro and….. familiarty… That’s it.
Microsoft is now of course (apparently – again) embracing ARM so perhaps things will change in a few years, however for now my MacBook Pro is becoming a media machine, and I suspect my day job will now be XPS driven.
Weird how things come around isn’t it? It’s interesting to see the fervent arguments each way – I’m not one of those arguers – usually. I just have – had – a preference. The problem is my preference is now making my day job more difficult, in that I have to plan for other methods and other ways of getting stuff done.
That isn’t cool, and no amount of looks nice or familiarity can overcome that.
I got asked something the other day, that while a simple question, took me some time to ponder and fully answer. Why do I produce so much documentation for stuff?
First, some context. I spend most of my time designing, deploying and even sometimes – operating – mid-market IT systems. Mostly Office365 and Unified Communications areas, as I find them the most interesting. By mid-market I tend to focus on the up to 10k seats area. Mainly as I find that’s a size that’s manageable and you spend most of your time actually doing the interesting technical stuff rather than lots of incremental minor things due to risk management. I have worked on big stuff – some of it properly big (400K+ users) – and while that has it’s own attraction and interest, the mid-market I find more interesting.
Over the years I’ve developed a solid strategy for dealing with complex systems, and managing change. I don’t mean the formal change management processes – they of course have their place – I mean how *I* manage what I’m doing, how I establish the outcomes I want, and how I get there. This is the bit that tends to produce a lot of documentation.
Let’s imagine we have a requirement to implement a reasonable amount of change for a system on a remote site. My documentation process will follow this methodology:
The why and the what. Here it’s a brief to ensure that everyone understands what’s being asked for, why it’s being done, and what the expected outcomes are. This has been vital in catching some misconceptions/differences between people.
The how. This details how I’m going to achieve what is being asked. All touch points, impacts, expected outcomes etc. Also includes how we roll back. This is often included in the change management process.
The doing. What happened when we implemented? This is great for lessons learned and for future similar projects.
The final state. Sometimes referred to ‘as is’ documentation.
This feels like a lot doesn’t it? It really isn’t in the real world. I’ve been following this process for so long that it’s second nature to me. It has some very specific pay offs too. I have a complete audit trail of what was asked for, what was agreed, and what happened when we did The Thing. That’s come in very useful in the past.
Do you know what’s really important about the process though, that I think is often missed? This process helps me vastly reduce risk in increasingly highly complex systems. This has been a developing area in the world of technology (Complexity Theory), with a key part of it being Systems Theory. Understanding how one system is dependant on another, and affects several others – it’s challenging.
This documentary process then – for me – is a lot more than just the documentation. It’s a process of fully understanding a requirement, establishing how we get there, and then helping the people running the systems also have a handle on it after we’re done. The process is arguably just as important – if not more so – than the documentation itself.
This is the bit I find interesting, and it took me some time to explain.
The pay offs from this process are several. From a freelancer perspective, this makes me reliable. Typically I achieve what I am being asked to achieve, and usually in the manner we’ve planned and agreed. Another key pay off, is that it makes me look at the technology I deal with in a lot more detail than is perhaps necessary for specific items. That always aids understanding, and that is never a bad thing in technology.
Anyway, a simple question, not such a simple answer. Writing good documentation is also challenging in the technical space as you have a wide range of readership to consider, but that’s a subject perhaps for another day.
I’ve been thinking about approaches to technical issues recently – large issues rather than small ‘my laptop is broken’ type ones, and it’s got me thinking about people’s approaches to complex problems. There seems to be two types (I’m sure there’s many more, but I’m going with two for this).
1. Keen to work a way to a solution.
2. Nope. Too hard. Risk. Nope.
The former one – people like that I enjoy working with. Working out the correct way to address problems and actually getting things done is a skill in itself. One I’ve spent a lot of focus on personally, as I think it’s one of those things that separates techs. It’s not just about the technology, it’s about getting a business requirement done. Knowing the correct balance between perfect/not done, and done but not perfect…..well, it’s a skill.
What about the second type? Well, I find these groups incredibly difficult to work with – but it always ends up the same way. Let’s consider what I’m talking about with an example:
We have three blocks, numbered 1, 2 and 3. The requirement is at least ONE of those blocks has to be in that box over there. Let’s look at how this goes:
-> OK – let’s put block 1 in the box!
—> NOPE! I need that, I like its colour.
-> OK – 2?
—> NOPE! Thursday.
-> 3?
—> We couldn’t POSSIBLY do that.
So we have a defined requirement, and yet that requirement you have made impossible. What tends to happen is this goes around and around for a bit until somebody gets thrown off the roundabout in frustration. Typically, it then gets escalated to somebody who has some say in stuff.
BOSS: Right, we’re putting block 1 in the box. There are some issues to fix and some pain, but it’s less pain than not having the stuff in the box.
Everyone: OK, let’s do that.
Tech – Facepalm
The thing is with this approach is it damages relationships as it’s so exhausting. It’s why I much prefer working with your Type 1s. They work through things, they get stuff done. Type 2s? They just end up being told they’re wrong. Pretty much whatever they do, they’re going to be wrong. How people work like that is beyond me, it must be utterly ruinous.
I’ve seen of a couple of instances of phone number hijacking again recently – typically WhatsApp – but you can also see it with services like Skype (Consumer) and the like. What am I talking about?
Well, let’s consider Skype (Consumer). When I make a call from my Skype client it actually appears on the remote end as to be from my mobile. When I set this up, I have to enter my mobile no. I then get a code on my mobile which I have to enter to show that I own that number. When I do, I can then make calls with an outgoing number of my mobile.
Spotted the hack yet? Get that code, and you can make phone calls appearing from my mobile.
Imagine you’re selling something and the buyer is reasonably wary. Conversation goes like this:
Buyer: I want to make sure you are who you say you are. I’m going to text you a code and if you can tell me what code is we can continue.
Innocent: Sure!
Innocent: Gets code, sends it to buyer.
*BOOM* buyer now can make phone calls appearing to be from your mobile.
It’s a similar hack with WhatsApp. Just replace being able to make calls to owning your WhatsApp account.
Be very wary of telling people these codes. Make sure you trust the service asking for a start. Here’s a real example:
A friend was after some general advice on storage/availability and backups for home stuff so rather than just reply specifically to him I thought I’d put my general thoughts together on non-professional data protection. The stuff in my day job is generally focused on 99.999% (5 nines) availability so the backup and availability strategy is usually beyond what you’d want to do for home.
The questions are usually around should I implement RAID? How do I backup? What should I backup? Where to…? To answer these questions you really need to look at fundamental aspects of your data protection strategy, and they are:
Recovery Time Objective (RTO). How long would it take to restore you data, and how much of a pain would it be not having that data for that recovery time? There’s also the question of effort to restore data, but that’s a softer consideration – if you’re busy, this can be a significant added burden to any potential restoration process – arguably this massively increases the pain of not having your data for that recovery time.
Recovery Point Objective (RPO). How much data can you accommodate losing between backups? For static stuff that doesn’t change often for example you may only backup once a week or so.
From a general data protection point of view, the 3-2-1 backup strategy is the one most talked about. What this means is:
You have three copies of your data at any one time.
Two of them are on physical different devices.
One of them is away from the main premises you use – I.e. Off-site storage.
Considering the above is how I would come to a backup & data protection strategy. A couple of quick points:
RAID is not a backup. Using RAID is a strategy that affects your RTO and RPO. Lose a RAID array and you’re in trouble aren’t you? Having RAID does not affect the 3-2-1 strategy, it is an availability technology, nothing more. It vastly reduces your RTO & RPO. Lose the array with no backup then your RT & RP become infinite….
Automation is key to a good-backup strategy. If you have to do something manually, the one time you think you’ll be fine is the one time you’ll be crying in to your soup.
You may want to consider have a second off-site copy. Why? Well, consider ransomware protection. If your backup solutions are automated to the cloud for example, there is a (albeit remote) possibility that your off-site backups also get encrypted with Ransomware. To see what I mean in a bit more detail, have a look at my video here. RansomWare – Protect Your Stuff!
So, in reality, what would a backup solution look like?
One device with live data.
One device with a copy of your live data.
One off-site copy.
So where does the RTO and RPO come in to it? Well, it comes down to how quickly you need your data backup, and how much you can lose. Traditionally, most systems would backup every evening (often using a Grandfather, Father, Son scheme) and this will probably be enough for most home systems. What’s the worse case here?
Let’s say you backup at 23:00 overnight. One lovely Friday at 22:59 your main storage blows up/gets flooded with milk (don’t ask). Well, you’ll have lost all of your data from 23:00 the previous night to 22:59 on the day of the milk issue. That’s your Recovery Point.
Next, you need to consider how long it takes to restore your data – that’s your recovery time.
Where does RAID come in to this? Like I say, this is an availability consideration, not a backup. If you:
Have a good backup system that’s automated and backs up to another device every night.
Would be OK with losing 24 hours of data.
Would be OK with the time it takes to get access to your data….
…. Then what will you gain from RAID? Not a lot really. However consider that you may want everything to just carry on working even in the event of a drive failure – that scenario RAID is a great help. You can take a drive failure and carry on as you are and replace the drive. Note you’re still backing up at this point.
When considering your backups from device one to device two, do you just want them to be exact replicas? There’s danger in this. Imagine corrupting some stuff and not realising. You’ll end up with the corruption duplicated on to the other devices, and your off-site backup. This is where having the Grandfather, Father, Son mode of historical backups come from – this takes more automation to achieve, and you may of course consider it well beyond the requirements for home.
So…do I need RAID? It’s not as simple a question to answer as may first appear is it? Personally I think that anything keeps your data available, and avoids me having to resort to backup systems is absolutely worth it. You really want your backup system to be a ‘last resort’ type thing, so in reality I always tend to RAID my stuff. This is where NAS devices come in by the way – not just for their RAID systems but also for their in-built backup solutions. Let’s take how I used to use my Synology stuff (I’ve upgraded now for 10Gbe and I have a ridiculous internet connection so rely on Azure stuff a lot more now):
Primary Device
Synology 918 with 4 x 12TB drives giving about 36TB available.
Secondary
Synology 416 (I think) with 4 x 12TB drives giving about 36TB available.
Overnight the primary device is backed up to the secondary, and it has a 12 month retention – I.e I can go back up to pretty much any point in the previous 12 months. In addition to that, live data that changed often was snapshotted from the primary to the secondary about 4 times an hour.
Finally, the secondary Synology also sync’d those backups to an off-site hosted solution.
Probably way over the top however the principle can be easily replicated without all that expensive gear.
Primary Device
2 x 6TB drives, mirrored, so 6TB available. If you get a drive failure your data is still available, and you can replace the drive.
Your primary device also replicates your data to cloud storage.
Secondary Device
A 6Tb or larger hard disk with point in time incremental backups of the primary.
Far smaller, but with the same principle, and you get the same range of dates for your recovery point (I.e. You can restore back to a point in time.
Told you the question isn’t as simple as you’d imagine.
A very quick one for you today. You may run in to an issue where if you renew your public certificates on your Skype for Business Access Edge Server you may not be able to make calls when connected via your Edge Server (I.e. External).
You can call out, the phone will ring, and when the user answers you’ll see ‘Connecting’ and then the call drops.
If you get this, the simple way to fix this is just to restart the Mediation Server Service on the front-ends associated with the pool.
Why? Well, I think the reason is down to the A/V authentication service – have a look here:
The A/V Authentication service is responsible for issuing tokens that are used by clients and other A/V consumers. The tokens are generated from attributes on the certificate, and when the certificate expires, loss of connection and requirement to rejoin with a new token generated by the new certificate will result.
There is also a ‘proper’ way to address this, and this is also outlined in the article:
A new feature in Skype for Business Server will alleviate this problem – the ability to stage a new certificate in advance of the old one expiring and allowing both certificates to continue to function for a period of time.
So you can use this new feature – or you can restart the Mediation Server service and from what I can tell it achieves the same thing. You can also just wait – it should start working after the tokens timeout in 8ish hours.
If you’re in the tech industry you may find yourself needing to use a specific version of Microsoft Office. Of course if you just install it from the Portal, or use the Office Deployment Tool with its enclosed configurations you’ll end up with the current version.
Fortunately, there is a fairly easy way to install a specific version. You do need to use the Office Deployment Tool – see here for details on that.
Here’s a quick and vaguely interesting one for you. I was recently trying to bulk update some delegates in Skype for Business Server using SefaUtil. As part of that process, I had to remove existing delegates. I was using a command like this:
Now, whatever I did, could I get Pamela to go? No, no I couldn’t. After scratching my head a few times I tried to find Pamela in Skype for Business – and bingo, I spotted that Pamela no longer existed. She’d been terminated. There’s an easy way to fix this, fortunately. To do it you will need a test user in Skype for Business – so either use an existing test user (you have one, right?), or setup a new AD Account and use that.
What you need to do is set that test user’s SIP address to the same as what the person you’re trying to remove was – so in this instance, Pamela.Anderson@KnightIndustries.com. Set that, and wait a while for everything to update, and then re-run the sefautil command as above. You’ll find Pamela has now been removed.
You can then go through and remove the Pamela Anderson SIP Address from wherever you put it.
Simple way to fix something I thought I’d have to be diving in to SQL to resolve. Sometimes, lateral thinking things through to a simple conclusion is far easier.
Virtualisation on MacOS is astonishingly capable. Before I get text-abuse, I’m fully aware that you can virtualise on Windows too – HyperV, VMWare Workstation etc. Can you run Final Cut Pro though…? Legally…? Nope. Anyway, I digress.
I tend to use Parallels Desktop for my client-side virtualisation, and VMWare Fusion for my server stuff – but what should you use? Assuming we’re just looking at client-side virtualisation, then this video may help.
When I did my mini-rant I was focusing on the product platform and services, which in some respects led me to reflect on the pricing of some of their stuff. I wasn’t considering Apple’s company performance. It would appear though that it’s not just I that’s becoming a bit disillusioned.
The thing is, that disillusionment, some people think it’s obvious and has been around for a long time. It may have been – but it’s really hard to ascertain from the noise of Apple-haters isn’t it? Just go read some of the uneducated bleurgh comments on those two articles for example.
I’m a technology fan, and I’m fortunate enough that for the most part I get to be able to choose the technology products and vendors that I like to use. Now, of course price is part of that, however as most of it is company money the real ‘cost’ of the product is less important to me than the quality of platform I’m actually using.
For a long, long time – circa 2010 from the look of my purchase history – my compute platform of choice has been MacOS stuff. I use it primarily as like the stability of the platform, it’s ability to virtualise pretty much anything I throw at it, and the quality of the hardware. Primarily of course it’s how well all these things work together that ‘sells’ the platform to me. Add in some great service I’ve had over the years and, well, the technology fan in me finds it hard to find a preferable platform. As a quick side-note – I find mobile phones utterly dull and have very little interest in them. I have an iPhone simply for the reason that it fits well with everything else I use.
In terms of product life-cycle, my ‘power’ stuff that I use in my day to day job gets replaced every 2-3 years. My mobile one – I.e. Laptops/phones – usually with each new generation. The main driver behind that generational update on my laptops by the way is a financial one – the resale value of Apple laptops is awesome, and it generally means I getter resale value re-selling something that’s still under warranty and relatively current. It makes the vector upgrade price a lot smaller than you’d imagine.
For the first time in a long, long time I’m seriously looking at other platforms and products. I’ve a couple of iMac Pro units which, bar the support issues, have been probably the best compute platforms I’ve ever owned. They’ve still got a good couple of years in them to be fair, however given the current Apple range and it’s overall offering, I can’t see me refreshing them.
I’ve a Mac Pro by the way. Overheats if it gets a bit stressed, and shuts down. Can’t innovate, my ass. Another long broken link, sorry!
Things do get a bit interesting at this point by the way. Looking at other platforms. I kept hearing about how great, fast and all round super the Microsoft Surface Book 2 was. So I bought one. It’s nice, but from a performance perspective it’s a complete toy next to any of my MacBook Pro units. Don’t believe me? Just look at the benchmarks, or at some of the comedy performance comparisons. Another long broken link, sorry!
I’m sure there are some excellent platforms out there, I’m just struggling to find them. A Dell XPS perhaps…? Looks pretty good on paper doesn’t it? Perhaps I’ll check one of them out.
I suspect Apple’s current rough patch – and I’m feeling that rough patch, to be clear – makes us forget exactly how good their kit is. Even in this rough-patch I’m struggling to find a decent comparison piece of kit. I will say though their current range and pricing has got me looking far more in earnest than I did previously anyway.
How would Apple get out of this pit? I’ve no idea financially, as I’ve said my focus is on product and platform really. How would they get me believing again? Well, stop taking the piss on stuff like the i9 MacBook Pro issue for example. Making it possible for me to get the support on my iMac Pro units that I thought was available. Not doing cynical upgrade cycles by only enabling functionality in software that previous hardware was more than capable of supporting.
Get back to thinking product and experience is their number 1 priority. Everything else will just follow with that. Right now it obviously isn’t their number 1, it’s money and share-price.
I’ve noticed recently that whether online or in real stores like PCWorld/Currys, I’m being asked a lot more whether my purchase is for business use or not.
“Is this a business purchase, Sir?”.
They laughably refer to ‘giving you a VAT receipt’ which of course you should be entitled to anyway.
The cynic in me thinks there is only one possible reason this is happening more and more – to get out of consumer protection laws – distance selling rights for example. Here’s the thing – if you say it’s a business purchase very few of these rights then apply. How crafty is that?
Anyway, here’s the point – if you ever get asked if it’s a business purchase always say no. You’ll retain far better consumer rights, and lose nothing in the process.
The arms race between Parallels Desktop and VMWare Fusion has continued with the recent release of Parallels Desktop 14.0 and even more recently VMWare Fusion 11.0. I use both products – typically VMWare for my server stuff, and Parallels for desktop type setup (Think Office/Outlook/Windows 10).
I’ve upgraded my Fusion to version 11 – and oh am I regretting it. There’s tons of problems with it:
Wow it’s slow compared to Parallels
I can’t run ANY virtual machines if I’ve previously run Parallels or VirtualBox
The network performance is all over the place.
Did I mention how slow it was? Startup/shutdown & Snapshotting.
I’ve tried this on multiple machines, and all with similar results. The most irritating one is that if I try and use VMWare Fusion after having either Parallels or VirtualBox running, I get an error saying ‘Too many virtual machines running’. The only way I seem to get around it is by rebooting and not using Parallels or VirtualBox at all. It’s infuriating.
I’m sure VMWare will iron out the issues, but for now it’s going in the bin and I’m going to ask for my money back.
Video below shows the general performance and issues in more detail.
The ability to run multiple different operating systems on your laptop has proven to be invaluable for me – it’s just so, so useful. I’m often on many different sites all with slightly different environments, or I’ll be needing to build & test server based stuff. Being able to do that on my laptop has saved me so much time & effort.
As an Apple Mac user, I’m always coming across scenarios where I need to run Windows – whether server or desktop – so being able to fire up multiple different versions all at the same time saves a ton of time. No rebooting into a single copy of Windows in BootCamp for example. My normal productivity environment for example is an Apple Mac running Windows 10 in Parallels Desktop.
One thing I get asked about a lot is what’s the impact of virtualising Windows like this, just how usable is it? Well, it’s brilliantly usable, just as much as most physical devices (I.e. Natively running Windows) I’ve used. There has to be a performance impact though, right? Yes, yes there is, but it’s relatively minor in reality.
I’ve done some benchmarking below showing:
Cinebench scores natively in MacOS, and in Windows 10 running in both Parallels Desktop 13 and VMWare Fusion 10.
Geekbench 4 scores natively in MacOS, and in Windows 10 running in both Parallels Desktop 13 and VMWare Fusion 10.
Anyway, these figures are shown below.
General Machine Benchmarks
Now, I know it’s a bit unfair to compare the Surface Book 2 to an iMac Pro like I have above, but even on my MacBook Pro I get better performance in Windows 10 virtualised than I do natively on the Surface Book 2, and the SB2 Is hardly a slouch.
It’s interesting to see the differences in the performance for VMWare Fusion and Parallels by the way. I tend to use Parallels for my Windows 10 setups, and VMWare Fusion for my server stuff, however looking at the above I may now reconsider this. More testing required. I will say though that in all of the graphics tests Parallels 13 seems significantly faster than Fusion.
Anyway, my general point being that running an OS virtualised for general day to day use is amazing. Being able to take snapshots, to roll-back etc. when testing is invaluable. As is having standard builds of Windows available for a simple copy, rather than having to build fresh very single time I need a machine saves me tons of time.
You can do this on Windows too of course using HyperV – this is included in Windows 10 Enterprise or Professional. Anyway, you can read about that here.
One of the physical differences between the 2017 5k iMac and the 2017 iMac Pro is the RAM upgrade process. In the normal 5k unit there’s a small door at the back that grants you easy access to the RAM slots – you can upgrade the RAM yourself, and very easily.
With the 2017 iMac Pro, the RAM is upgradable, but you cannot do it yourself. Well, unless you’re quite brave with an expensive machine – you have to dismantle it. For anyone who’s ever dismantled and iMac, it can be quite challenging.
Anyway, if you look at the Tech Specs for the iMac Pro, you’ll see the base RAM is 32Gb, and it’s configurable to 64Gb or 128Gb. The units have four memory slots in them:
iMac Pro RAM Slot Layout
Notice the ‘memory upgrade instructions’? That just takes you to the Apple support pages. In addition, you can see the memory specifications here:
iMac Pro memory specifications
Note this bit:
iMac Pro RAM Details
In effect, an Apple Store can deal with Warranty issues. If you want the RAM upgrading however then you have to visit an Apple Authorized Service Provider (AASP). Anyway, I could not find this information originally, and it’s seriously making me question whether this was the way it was worded in the first place. But hey, what can you do.
When I bought this iMac Pro, there were quite significant delays on getting the units, especially with any customisation. After speaking to Apple, they suggested buying the 32Gb unit and bringing it back to have the RAM upgraded. Simple you may think.
Twice I took the iMac Pro to my local Apple Store. Twice I regretted not remembering that the box handle isn’t strong enough to carry the weight of the machine, but that’s a different story.
The first time I attended they struggled to find any information on the upgrade process, and suggested that as the units were so new, and so different, they wait a while and try again.
So I did wait a while. Approximately 6 months. 32Gb of RAM wasn’t terrible in the unit for the uses I had, however now I was struggling, so it needed upgrading.
This time, rather than placing my trust in the Genius Bar, I contacted Apple via their support telephone no, and was referred to their online chat (!) as it could take a while to work out. Fair enough. I think spent some time with the online chat people who were very helpful, and arranged a visit for me to my local Apple Store to have the RAM upgraded…..and this got complicated.
When I turned up at the Apple Store there was much ummmm and ‘well, we don’t know the process for this…’. I was fairly insistent this time, given it was second trip and the fact I’d verified the process with Apple Support first.
They did the right thing by suggesting I leave the machine with them if I could – fortunately I have other kit and just needed it done, so happily left it in their capable hands.
They called me back when they said they would – am I the only person that thinks such small points make a huge difference to your perception of service? Whomever put those reminders in their service system needs a commendation – this has always been my experience with Apple.
Anyway, the result of the call with them was a bit….Interesting. They had no process to upgrade the RAM, and now they were pushing all the upgrades to the AASP. You an feel my groaning at this point…Have to go pick it up, take it somewhere else etc. Etc. It was a bit frustrating to be honest – you’d expect them to know their processes.
This is not however what happened. Apple twice recently have surprised me with their level of service. What did they do? They ordered me a replacement unit with the specification I actually wanted, and replaced my original unit, with the idea being I simply pay for the upgrade.
That was a great outcome for me. Admittedly had to wait for a couple of weeks for it to turn up, but no real drama with that, I have other equipment to use.
Weird experience isn’t it? I get the iMac Pro units may be a bit unusual, but I kinda thought the Apple Stores would be a bit more on top of how they deal with such things? The final outcome for me though was an effective one, and one that surprised me. Why, I’m not sure, as I’ve only ever had excellent service from Apple.
When is plain old storage not plain old storage? When it’s Network Attached Storage (NAS) that’s when.
I don’t tend to delete stuff, as storage is relatively cheap and I usually find that if I delete something I, at some point in the near future, will be irritated that I’d deleted said thing. I have my email archives going back to 1999 for example. Yes, yes I know.
I’ve always shied away from network attached storage. Every time I’ve looked at it I’ve been caught by the network transfer rate bottleneck and the fact that locally attached storage has for the most part been a lot quicker. Most of my kit is SSD driven, and volume storage was fast Thunderbolt type. Typically I’d have a tiered storage approach:
Fast SSD for OS/Apps/normal day to day stuff.
Thunderbolt 3 connected SSD to my virtualisation stuff.
Spinney ‘volume’ storage.
The thing is, my storage was getting into a mess. I had loads of stuff connected. About 12Tb off the back of my iMac#1 (My virtualisation machine, for stuff that’s running all the time), and about another 15Tb off the back of my everyday iMac Pro. That’s a lot of spinner stuff. Trying to ensure important stuff was backed up was becoming more and more of a headache.
So, I finally gave in, mainly due to the rage around cabling more than anything else, so I started investigating a small server type setup, but then it occurred to me I’d just be moving things about a bit, and I’d still have a ton of ad-hoc storage….So I started investigating the Network Attached Storage devices from the likes of Synology and QNAP.
Oh my, how wrong was I about NAS units. They’re so capable it’s ridiculous, and they’re not just raw storage. I have a few of them now, and they’re doing things like:
Storage because storage because I needed storage
A couple of virtual machines that run some specific scripts that I use constantly.
Some SFTP sites.
A VPN host.
Plex for home media.
Volume snapshots for my day to day work areas.
Cloud-Sync with my DropBox/OneDrive accounts.
Backup to another unit.
Backup to another remote unit over the Internet (this is more of a replica for stuff I use elsewhere really).
Backup to a cloud service.
I did run in to some performance issues as you can’t transfer to/from them faster than the 1Gbps connection – which is effectively around 110MB/s (Megabytes per second) – so 9-10 seconds per Gigabyte. My issue was that I had other stuff trying to run over the 1Gbps link to my main switch, so if I started copying up large files over the single 1Gbps links from my laptops or iMac(s) then of course everything would slow down.
That was fairly simple to fix as the Synology units I purchased support link aggregation – so I setup a number of ports using LACP link aggregation (Effectively multiple 1Gbps links) and configured my main iMac machines with two 1Gbps link-aggregated ports. Now, I can copy up/from the Synology NAS units at 110MB/s and be running other network loads to other destinations, and not really experience any slow downs.
Just to be clear – as I think there’s some confusion out there on link aggregation – aggregating 2 x 1Gbps connections will not allow you transfer between two devices at speeds >1Gbps as it doesn’t really load balance. It doesn’t for example send 1 packet down 1 link, and the next packet down the next. What it does is works out which is the least busy link and *uses that link for the operation you’re working on*.
If I transfer to two targets however – like two different Synology NAS units with LACP – I can get circa 110MB/s to both of them. Imagine widening a motorway – it doesn’t increase the speed, but what it does do is allow you to send more cars down that road. (Ok, so that often kills the speed, and my analogy falls apart but I’m OK with that).
I can’t imagine going back to traditional local attached storage for volume storage now. I do still have my fast SSD units attached however they’re tiny, and don’t produce a ton of cabling requirements.
I regularly transfer 70-100Gb virtual machines up and down to these units, and even over 1Gbps this is proving to be acceptable. It’s not that far off locally attached spinning drives. It’s just taken about 15 minutes (I didn’t time it explicitly) to copy up an 80Gb virtual machine for example – that’s more than acceptable.
The units also encrypt data at rest if you want – why would you not want that? I encrypt everything just because I can. Key management can be a challenge if you want to power off the units or reboot them as the keys for the encryption must either be:
Available locally on the NAS unit via a USB stick or similar so that the volumes can be auto-mounted.
or you have to type in your encryption passphrase to mount the volumes manually.
It’s not really an issue as the units I have have been up for about 80 days now. It’s not like they’re rebooting every few days.
The Synology units have an App Store with all kinds of stuff in there – properly useful things too:
Synology Home Screen
Anyway, I’m sure you can see where I’m going with this. These units are properly useful, and are certainly not just for storage – they are effectively small servers in their own right. I’ve upgraded the RAM in mine – some are easier to do than others – and also put some SSD read/write cache in my main unit. Have to say I wouldn’t bother with the SSD read/write cache as it’s not really made any difference to anything beyond some benchmarking boosts. I’d not know if they weren’t there.
I’m completely sold. Best tech purchase and restructure of the year. Also, I’m definitely not now eyeing up 10Gbps connectivity. Oh no.
As a quick side-note on the 1Gbps/10Gbps thing – does anyone else remember trying 1Gbps connectivity for the first time over say 100Mbps connectivity? I remember being blown away by it. Now, not so much. Even my Internet connection is 1Gbps. 10Gbps here I come. Probably.
2018-08-02 Brief update – I’ve added a video clip at the bottom showing the 2018 i9 MacBook Pro against the 2017 iMac Pro 10 Core/64Gb RAM unit).
iMac completes it in 4 min 43 seconds, 2018 i9 MacBook Pro 9 Minutes 33 seconds.
iMac Pro Example Times
====
Anybody with any interest in tech can’t fail to have noticed all the noise around the recent update to the Apple MacBook Pro range – in particular around thermal throttling and the performance of the units. To be fair to Apple, they responded quickly ( surprisingly so… ) and the patches they published did seem to make a significant difference.
I’m not particularly in to the ‘OMG it wouldn’t have happened under Steve Jobs’ thing, but I can’t help thinking this wouldn’t have happened under…//slaps myself. It does however seem that Apple’s quality control is struggling a bit doesn’t it? Let’s think, there was the ridiculous High Sierra Security Bug, the throttling issue, T2 kernel panics (work in progress), iPhone throttling, and of course the issue around the failing keyboards.
As a quick side-note, if you’re interested in the repairability side of Apple kit, you could do worse than to subscribe to Louis Rossmann’s channel over on YouTube. It’s fair to say he’s not a fan of Apple’s attitude to repairability! Quite reasonably so from what I’ve seen.
I’m not going to bang on about the throttling, however I thought I would look at the performance of the 2018 unit and compare it to my older ones, and just for the laughs to the Surface Book 2 I also have. You can see the results in the video below – spoilers: The i9 is faster than all of them, who knew.
I should also do a comparison against my iMac Pro but I can’t at the minute as Apple is busy swapping it for another one. More on that in a later blog, once I have an outcome.
So, quick summary. Do I like the 2018 unit? Is it a big step up from the 2017? Do I have any concerns? Well:
Yes. It’s fast.
Yes. The 32Gb upgrade is going to help me a lot. In some instances I’ve had to carry two laptops to achieve some things (admittedly an unusual use case), but I won’t have to do that any more.
Concerns? Wow it runs hot. That makes me wonder about reliability. But. We shall see.
Anyway, the video is below should you be interested. You can see the information on the 2017 unit here: 2017 Kaby Lake MacBook Pro.
Faster Internet – for FREE! Can you really get something for nothing? Well perhaps not, but there are things you can do to both optimise your Internet connection and protect your usage.
What do I mean? Well, given most of my readership tends to be techy in nature, I’m not going to go in to massive amounts of detail, but in effect every Internet Provider tends to assign you their DNS servers…and these are usually far from optimal. A lot of techs I know then default to switching to Google’s DNS (8.8.8.8 and 8.8.4.4) because they’re pretty quick.
Yes, they’re pretty quick…But you’re gifting Google with the ability to know every URL you resolve to an IP address. If you’re comfortable with that then fair enough – I’m not, however. Google makes me uncomfortable from a privacy perspective.
So, let’s look at Cloudflare. Many of you will be familiar with them with their Web Caching technologies, but few seem to be aware they also have DNS servers available – 1.1.1.1 and 1.0.0.1. Cool addresses hey? Forgetting the cool addressing, just look at the performance – they’re properly fast.
There’s various DNS benchmarking tools out there – OK, they’re not the most interesting of tools but they do give you decent information. Consider the performance difference between the Google servers and Cloudflare:
DNS Performance
As you can see, in other than localised cached versions CloudFlare nails the performance – and the reliability – in all the required areas. I know it doesn’t look like much, but the differences add up, and you can feel the difference.
What about the privacy thing about the provider knowing everything you do? Well, I suppose there is an element of me just not trusting Google – any company that needed a tag line of ‘don’t be evil‘ has issues – CloudFlare do seem to have a defined policy of never storing your queries on disk, and being audited to ensure this is true. Apparently. I have no proof this is true, beyond stated policy.
I’ve been using the service for a while, and it is faster than the ones I was using previously, and by some margin. The privacy element is a nice cherry on the cake.
The future expansion plans to cache more can only provide better response times you’d hope.
Oh, as a funny and slightly bizarre side-note, some ISPs won’t actually be able to route to 1.1.1.1. I’m sure they’re working on resolving that – it’s easy to check if you can use the system simply by firing up nslookup (whether in Windows/Linux/MacOS) and then selecting the server with ‘server 1.1.1.1’ and seeing if you can resolve any addresses:
NSLookup Example
How you implement this for your Internet connection varies – on my platform for example I have my own DNS server that caches stuff, so I just CloudFlare as a resolver to that. You can also update your DHCP on your router to issue 1.1.1.1 and 1.0.0.1 – that’s probably the simplest way of doing it for most people I imagine.
I installed a couple of servers recently on 2016 using the Evaluation as we hadn’t received the correct keys. Now, usually, I’ve found that using this method of setting the correct key, or simply changing the product-key from the properties of ‘My Computer’ worked, however for these units I kept getting this error:
This Edition Cannot Be Upgraded
This did not bode well as we’d done a fair bit of work on the deployed servers. Yes, yes I know….
Anyhow, I did some investigation with the DSIM tool, and it turns out you can actually use that tool to upgrade the license, and it worked just fine.
Firstly, check to see what versions you can upgrade the license to, or rather check to make sure the version you want is in the list. You can do that with:
Dism /Online /Get-TargetEditions
You should get an output similar to this:
Example Output
We can use the same tool to set the license key and upgrade it the full version. That command is:
2018-05-25 Wow, fastest disagreement ever on a blog post. Some of the pricing below (like Spotify for example) are student pricing as apart from my day job of not being Batman I’m also a student. Also this year’s Prime will drop in price because of that too.
====
It’s no secret that a lot of tech industries have moved to a subscription models where you pay a monthly fee to access their product and services. So much of not a secret that it’s dull, so I’m not going to talk about that too much.
What I’m going to talk about however is how cheap things can all of a sudden make you realise you’re paying a ton of money for things that previously you didn’t pay a ton of money for. All the small things add up don’t they?
I’ve been trying to rationalise my subscription services as I’ve got a lot of cross-over in some areas, and it’s made me realise how much I’m actually paying for stuff. Things like:
Monthly Subs Costs
For the sake of transparency of highlighted my work stuff in green – slightly differing cost there as no VAT, and they’re tax deductible expenses (I think).
Anyway, they do add up don’t they?! I’m going through the process of rationalising stuff as there are some obvious cross overs there. Audible for example I’ve now got enough credits to listen to audio-books until my ears bleed, and yet I keep amassing more.
Cancelling Audible is always interesting – here, have it for half price! What I actually read is that they’ve been over-charging me since day 1.
The cloud backup service, dropbox and Offic365 all have cloud storage in them, and more than enough, so why do I have all 3? I suspect when you see the low monthly cost combined with the effort involved you think meh, what the hell. Then you’re invested. They’ve got you.
Zwift I don’t use in the summer either, I go outside like a normal person. So why am I paying for that?
The push to subscription services can really alienate me as a consumer. Take two companies I used to have a lot of time for – now, I wouldn’t touch their products if you gave them away with a free alpaca:
1Password
TomTom
What did they do that was so terrible? Well, they tried to force me to dump my initial capital investment and switch to their subscription model. 1Password for example I had invested fairly significantly in – multiple clients, MacOS, Windows, phones etc. and I liked their product. Then a push to the subs and a lack of updates to the normal capital purchase clients. It felt like a complete stitch up. Like I say, now, whenever anyone asks about password managers instead of recommending a company the first thing I say is ‘don’t use 1Password’.
Same for TomTom. I paid a fair amount of money for their product on my phone. Next thing I know is oh, we won’t be updating that any more, you have to buy a subscription to get access to ‘miles’. Yeah, how about no? I’ve already bought a product I expected to work.
Just to be clear, I understand that products have a life-cycle. I expect to pay to upgrade when necessary. I also expect however to have the opportunity to make a choice on whether to upgrade based on a balance of costs against new functionality. What I don’t expect is the products I’ve purchased to not have the functionality I originally procured unless I then upgrade to their subscription. Yes TomTom, I’m looking at you.
Some services of course I think are an absolute bargain. The core Office365 offering (I use multiple E3 for my work) and I think for what you get it’s an utter bargain. The phone system….not so much. It’s expensive for what it is.
Aaaanway, monthly subs. Look cheap, and they’re not.
I was recently trying to set up some security groups in Office365, and I wanted to add a subset of users to that group. Could I work out how to do it? Well, yes, I could….But it took a while.
I tried the obvious approach of feeding each user to the add-msolgroupuser cmdlet and it just wasn’t having it. Some further google-fu and I worked out that this command doesn’t accept collections….So a different approach was needed.
In effect you create a variable with the users you want, and then feed that list of users to the add-msolgroupuser cmdlet. This worked for me anyway – so let’s have a look at how below. I was working with a group for SharePoint in this instance.
Add your group to a variable
$group = get-msolgroup | where {$_.Displayname -eq ‘SharePoint Users’}
Add your users to a variable
There’s various ways to get your users. In my case it was simply users with a certain domain name so I selected those using:
Obviously change the ’emailaddress@domain.com’ to whatever you’re looking for. You can use wildcards too, so for example DA*@contoso.com would find any alias beginning with DA and @contoso.com
So there’s been yet another security issue with MacOS High Sierra highlighted – the fact that you can authenticate to the App Store preference pane with any old password. Combine this with the recent one where you could authenticate to any MacOS machine with no password on a root user…well, it’s enough to make anyone a little concerned isn’t it?
Major macOS High Sierra Bug Allows Full Admin Access Without Password
I find it interesting that people think MacOS is so, so secure against the competition (Yes Windows, I’m looking at you). Really, is it? I’m not convinced. I think it’s probably reasonable to say that MacOS users are at less risk than their Windows counterparts (security by obscurity and all that), but I don’t think it’s inherently more secure. If this latest bug doesn’t convince you of that I’m not sure what else will.
It’s the same with Anti-Virus/Malware in my opinion. Wrote about that previously:
I was using one of my Windows 10 Virtual Machines earlier and the profile lost all of its colour. It went grey (or gray…Which to use?!). It looked like this:
Grey – Wrong
…instead of:
Correct Colours
Just a bit strange I thought. Anyway, after some digging around it turns out Windows 10 has a set of colour filters to assist people who struggle to see certain colours. Somehow I’d managed to turn it on.
It’s simple to toggle – simply use Windows Key+ctrl+c and it’ll toggle between the two.
You can also get to it through the Control Panel – go to ‘Ease of Access’ and you’ll see it in there under ‘Color Filters’. Well you learn something new every day, don’t you?
I’ve had this little tip kicking around in my archives for a little while – and it’s quite a handy one. As far as I know there’s no ‘official’ way of duplicating polices in Skype for Business. For example, you may want to copy the settings from one client or voice policy to another.
It’s fairly easy to do with an XML export/import process, fortunately.
By way of example, let’s say I have a client policy called ‘LondonSite1’, and it’s got a ton of configurations in it. I then want to create another site policy for ‘LondonSite2’ that has the same settings, bar a couple of modifications.
Simple way is to export LondonSite1, modify the XML, and then import into LondonSite2. Here’s how:
Open up the XML in notepad, and look for this line:
London Site 1 Example
The important bit is the Identity – the Tag will be whatever your policy name is. Anyway, change the name Tag:policyName to your new policy name. In my example:
London Site 2 Example
Create the New Policy
We need to have the new policy available to import to. So create the new policy with:
New-csClientPolicy -Identity LondonSite2
You may already have done this of course.
Import the Settings
Now, we’re going to feed the XML settings to set-csclientpolicy with: