Month: May 2025

  • Thunderbolt 5 Storage

    Thunderbolt 5 Storage

    Earlier I had a need to move a 500GB Virtual Machine to another one of my virtual hosts. I could of course have copied it across my 10Gbe network, which would have taken 20 minutes or so, but instead I thought it simpler to throw it on an external NVMe drive I have. My Mac happily told me it was going to take 2.5 minutes to copy the virtual machine to the drive.

    TWO AND HALF MINUTES!

    In the end it took nearer three, but hey, that’s fast. This got me reminiscing. Back in the day when I first started working on ‘larger’ stuff, I did a lot of Novell Netware. We used to use Fujitsu 500MB SCSI drives in our normal server setups (the M2624FA I think)…. like this:

    Fujitsu M2624FA SCSI Hard Drive
    Fujitsu M2624FA SCSI Hard Drive

    This was hooked up to 10Mbps Ethernet – mostly Co-ax (Cheapernet), and then later moving to UTP (at a heady 100Mbps). What I remember about those drives is that copying that 500MB drive to a new server typically took about 20 minutes. That’s about 0.4MB/s. Shudder. The drives themselves were capable of more than that – sometimes a whopping 4MB/s – but the overheads of copying/delivering over 10Mbps limited that.

    Now, I’m sat here copying a 500GB virtual machine at about 2.8GB/s. That’s 7,000 times faster. That’s some progress. At 0.4MB/s it would have taken 14.5days…assuming it didn’t just melt.

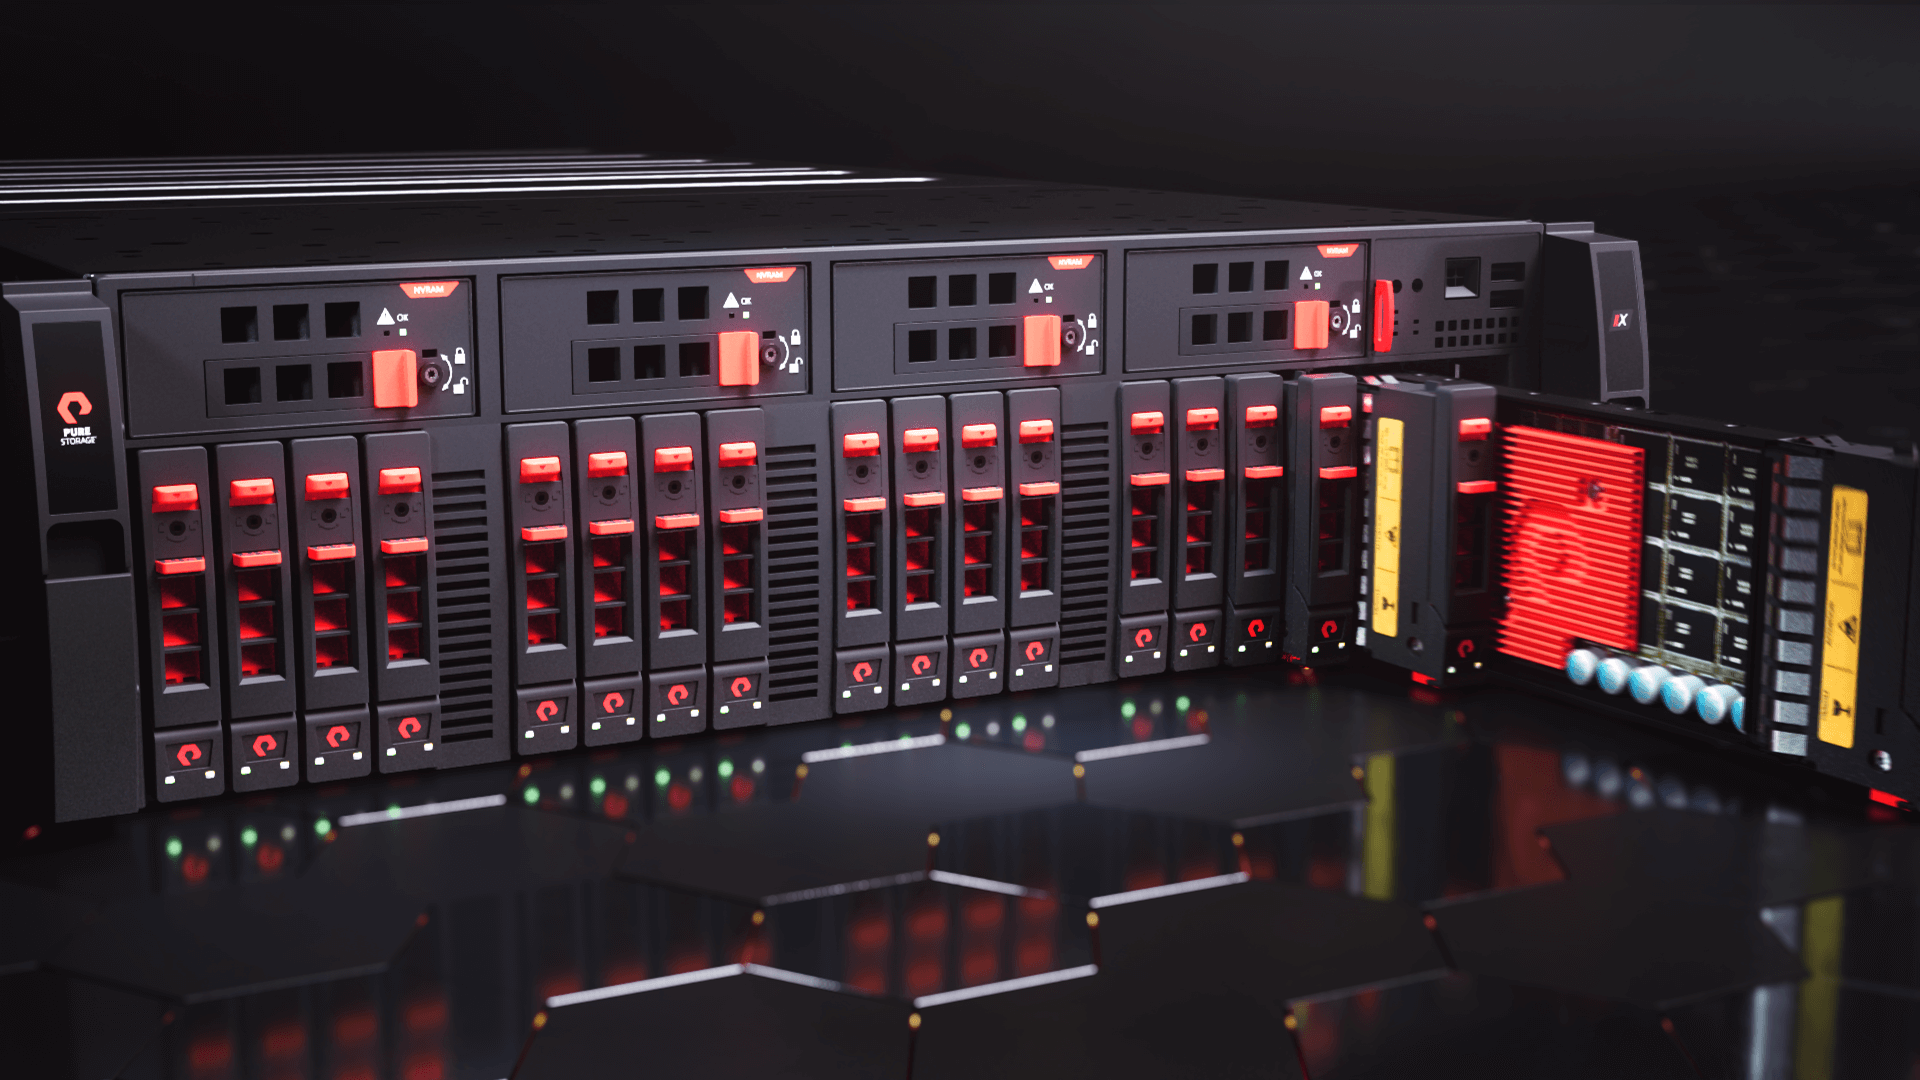
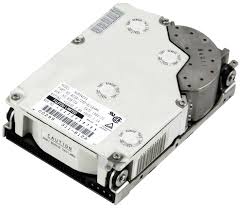
    I then got thinking about some of the Microsoft Exchange implementations I’ve done over the years. IOPS and drive performance were king in those configurations. We’d end up putting in a lot of drives to meet the performance requirements rather than the space requirements – single enterprise drives would often only deliver 150-200MB/s, with maybe a 150IOPS per drive. For a 5,000 mailbox solution, you’d need about 5-10,000IOPS (I haven’t worked this out fully, don’t @ me!). So you see the problem. Here’s a 16TB Toshiba Enterprise Drive for example:

    Image shows the performance of a Toshiba Enterprise 16TB Hard Disk Drive
    16TB Spinning Hard Disk

    Now a single NVMe (PCIe 4×4 for example) 500,000 to 1,000,000 IOPS. So yeah, the world changed.

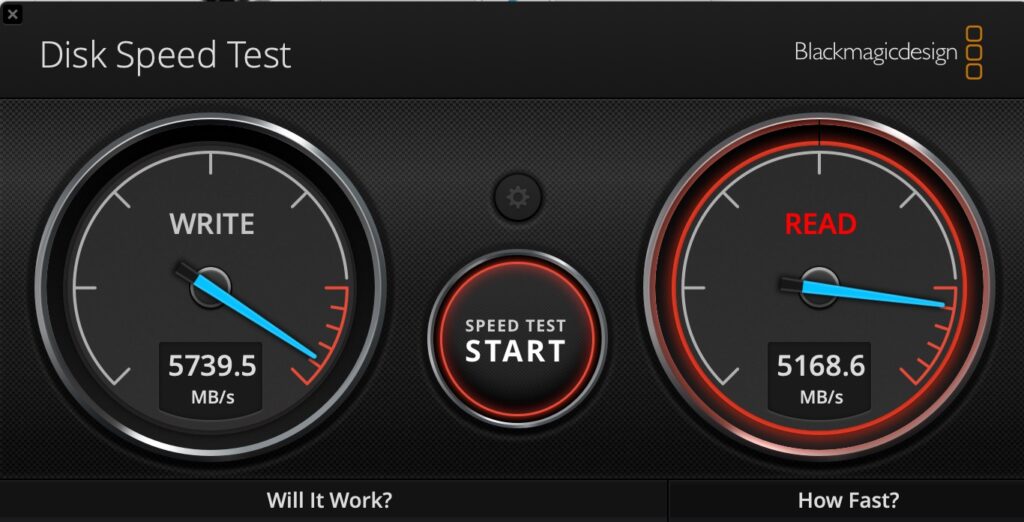
    Anyway, enough reminiscing! What about that drive I was copying to? Well, it’s an external Samsung 990 Evo Plus 4TB installed in an ACASIS 80Gbps M.2 NVMe SSD Enclosure. The performance of this setup is simply epic:

    Image shows the performance of a Thunderbolt 5 connected NVMe SSD
    Thunderbolt 5 NVMe

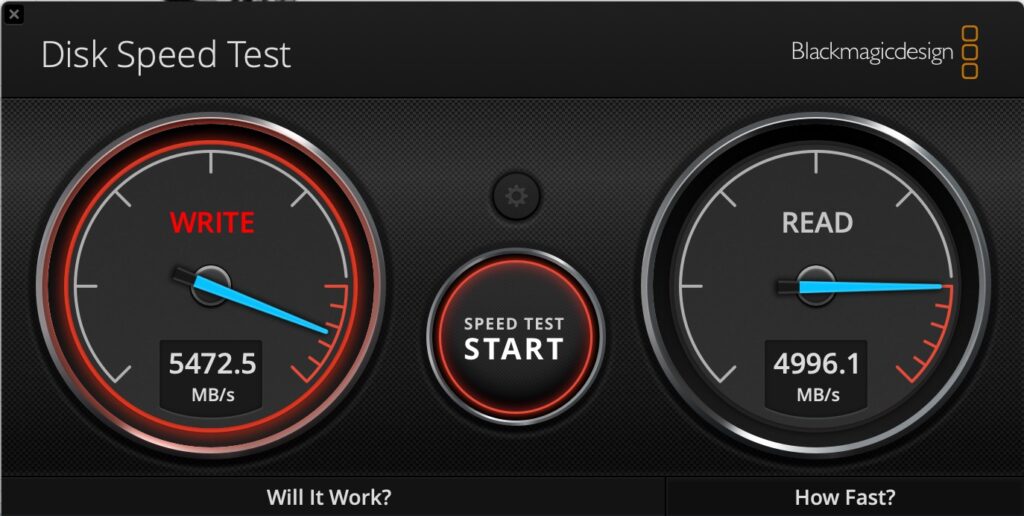
    So about 5.5GB/s write, and 5GB/s read. That compares pretty well with the internal SSD on my MacBook Pro M4 Max:

    The image shows the MacBook Pro M4 Max Internal SSD Performace
    MacBook Pro M4 Max Internal SSD Performace

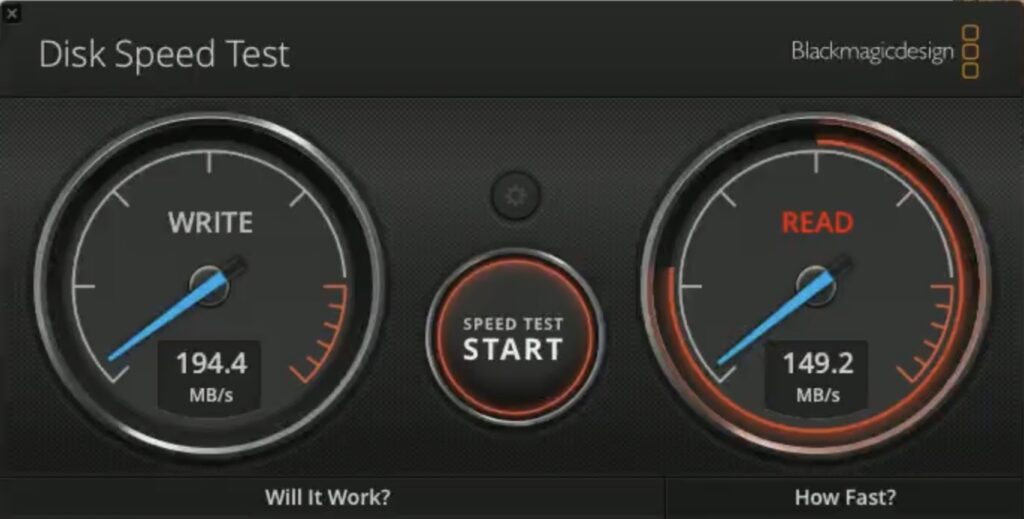
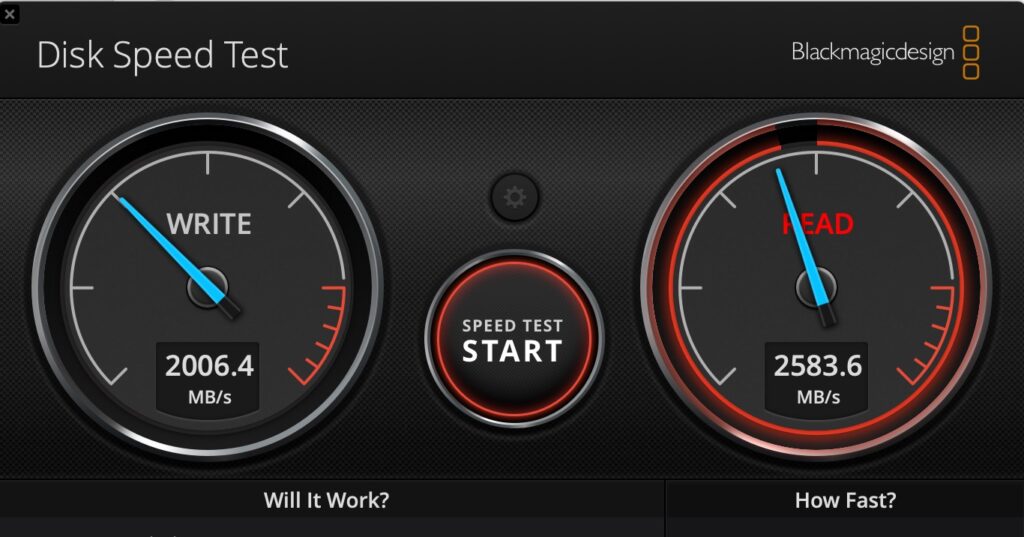
    Thunderbolt 3/4 was also pretty fast of course, but it couldn’t get close to the internal speeds – this is a 2TB version of that same Samsung drive but in a Samsung X5 Thunderbolt 3 enclosure:

    Image shows the performance of a Samsung SSD in a Thunderbolt 3 enclosure
    Samsung 990 Pro 2TB/Thunderbolt

    That external Thunderbolt 5 enclosure is a bit pricey at about 250GBP, however you pay the price for new stuff don’t you. It does work, and it works very well. It’s also got a cooling fan in which I thought could be helpful as I’ve often seen drives slow down considerably under constant load due to heat – there’s also the faster cache to consider too. These 990s have about 400GB of pseudo-SLC cache on them before they slow down.

    I’ve been thoroughly impressed with them (I’ve a couple), and am always constantly surprised by the performance. Being able to use Carbon Copy Cloner for example to backup a few TBs from one to the other becomes a quick coffee break rather than a plug in, forget, check tomorrow operation.

    Anyway, that’s enough reminiscing for one day. New stuff is newer, faster, spankier – who knew.

  • Brits & 13 Amp Fuse Obsession

    Brits & 13 Amp Fuse Obsession

    I’ve been clearing stuff out at home, and a big chunk of that clear out has been cables. I was throwing out a ton of US extension cables (I worked in the US for a while), and two things struck me:

    1: None had fuses in. I even hacked one of them apart to check.
    2. Some of them weren’t earthed.

    This got me thinking about safety & stuff. The plug receptacles will be protected by the circuit breaker at the fuse box – but that will only protect the cable in the wall to that central distribution cabinet won’t it? Assuming it’s say a 20Amp breaker (I don’t know what they actually are), that means you could have 20Amps (or 2200watts) being pushed down an extension cable rated for less than half of that. Seems a recipe for a bonfire doesn’t it?!

    Throw in some daisy-chained extension cables etc. and that sounds disastrous. What am I misunderstanding here? Anyway, it got me further thinking about how we do things in the UK.

    We of course have similar circuit breakers in the UK, although I think they’re typically rated at 32amps – which is 7680 watts. Our extension cables and plugs however are fuse protected – typically with a 13amp fuse. A 13amp fuse will allow up to circa 3120 watts at 240v before the fuse blows.

    Yet everything is fitted it would seem with 13 amp fuses, regardless of power-draw. While it seems a lot safer than the US system it does seem like a blank assumption that 13 amps is the right protection point.

    My main tech stack for example consists of 5 extension cables configured in a star formation. I.e., one ‘master’, and four connected to that master. Sounds excessive until you look at the load:

    Image shows the power draw of my core technology hub.
    Tech Hub Power Draw

    It averages about 150w during general day to day usage, which is about 0.62amps. Tiny. Even at full power on it peaks at about 500watts for a couple of minutes – again only 2.08Amps. So why would it be protected by a 13Amp fuse? It isn’t any more, it has a 3amp fuse in it and it powers up just fine. If it blows, I’ll put a 5amp fuse in I think. It’s all UPS protected anyway.

    I had a brief scan around other things – Microwave, 13amps (reasonable), Kettle 13amps (reasonable), TV 13amps….Lol wut. I’ve never seen my TV pull more than 150watts so why on earth is it protected with a 13amp fuse? Just because, I guess. Same on the Playstation 5.

    Anyway, I am probably obsessing over something I found vaguely interesting. Firstly, my sudden perception of how unsafe the US model of extension cables & power control seems to be, and secondly with our obsession with 13amp fuses over here in the UK!

    I will say though that I think the UK plug is an absolute master of design. It would also seem I’m not the only one to think so!

    I’d love to hear perhaps a better educated opinion on the matter.

  • Updating and Backing up your Windows Apps

    Updating and Backing up your Windows Apps

    A while ago, I wrote about a way of easily backing up your Windows drivers. Believe it or not, there’s a fairly simple way to do it for (most) of your apps too, making setting up new machines fairly simple. You can also update all the apps using a similar method. So let’s have a look.

    Updating all your packages

    Windows now includes a package manager not that dissimilar to Linux. You can use this package manager to update your apps – well, apps where there is a repository available.

    So, how do we update those apps? It’s easy. Start an elevated command prompt and use this command:

    winget upgrade –all

    …and this is what it looks like:

    The image shows the output of 'Winget upgrade --all'
    Winget Upgrade

    If this is the first time you’ve run this process, you may be surprised by how many updates there are, so it could take a few minutes. When it’s done, you’re all up to date.

    Backing up your packages

    The process to backup your packages doesn’t actually backup the packages – what it does, is it makes a list of the packages you have installed, enabling re-installation on a new machine simple. Bear in mind not all packages will have an available source, but I find that most do. To backup the packages, again start an elevated command prompt, and use the command:

    winget export -o c:\packages.json

    You’ll see an output similar to this:

    Image shows the output of 'Winget export'.
    Winget Export

    You will see a lot of entries stating packages were not available – for the most part, these seem to be system components, and for some versions of Microsoft Office (mine is quite highly customised for example).

    The output is a single .JSON file – copy that off somewhere.

    Reinstalling Your Packages

    To use that .JSON to install on a new system, use the following command:

    winget import – i c:\packages.json

    This will import/install what it can, and get you far closer to a fully deployed system than doing everything manually.

    It’s quite a powerful tool that WinGet, so worth the effort to get familiar with.

  • JetKVM – IP Keyboard/Video/Mouse

    JetKVM – IP Keyboard/Video/Mouse

    Getting remote access to some machines – headless servers for example – can sometimes be a challenge. Sure, there’s RDP or VNC, however that requires the machine to be up, on, and usable doesn’t it? What about those times you need to deal with machine that isn’t accessible for whatever reason? Or if you need to do something that requires a good old fashioned keyboard, monitor and mouse? BIOS/Service Pack upgrades for example.

    Well, that’s where these KVM units step in (Keyboard, Video, Mouse). Essentially they are devices that connect to the PC HDMI post, and provide a keyboard & mouse via USB. They then connect to your network allowing you to remote control that PC/Mac as if you were sat physically in front of it.

    I tend to use Mac mini devices as my headless servers as they’re so capable, and use so little power. One challenge you have with those is that on a fresh reboot, if you have FileVault enabled (encryption), you must login with a physical keyboard at the device to get at the keys to unlock the drive for normal boot. This is a huge pain for a headless server.

    I had taken to configuring a small boot OS that was not encrypted, and then having another encrypted partition with my ‘real’ user on. This would mean you would initially connect remotely and login as the unencrypted user over VNC, logout, and re-login as the user that has the encrypted partition. I’d move that user’s home folder to the encrypted drive too. A bit of an effort.

    This unit solves this challenge as you’re effectively logging in from a local keyboard.

    I’ve been through several KVM units like these over the years and never really found one that I got on with fully. Then I stumbled on the JetKVM on Kickstarter.

    This is a small device that plugs in to your HDMI port, a USB port, and an Ethernet port on your network. It picks up its own IP Address (which it helpfully displays on the small screen), and you can then connect to the IP using a web-browser:

    Image shows the JetKVM connected to a remote machine.
    JetKVM Connected

    It takes minutes to setup, and so far it’s been awesome. It’s done exactly what it said it would do. There are some considerations of course – a big one being power. If, when your machine goes to sleep, it stops powering your usb ports, then you could have an issue as the JetKVM gets its power from the USB Port. Fortunately, they provide a pass-through cable that allows you to power the JetKVM with a mobile-phone USB-C charger.

    This was interesting as my observations with the Mac mini M4 have been that it does indeed power down the USB Ports on sleep…but, for some reason, the JetJVM maintains power. I know that Apple does use a low-power sleep system for keyboards and the like, so perhaps it’s through that mechanism? In any event, you can power it separately if you require. I also understand that a PoE version is in the works.

    On the subject of power, the device doesn’t allow for physical power-down and re-start of the end-device. Not surprising if you think about it! I control that differently anyway, using Smart plugs. Depending on your use case however, help could also be coming for that….

    There’s also an RJ11 Port (serial). All the software is Open Source and is up on GitHub – I’d expect to start seeing some cool extensions coming! Perhaps one of those extensions could deal with power?

    Image shows the layouts of the ports on the JetKVM
    JetKVM ports
    Image shows the front-view of the JetKVM
    JetKVM Front View

    They do provide a cloud-access model too, to allow remote-access. Currently, this requires authentication with Google. I’ve not tried the remote access element as I have my own mechanisms to provide remote-access where it’s needed, however it looks like a fairly decent offering.

    You can see all the current docs here:

    JetKVM Documentation

    I paid 68US$ + 19$US Shipping back at the beginning of April, with the unit turning up about 10 May. I suspect now they’re clear of the Kickstarter campaign these will start popping up on Amazon and the like – and I suspect, when they do, I’ll have some further ones to buy.

    Very happy with the unit so far, it’s been really useful!

  • SynologyDrive Would Like to Access Data from Other Apps

    This is an irritating error message I seem to be getting from the Synology Drive App Recently:

    The image shows the message 'SynologyDrive would like to access data from other apps'.
    SynologyDrive would like to access data from other apps

    In a fit of boredom I thought I’d set out to search why this was so – I tried adding the Synology Drive app to full disk access however it didn’t help. Then I noticed the clue is in the error – ‘SynologyDrive’ – notice the lack of space. So, off I search for SynologyDrive…and you’ll find it here:

    <username>/Library/Application Support/SynologyDrive

    Image shows the location of the 'SynologyDrive' app
    SynologyDrive App

    That’s the app we need to add to Full Disk Access. Now, this is usually hidden (the Library folder) – so we need to show hidden files. You can do this with CMD+Shift+. (That’s . at the end!). You can also do this in terminal:

    defaults write com.apple.finder AppleShowAllFiles TRUE
    killall Finder # refreshes Finder

    Browse to the location and make sure you can see the file. Next, open Preferences and go to ‘Privacy and Security’, followed by ‘Full Disk Access’.

    What you now need to do is drag ‘SynologyDrive’ from Finder to the panel in preferences, and ensure it’s turned on:

    Full Disk Access
    Full Disk Access

    You’ll be warned that you need to restart Synology Drive – do so, and you should see that message no longer pops up.

    You can turn off showing hidden files using the same CMD+Shift+. or the following in Terminal:

    defaults write com.apple.finder AppleShowAllFiles FALSE
    killall Finder # refreshes Finder

    They really should fix this in the installer!