A while ago, I wrote about a way of easily backing up your Windows drivers. Believe it or not, there’s a fairly simple way to do it for (most) of your apps too, making setting up new machines fairly simple. You can also update all the apps using a similar method. So let’s have a look.
Updating all your packages
Windows now includes a package manager not that dissimilar to Linux. You can use this package manager to update your apps – well, apps where there is a repository available.
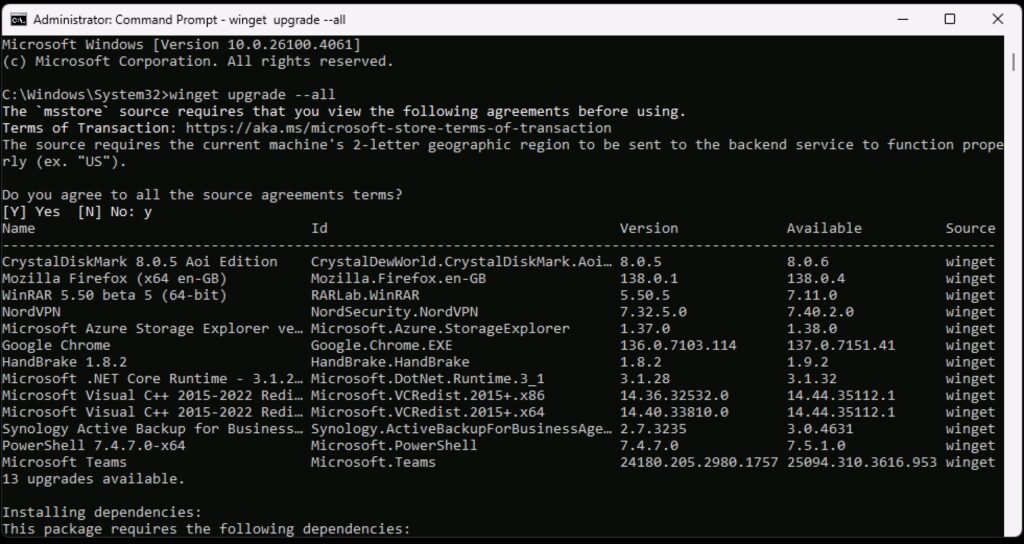
So, how do we update those apps? It’s easy. Start an elevated command prompt and use this command:
winget upgrade --all
NOTE: It’s TWO -. Noticed on some web-browsers the — is appearing as 1. Derp.
…and this is what it looks like:
Winget Upgrade
If this is the first time you’ve run this process, you may be surprised by how many updates there are, so it could take a few minutes. When it’s done, you’re all up to date.
Backing up your packages
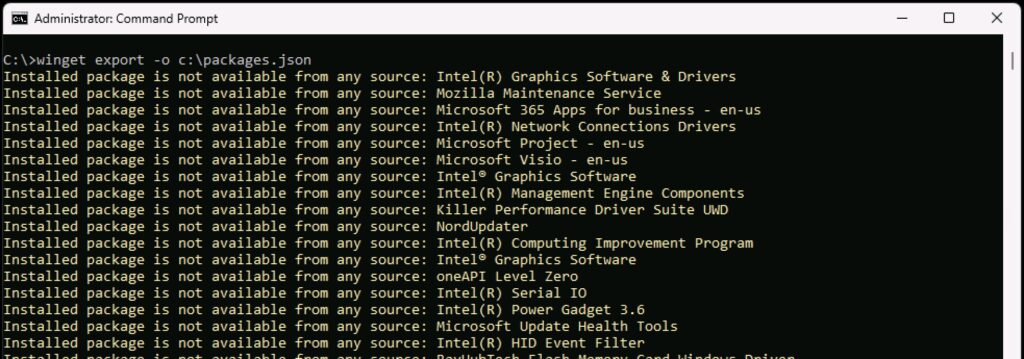
The process to backup your packages doesn’t actually backup the packages – what it does, is it makes a list of the packages you have installed, enabling re-installation on a new machine simple. Bear in mind not all packages will have an available source, but I find that most do. To backup the packages, again start an elevated command prompt, and use the command:
winget export -o c:\packages.json
You’ll see an output similar to this:
Winget Export
You will see a lot of entries stating packages were not available – for the most part, these seem to be system components, and for some versions of Microsoft Office (mine is quite highly customised for example).
The output is a single .JSON file – copy that off somewhere.
Reinstalling Your Packages
To use that .JSON to install on a new system, use the following command:
winget import - i c:\packages.json
This will import/install what it can, and get you far closer to a fully deployed system than doing everything manually.
It’s quite a powerful tool that WinGet, so worth the effort to get familiar with.
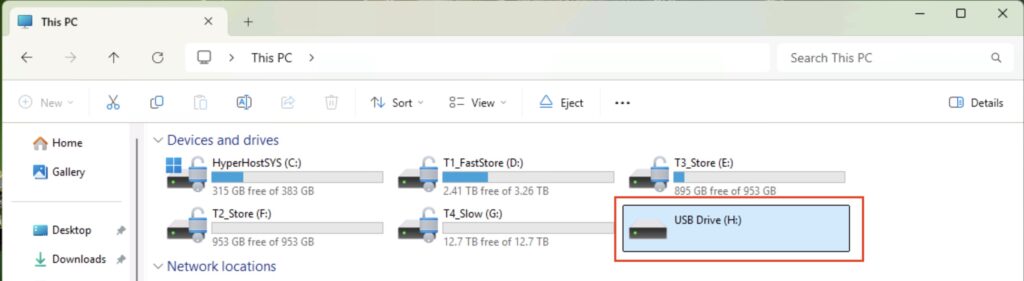
If like me you swap between operating systems for external drives you can sometimes find yourself in the situation where – for whatever reason – you can’t partition a drive how you want. Usually it’s if I’ve been swapping between Linux/Windows etc. and have been doing unusual things.
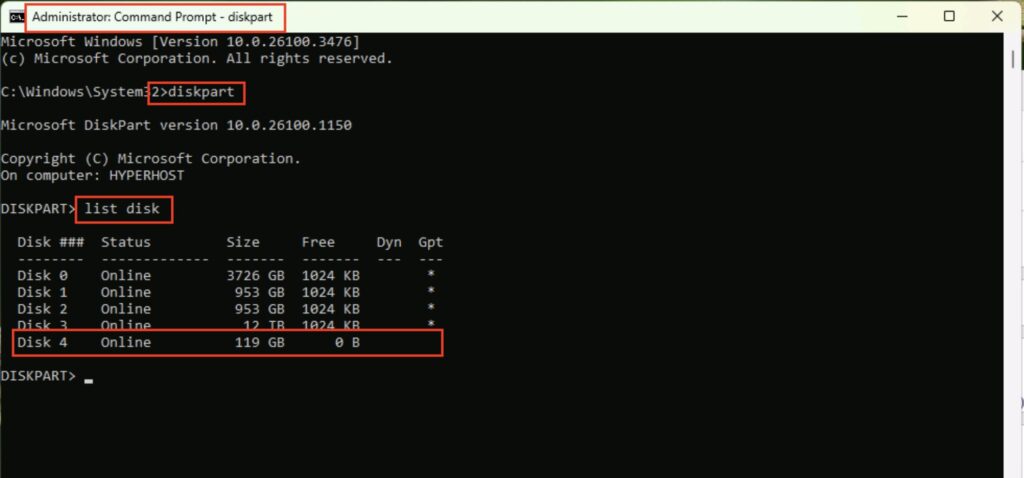
Anyway, it’s real easy to clear down that partition table on a drive in Windows using something called DiskPart.
In my example below, I have a USB stick that’s not behaving. It could be any type of drive I believe.
Windows Explorer
Let’s clear down that USB stick. First, start a DOS prompt as Administrator, and then run the program ‘DiskPart’. Next, type ‘list disk’, and you will see a list of your drives. Make sure you select the right drive! You do not want to be wiping the wrong one…. In my example, it’s the 119GB USB Stick, Disk 4.
DiskPart
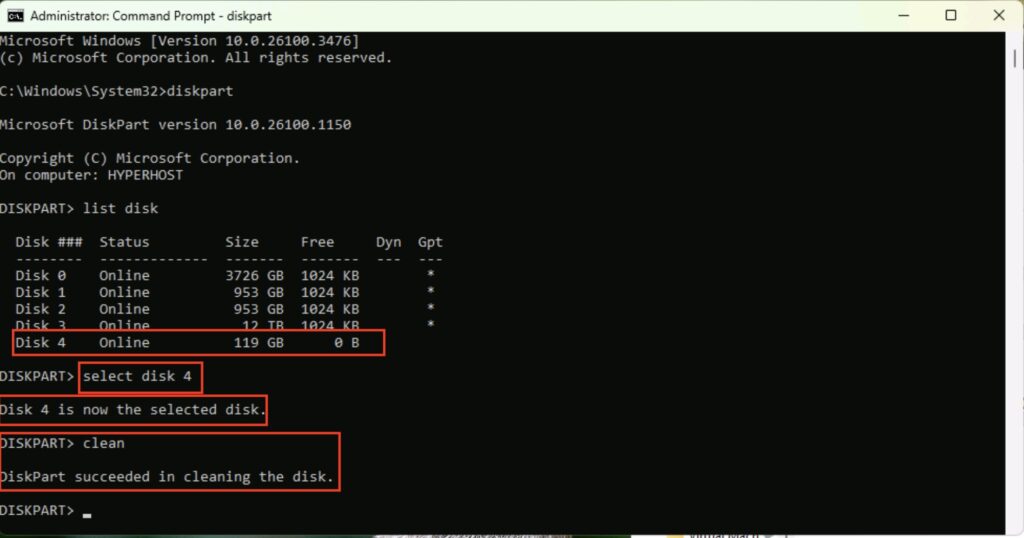
Next, we’re going to select that drive, and clean it. To do that, you use the command:
select disk 4
clean
Again, be extra careful and make sure you’ve selected the right drive!
DiskPart Clean
That drive is now sparky new and you can go off and do what you want with it.
I’m feeling a bit … lost. For some reason on one particular machine I don’t seem to be able to rename any Network Interface on Windows 11:
NIC Rename Screenshot
I’ve just tried it on another couple of machines and it’s worked fine – and I’ve obviously managed to rename some previously! So, anyone any idea what’s going on here? I’m sure we can do this with PowerShell though, so let’s do that.
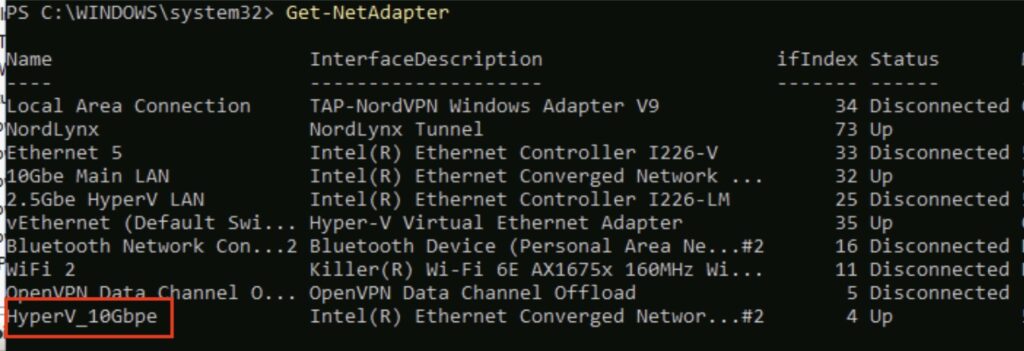
Fire up PowerShell as an Administrator and use the following command to get a list of your adapters:
Get-NetAdapter
Get-NetAdapter
You can see my output above. Next, rename the adapter using the following command:
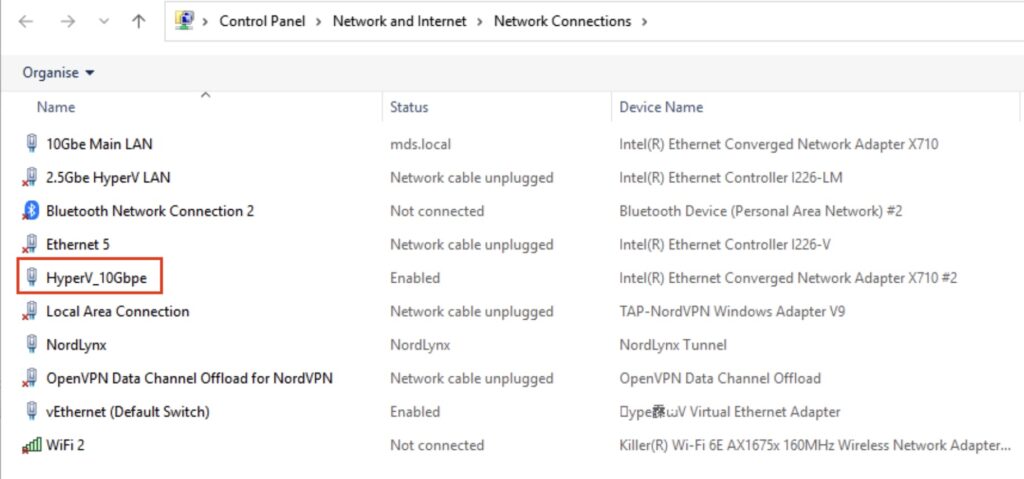
…obviously use the name of the interface you want to change, and what you want to change it to. Nothing appears to happen, but if you run the get-netadapter again you should see your changes:
Get-NetAdapterNetwork Connections
If anyone knows why I’ve lost the ability to do this in the GUI I’m all ears – I’ve tried removing all the HyperV vSwitch configuration but that didn’t seem to make any difference.
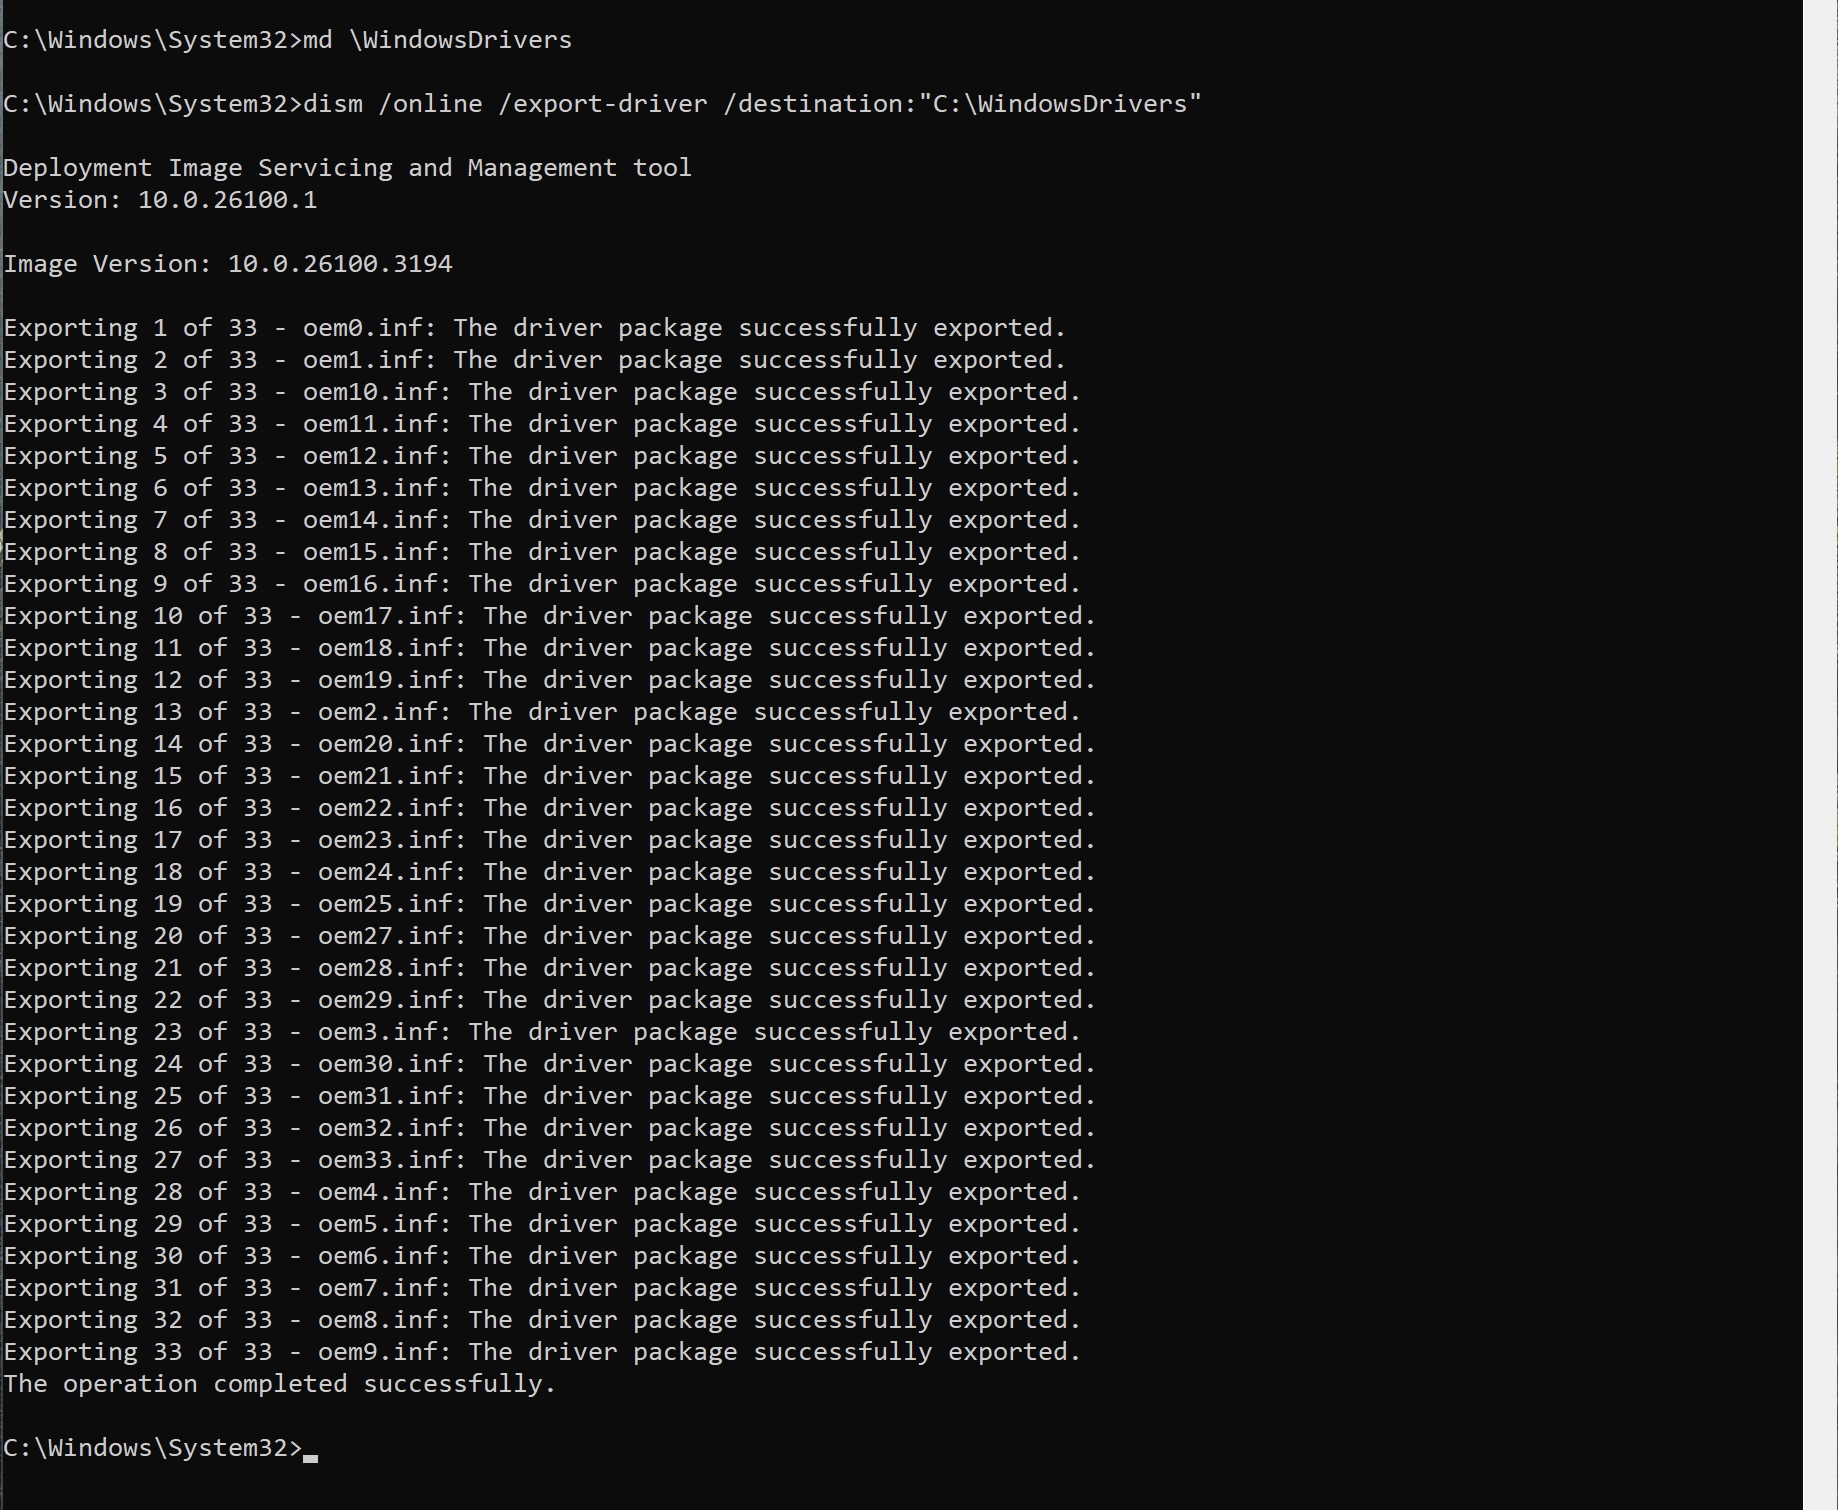
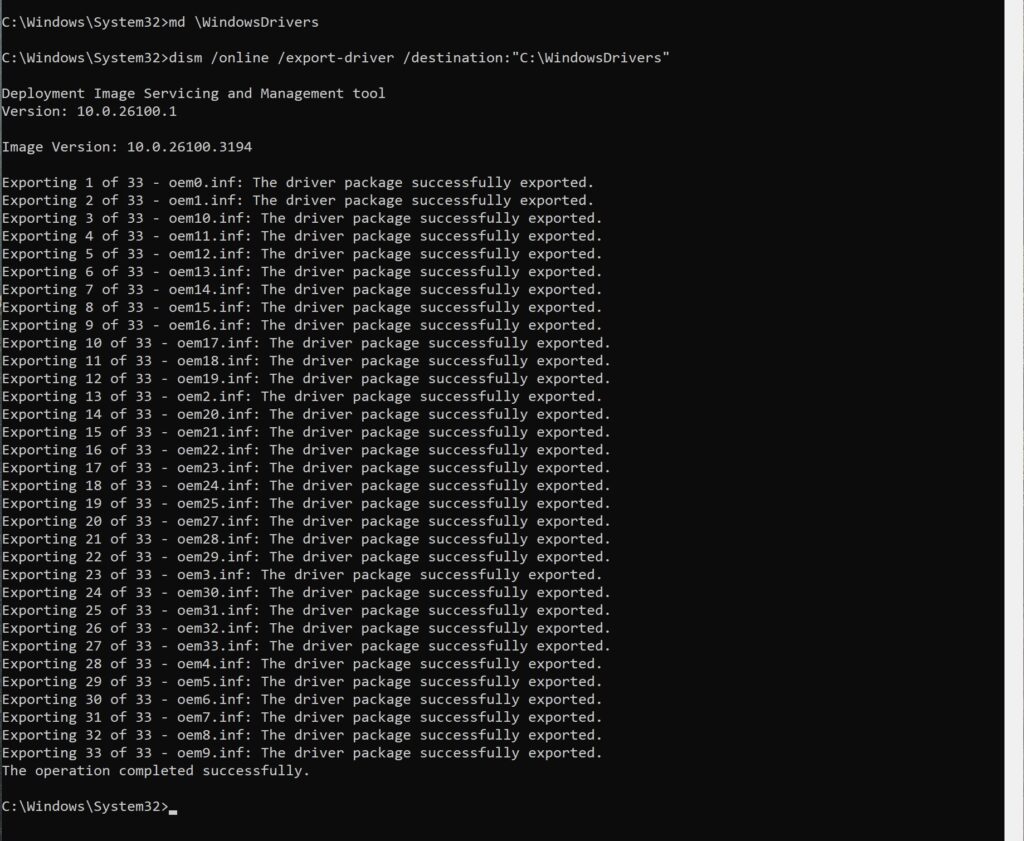
I was re-installing my Minisforum MS-01 recently as all the stuff I’d been testing on it meant it wasn’t really setup any more how I liked it. Anyway, one of the handy tips I’ve obtained from who knows where is a way to backup all of your device drivers before re-installing, helping to avoid the missing drivers thing in Device Manager.
It’s pretty easy too. All you need do is:
-> Create a directory for all your drivers ‘C:\WindowsDrivers’ for example.
This will then go and export all your drivers for you. You can see the process and the output below.
If you look in the directory, you’ll now see all your drivers.
Copy that directory off somewhere else, and you have a copy of all your drivers.
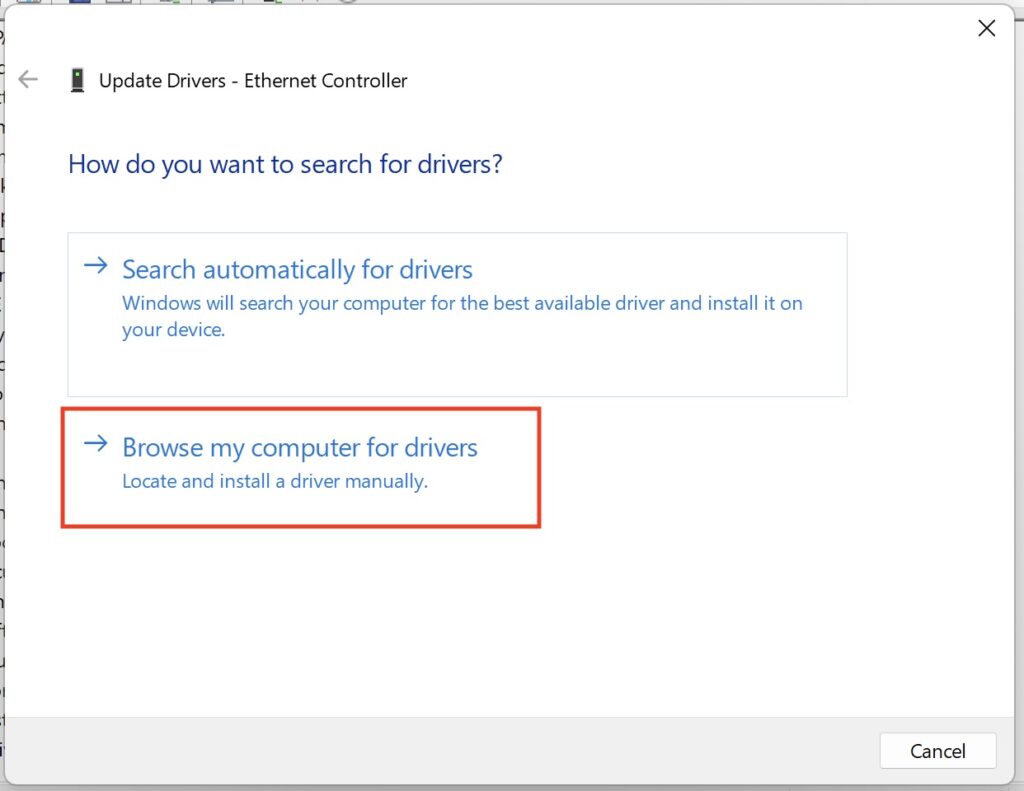
Now, when you go to re-install the machine, if any drivers are missing you can point Device Manager back to that directory or from a USB stick. In my example below, you can see that my device driver for my network card is missing (this example is from a Windows machine running on Parallels Desktop):
You can right click on that ‘Ethernet Controller’ and select ‘Update Driver’ – and from the screen that’s presented, select ‘Browse my computer for drivers’:
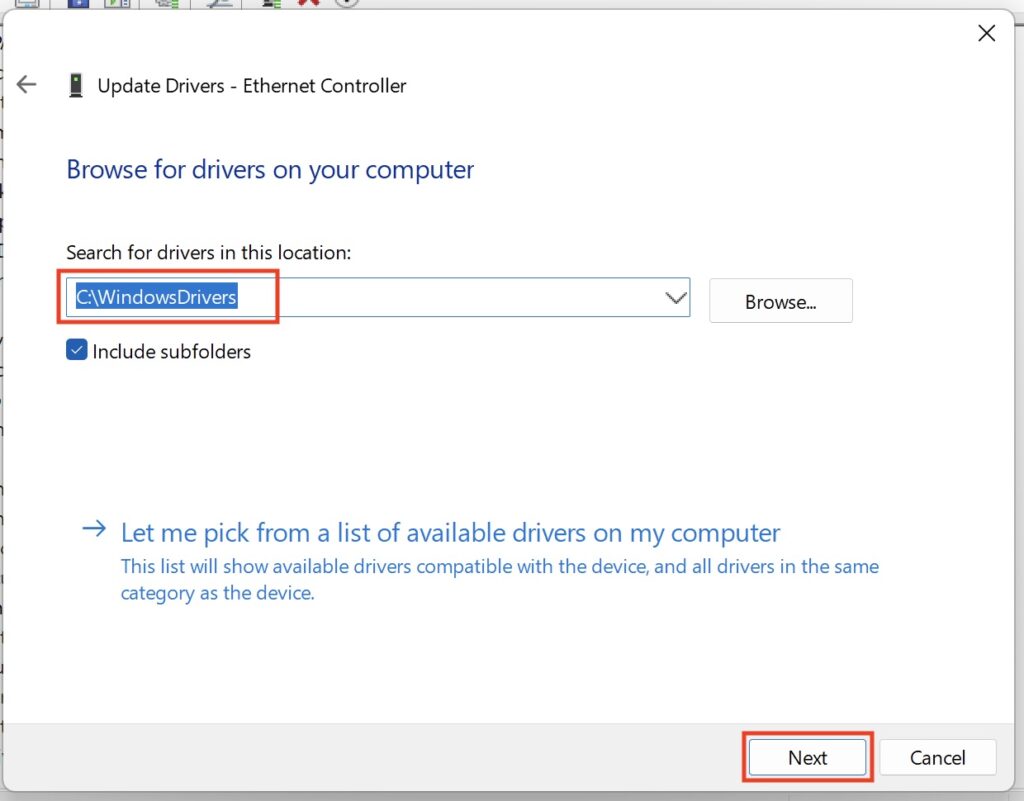
What you want to do now is select the folder where you have those exported drivers – or a USB of course. Make sure ‘Include subfolders’ is selected that way you don’t have to find the right specific directory. Then click ‘Next’.
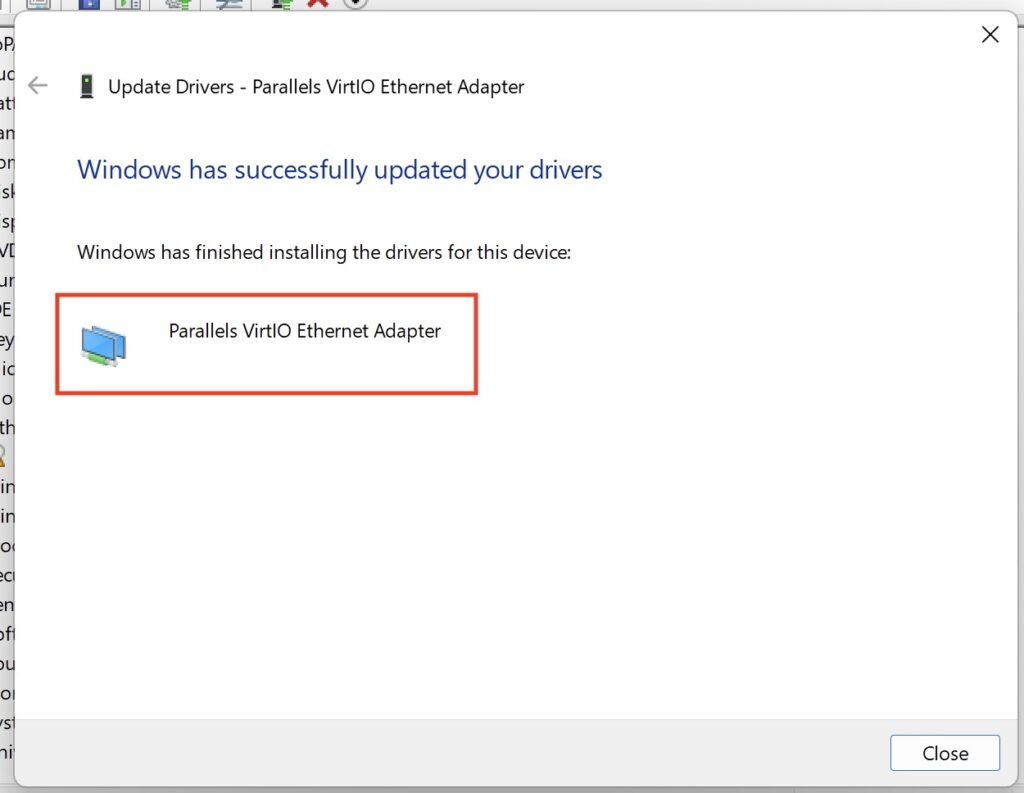
What you should see now is that the process has located the driver and installed it for you.
Now, if we look back in Device Manager, we should see the triangle/exclamation error has now gone.
Quite a handy thing that. I backup my drivers ever so often on my machines really to avoid having to hunt around for things. Anyway, you can also see a video run through here:
I’ve been in the hunt for new home-lab virtualisation servers. I previously used two 2018 Mac mini i7/64GB units. They have been solid units, and have served me well. I used Parallels Desktop for 90% of the virtualisation, with some VMWare Fusion in there too. They’ve lasted YEARS and have been rock-solid…but, their performance against their power consumption has been lacking compared to current offerings.
So I took a dual approach – for my constant stuff that needed to be on all the time (backups, some video conversion automation, AdGuard type stuff) I bought an Apple M4 Mini. More on this in another article, however it sips power while also being highly capable.
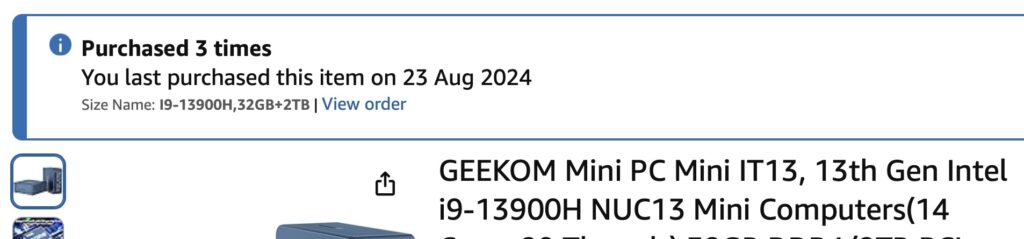
For my lab stuff – think 90% Windows, 10% Linux – I needed something x86. First, I looked at Geekom and their Mini IT13, and it was disastrous. I actually bought one direct from Geekom, and three from Amazon. All of them after a week or two just wouldn’t turn on.
Amazon Geekom Orders
I returned them all – so much so Amazon put me on the returns naughty step so I had to get AmEx involved, who were, as usual, absolutely badass at getting my money back.
This is when I stumbled on the Minisforum MS-01. The specs on this thing seemed out of this world.
-> Intel i9 13900H
-> Dual DDR5-5200 up to 96GB
-> 2 x USB4
-> 2 x 2.5Gb Ethernet
-> 2 x 10Gb Ethernet
-> HDMI
Have a look for yourself at all these ports – absolutely mad.
MS-01 Rear
Internally, the unit supports up to three NVMe slots. THREE. 1 PCIe 4×4, one 3×4 and one 3×2. Additionally slot 1 can be configured to use a U.2 NVMe too. The graphics are integrated UDH750 I think, but – and here’s something else that amazed me about this unit – it also comes with a half-length PCIe 3×4 slot! With it being half-length you’re limited by what you can put in there, but there’s certainly options out there.
I was quite blown away when I saw the specs of these units, and couldn’t order one fast enough, and to spec it out. The spec I’ve gone for is:
-> 96GB RAM
-> 1 x 4TB NVMe
-> 2 x 1TB NVMe
This is connected now over 10Gbe for the main LAN, and 2.5Gb for my HyperV machines. Absolutely bonkers considering its size.
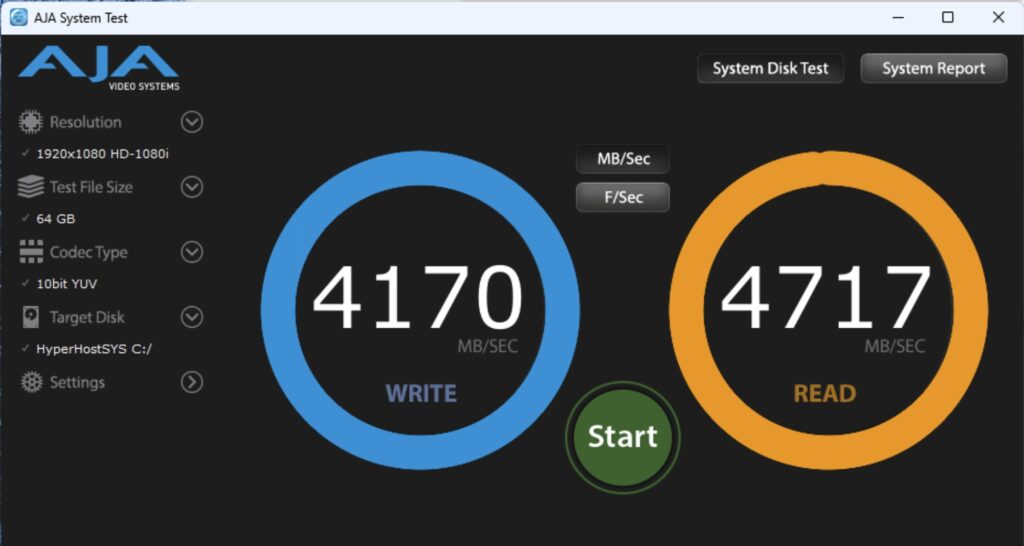
What’s the performance like? Well, let’s look at the primary SSD to start. This is a Lexar 4TB 4×4 that I already had.
SSD Performance
That’ll do. The other two SSD are a bit slower at about 2200MB/s read/write, still really acceptable.
The Intel 13900H in the MS-01 has a base TDP of 45watts but apparently can boost up to 115watts – it’s a mobile processor of course. By way of example, the desktop i-13900 has a base of 65W and boosts to 219W…but requires significantly more cooling.
You can see the Geekbench benchmarks for the 13900H here. If you want a bit of a giggle here’s the comparison between the 13900H and the binned M4 Max (I have the unbinned M4 Max). So processor performance is pretty good too – certainly good enough for what I need it for.
What about power consumption? At idle, the unit seems to average between 25 and 33watts, which is 0.6KwH to 0.8KwH per day.
MS-01 Power ConsumptionScreenshot
This does seem a little high compared to what some other people are reporting – several are reporting idle figures of 15-30 watts, but I’ve not seen it go that low. Perhaps it’s the spec and of course I have the 10Gbe interface in use.
What about under load? It seems to peak at about 115-120w but then settles in to about 90w. Assuming 90w consumption that’s 2.2KwH/day (rounded up), which isn’t insignificant, but then how often are you going to have it flat out..?
Assuming you work it hard for 8 hours a day, but the rest it’s fairly idle, running costs at GBP0.29/KwH would be as follows.]
MS-01 Power Consumption
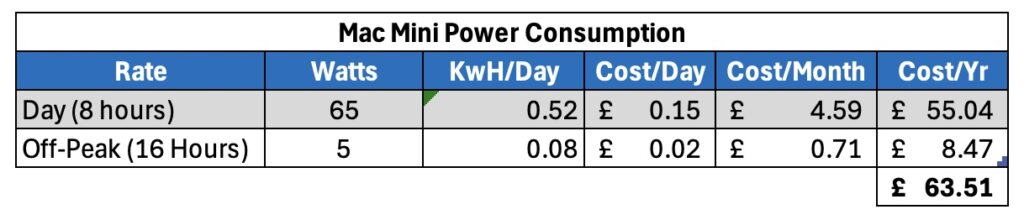
Just for the purposes of comparison – the M4 Mini I bought for my 24×7 automation stuff (Plex, backups etc.) averages about 5w at idle, and uses 65watts under full load.
M4 Mini Power Consumption
It’s a fairly decent difference isn’t it? Saying that, the M4 Mini can’t do all the x86 virtualisation that I need, but it’s still a reasonable comparison.
So what do we have at this point? Well, we have a small, powerful PC, with great networking, internal storage, and reasonable power consumption. There must be some downsides, right?
Well, so far, not too many. I do have some observations however. Firstly, noise. If these units are next to you, you will hear the fans. They seem to spin up even with the slightest of activity. They’re not particularly loud however you will hear them. They don’t bother me at all.
I also have a weird issue with the networking. Firstly, those two 10Gbe SFP+ ports. If I try use both of them they work for a little while but eventually I start to get problems with disconnections and the performance plummeting. If I had to guess, it’s because I’m using SFP+ to RJ45 connectors in there, and they’re getting heat soaked – so in effect, I can’t use both SFP+ 10Gbe connections at the same time. Not a huge issue given it also has two 2.5Gb ports.
Next is a weird one, and it sounds like a configuration bottle neck I’m hitting rather than an actual problem with the unit. With HyperV configured to use the 2.5Gbe interface only, and with management etc. on the 10Gbe port, I only get circa 2.5Gb performance not the 10Gbe port. In fact it’s so close to 2.5Gbe it makes me think this is a config issue. If I remove the HyperV configuration I get nearer the 10Gbpe. Something I’ll look into in the future I think, however it’s not that big a deal to me in reality.
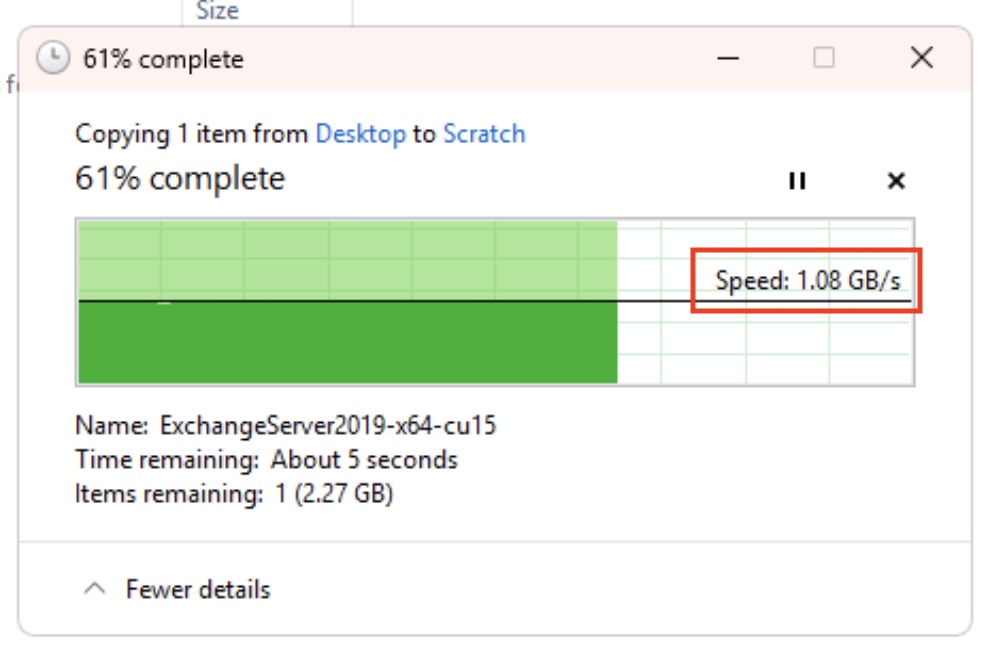
2025-02-25 20:32:04: I’ve now resolved this – it wasn’t just suspiciously close to 2.5Gbps it was 2.5Gbps…but it was reporting as 10Gbps. Essentially I was using a cheap non-managed 10Gb/2.5Gb switch, and an SFP+ to RJ45 converter on the MS-01. I swapped the switch for a 10Gbps QNAP managed switch and what do I see… the port running at 2.5Gbps. Swapping out the SFP+ to RJ45 connector and just using a straight fibre connection I now not only have the 10Gbps connection, it’s also running a lot cooler. I’ll test both 10Gbps connections shortly and see if running them both is workable.
10Gbps File Copy
What am I running on it? Well, my longer term plan is to configure it as ProxMox unit, for now however it’s running Windows 11 and HyperV. Not a great combination, but good enough for something I’m working on. I mean look what it’s running right now:
HyperV
That’s not too shabby is it?
Oh while I remember, the unit also supports Intel vPro for remote management – this allows for remote control, including BIOS level KVM access. How cool is that? Very useful for when trying to manage the unit remotely, and far more like grown up server solutions. It’s pretty impressive.
Costs
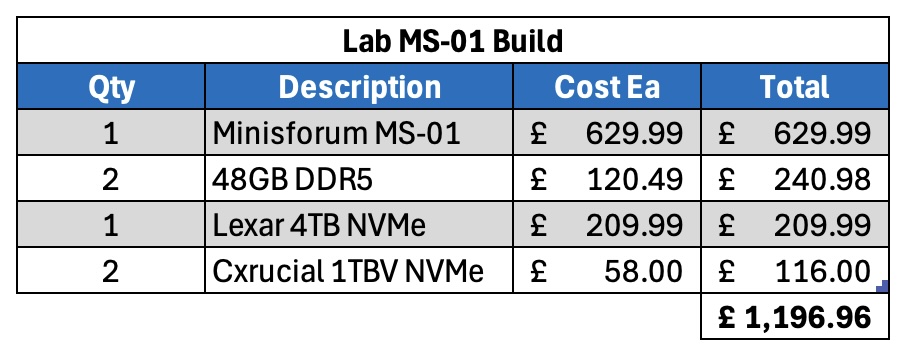
Now on to the thorny issue of costs. These are not particularly cheap units. Let’s look at this build – although I did have the SSD kicking about already.
Lab Build
NOTE: For my US readers, the above costs include our sales tax (VAT) at 20%.
So the cost isn’t insignificant, but for the capability I think it’s a bargain?!
Support
Now, this is worth being aware of. I’ve seen a few horror stories about dealing direct with Minisforum, and if it was anything like my experience dealing with Geekom I’d be very nervous about buying direct. Buy from Amazon however and any problems you can make their problem, and their returns process is usually excellent.
What’s Coming
It’s also worth being aware of the Minisforum MS-A2 that’s due for release circa April 2025. This has an AMND Ryzen 9 9 9955HX Core/32 Thread processor in it which will be even faster than the i9-13900H, so perhaps it may be worth waiting for that?
Then again if you’re always waiting for what’s around the corner you’d always be waiting for what’s around the corner.
Summary
I’m very happy with this Minisforum unit. The connectivity is bonkers, its power consumption reasonable, and its performance is certainly good enough for my purposes as a virtualisation lab host. I’d go as far to say as I’d be happy to use it as my every day machine should needs be, it’s that capable. It’s a little pricey – certainly compared to the Geekom, but then so far it hasn’t decided to become a paperweight – and there’s some concern about direct support from Minisforum, but so far, everything has been rosey and I suspect I’ll end up buying another one.
The arms race between Parallels Desktop and VMWare Fusion has continued with the recent release of Parallels Desktop 14.0 and even more recently VMWare Fusion 11.0. I use both products – typically VMWare for my server stuff, and Parallels for desktop type setup (Think Office/Outlook/Windows 10).
I’ve upgraded my Fusion to version 11 – and oh am I regretting it. There’s tons of problems with it:
Wow it’s slow compared to Parallels
I can’t run ANY virtual machines if I’ve previously run Parallels or VirtualBox
The network performance is all over the place.
Did I mention how slow it was? Startup/shutdown & Snapshotting.
I’ve tried this on multiple machines, and all with similar results. The most irritating one is that if I try and use VMWare Fusion after having either Parallels or VirtualBox running, I get an error saying ‘Too many virtual machines running’. The only way I seem to get around it is by rebooting and not using Parallels or VirtualBox at all. It’s infuriating.
I’m sure VMWare will iron out the issues, but for now it’s going in the bin and I’m going to ask for my money back.
Video below shows the general performance and issues in more detail.
I installed a couple of servers recently on 2016 using the Evaluation as we hadn’t received the correct keys. Now, usually, I’ve found that using this method of setting the correct key, or simply changing the product-key from the properties of ‘My Computer’ worked, however for these units I kept getting this error:
This Edition Cannot Be Upgraded
This did not bode well as we’d done a fair bit of work on the deployed servers. Yes, yes I know….
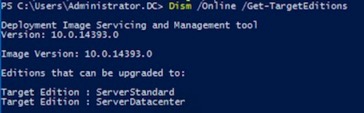
Anyhow, I did some investigation with the DSIM tool, and it turns out you can actually use that tool to upgrade the license, and it worked just fine.
Firstly, check to see what versions you can upgrade the license to, or rather check to make sure the version you want is in the list. You can do that with:
Dism /Online /Get-TargetEditions
You should get an output similar to this:
Example Output
We can use the same tool to set the license key and upgrade it the full version. That command is:
I was using one of my Windows 10 Virtual Machines earlier and the profile lost all of its colour. It went grey (or gray…Which to use?!). It looked like this:
Grey – Wrong
…instead of:
Correct Colours
Just a bit strange I thought. Anyway, after some digging around it turns out Windows 10 has a set of colour filters to assist people who struggle to see certain colours. Somehow I’d managed to turn it on.
It’s simple to toggle – simply use Windows Key+ctrl+c and it’ll toggle between the two.
You can also get to it through the Control Panel – go to ‘Ease of Access’ and you’ll see it in there under ‘Color Filters’. Well you learn something new every day, don’t you?
Recently on some of my machines I’ve been getting errors not being able to update Insider Preview versions. I end up with ‘Updates could not be installed’ or similar. Using the Windows Update Fix Tool doesn’t seem to sort it out either. Anyway, I’ve found a process that seems to resolve the issues for me. Have done it a fair few times and it seems to work…So I thought I’d share the process.
Stop the Services
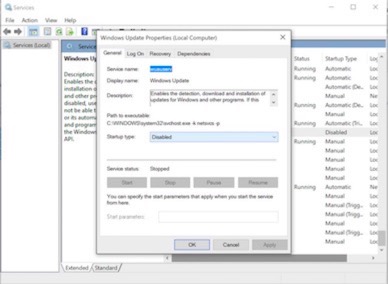
Start the Services plug-in – Services.msc (I’m assuming you’ll know how to do this – Windows key+R, enter services.msc).
Find the Windows Update service – if it’s started, stop it. Set the service to ‘disabled’ for now.
Services
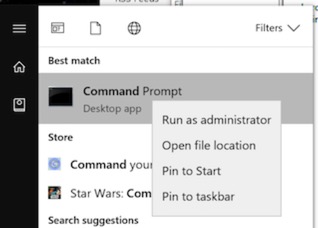
Next, fire up an elevated command prompt (I.e. Command from the Start menu, right-click, select run as administrator).
Run As Admin
From that command prompt, stop these services:
net stop bits
net stop appidsvc
net stop cryptsvc
You can copy/paste those in to the DOS prompt if you want.
Clean up the SoftwareDistribution Folder
Go in to your Windows folder, and find the ‘SoftwareDistribution’ folder. Rename it to ‘SoftwareDistribution.bak’. Note that if you get an error saying the folder is in use – double check to make sure you’ve stopped the Windows update service. Personally I just normally bin the whole folder – but then most of my units are virtual so I normally snapshot them before doing this.
Clean up the CatRoot2 Folder
Go in to your System32 folder in your Windows folder, and find the ‘CatRoot2’ folder. Rename it to ‘CatRoot2.bak’. Now, this can be fussy. This is often locked by the Cryptographic service (cryptsvc) and you’ll find that the CryptSvc often keep starting due to dependencies from RPC and the like. The trick is to wait until you get the ‘This folder is locked’ with the ‘Try again’ button, then type in the ‘net stop cryptsvc’ into the Command prompt, and as soon as it’s finished stopping, hit the try again button. This generally works. May take a few times though – it’s clearer what I mean by this in the video.
Reset Security Descriptors
Next, we’re going to reset the security descriptors for BITS and Windows Update. See here for the commands for that. Couldn’t paste them in here – keeps converting some of the stuff to Emoji, and I haven’t worked out how to stop it!
Reset the Windows Update Service to Manual
Finally, reset the Windows Update service to ‘Manual’ in the ‘services.msc’ consoler, and reboot.
You should now be able to re-run Windows Update and hopefully all your updates apply. There’s a quick video of the run through below.
Just a quick – ran into an issue on a site today where a Certificate Authority had been configured, but there was no CertSrv directory – so you couldn’t browse to https://server.domain.com/certsrv to issue certs.
Anyways, there’s a simple way to fix. Start an elevated command prompt and use this command:
Certutil -vroot
That’ll create your directories & site for you. Not really sure why it didn’t get created – at a guess they didn’t have IIS installed when they configured the authority? When I have come across this before it’s usually because people have added web services after creating the CA, and have not finished the post-install config in the Server Manager.
DHCP – there’s an ‘interesting’ subject. The older amongst us may remember what a godsend it used to be, after spending an age having to run about setting up IP addresses manually and the like. Anyone else remember that? Anyway, it’s not something usually to get excited about. Managing it’s availability is a subject that does come though. People have taken various routes including failover clusters (yes, really), to split scopes and all kinds of stuff.
Here’s the thing – Windows Server 2012 has in-built capabilities to deal with failover and load-balancing, and they just make life easier. There’s a decent TechNet article here that describes how it works.
Anyway, it’s an absolute doddle to configure. The hardest part is often defining all the failover relationships if you have many sites. As per many things though, I think the best answer is to keep it as simple as possible. It’ll make your life easier in the long run.
The video below shows a run through of configuring a basic load-balance DHCP config. Far better than split scopes and all that stuff…And way, way, waaaaay cheaper than setting up a failover cluster.
Windows Server Update Services – WSUS, WUS, SUS or whatever you like to call it. Possibly one of the daftest names for something I’ve seen in a long time…..Aaaanyway.
This is the role you can use to cache, download, and deploy Windows Updates out to your estate under your control – I.e you can control both what updates the clients get, and how they get them – I.e. From the Internet or from your servers. The latter bit being a common usage – download to one distribution point, and then distribute out to your estate rather than all the machines downloading over the Internet.
There’s lots of different architectures out there. The Technet article here is great at explaining them, and what the options are.
Most organisations don’t find this a difficult process or product to deploy – the ones that do, in my experience, have the problems because they try and massively over-complicate the deployment model for WSUS. Keep it simple – keep it working!
The video below runs through the process of setting up a single server, how to get your clients talking to it, and how to approve/install basic updates.
I produced it for a specific request, but I thought it would be useful to share.
Oh, by the way, if you have Windows 10 machines in your estate ensure your 2012 R2 WSUS server has this update installed. If it doesn’t, your Windows 10 machines will show up as Windows Vista – and nobody wants that.
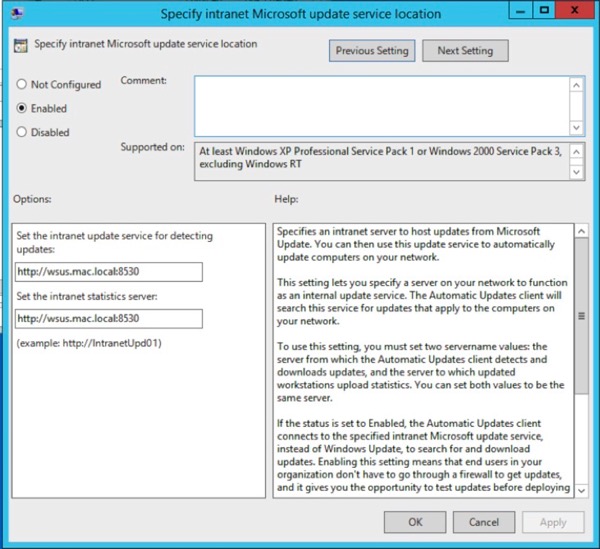
Another thing to watch out for is specifying the servers in your group policy – make sure you put the port in, otherwise I find that the clients just don’t find the WSUS update server, and you never see the clients register.
This bit – note the port numbers of 8530 and 8531 (http and https respectively), and don’t do what my brain keeps doing which is put 8350 and 8351 and sit there wondering why it’s not working.
WSUS Settings
The other piece of advice is that you should be patient once the group policy has applied – it can take a while for the machines to start appearing in the management console. That’s just fact, it takes a while.
A lot of people I know have started using Windows tablets of one sort or another – and a question that keeps cropping is why when their machines are members of the domain can they not use the PIN login method?
By default on the domain this feature is turned off.
As a side note, it’s interesting the resistance you can run in to enabling the PIN login method….It’s INSECURE shout/rant etc. It may be insecure – but it’s interesting that the same people who shout & moan about this don’t moan about 4 pin locks for people’s phones & iPads, and they arguably can contain very similar data-sets?
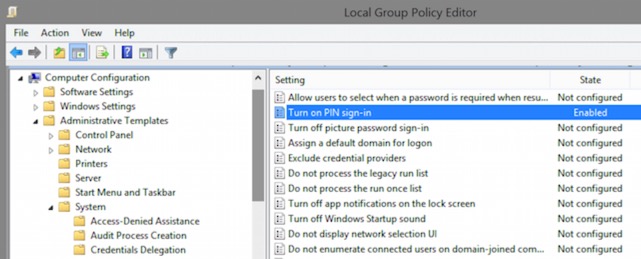
Anyways, where is the Group Policy setting? Under the Computer Policy, go to Administrative Templates\System\Logon.
Under there you should see the option for ‘Turn on PIN Sign-In’.
If you open the local group policy editor you can see it here:
You can also set it directly in the registry at this path (for example if your edition of Windows doesn’t have the Group Policy editor in it):
With the demise of Microsoft ForeFront Threat Management Gateway, I get asked repeatedly about what reverse proxy products are suitable for Microsoft Lync. Of course there are a raft of products out there capable of reverse proxy services – some of them quite expensive..There is also one that’s free – it’s called Application Request Routing or ARR.
You can have a look at the web site and read all about it here:
This is a plug-in for IIS that full supports Reverse Proxying, and is supported for Microsoft Lync usage. It’s pretty powerful in its own right really – but for the purposes of this blog I’m going to focus on the reverse proxy element.
Another useful feature – especially if you’re tight on public IP Addresses – is that multiple web sites can be proxy’d from a single IP address. I can have for example:
…all listening on one public IP Address but being routed to three different back-end web servers. The proxy is routed differently depending on the requesting URL.
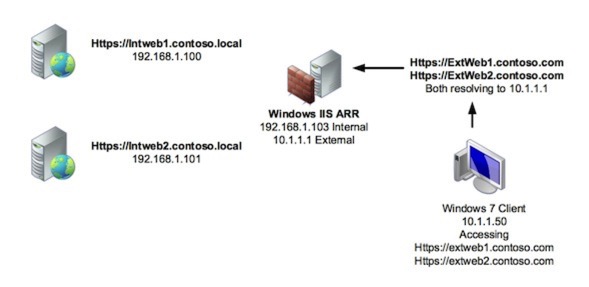
So to look at what’s involved in configuring the reverse proxy, first let’s look at our lab environment. It’s detailed below. Click on the image to see a larger version.
Configuring the Reverse Proxy Routing Firstly, there’s a few things to watch out for when you’re configuring the Server itself. I prefer to have two interfaces on these units – one internally facing, and one externally. The issue with having multiple interfaces is ensuring that the correct traffic goes out via the correct interface – if it doesn’t, you’ll have issues with your firewall rules won’t you? This article below explains what you need to watch out for on that front:
Certificate Considerations I want to be able to access my https sites from one IP address – to do that, I need a certificate that has all of the destination URLs listed in its Subject Alternative Name (SAN) field. So, for my lab, I have one certificate that has extweb1.contoso.com & extweb2.contoso.com in its SAN. This is then bound to the default web site within IIS. Without the AAR configured, connecting to https://extweb1.contoso.com for example, brings up the default page of the IIS installed on the reverse proxy server.
Installing ARR Installing ARR is simple. You can get the code, and run the installer from this web site here:
Configuring a Reverse Proxy Rule Let’s look at configuring the RP rules. We want multiple URLs routing to different hosts, so we need to configure multiple rules. In addition, I only want to Reverse Proxy HTTPS requests, not HTTP. To do this, we need to do the following items:
Configure our server farm within ARR
Turn off SSL Off-loading (Important!)
Delete the HTTP rule
Modify the HTTPS rule so that it only routes the requests that we want, and not everything
That’s really all there is to it! So let’s look at each bit – specifically, for the extweb1.contoso.com website.
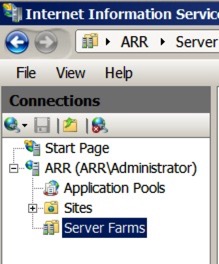
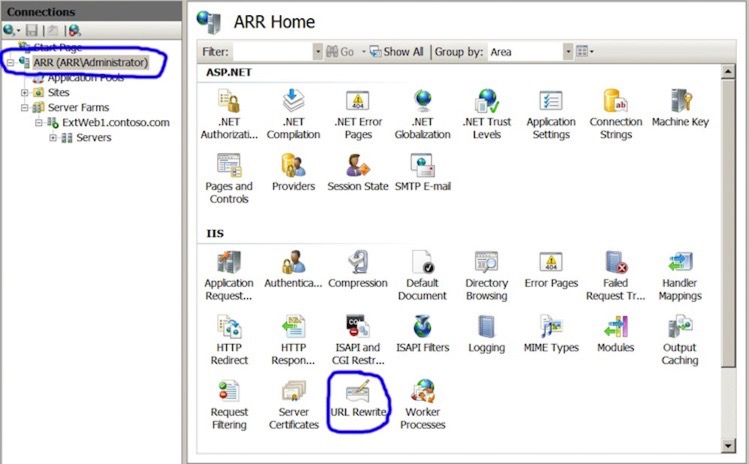
Configure our Server Farm for ExtWeb1.contoso.com Fire up Internet Information Services Manager, and expand down the panels on the left – you should see a new entry – Server Farms:
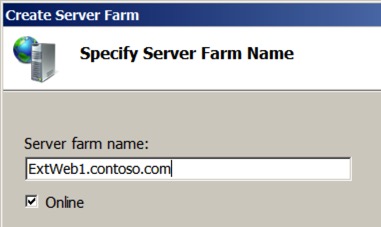
Right-click on the server farms, and select ’Create Server Farm’. You will be asked to give it a name – use the External Web Site address as it makes it easier to track. For this example, I used ‘ExtWeb1.contoso.com’. Make sure ‘online’ is selected, and hit next.
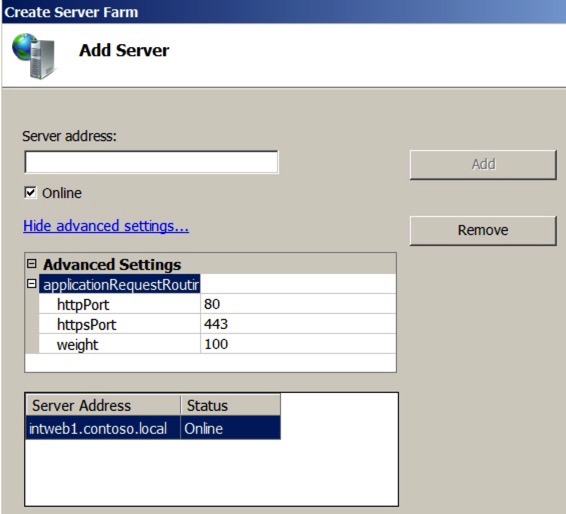
At the next screen, enter the target address that you want to route to. For example, I want ExtWeb1.contoso.com to route internally to IntWeb1.contoso.local. In addition, you Microsoft Lync People, you can modify the target ports here too (to 8080/4443 for example) by hitting the advanced button. Make sure you hit ‘Add’ to add the destination server to the list.
Once you’ve done that – hit finish. You’ll now be asked if you want to create the re-write rules – like below – click ‘Yes’. Note that if you have already created a proxy rule you may get a message saying that the system wants to create a conflicting rule – that’s because by default the rules capture all traffic, not just the traffic we’re interested in. We’ll modify that rule in a minute.
Now, we need to turn off SSL Off-loading, and optionally turn of disk-caching. Again for you Lync people, make sure you turn off caching as this causes issues with the Lync Web Services.
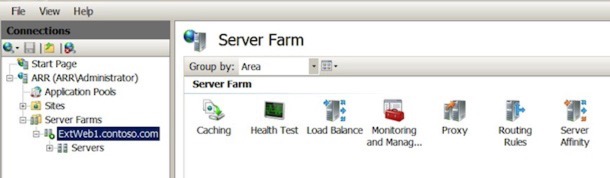
Under the ‘Web Services’ section now in the IIS Manager, you should see the Server Farm we have just created. Select it, and you should see all of the options in the right hand pane, like so:
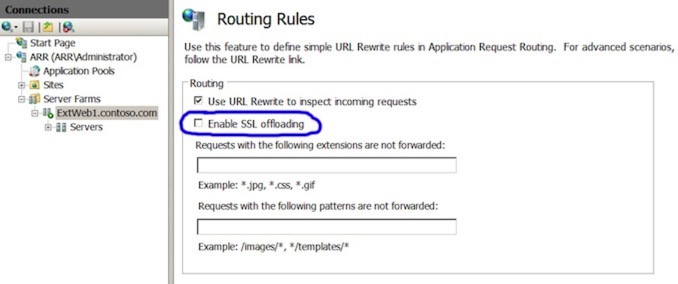
Firstly, select the ‘Caching’ option and turn off disk-caching. Next, select ‘Routing Rules’ and make sure you turn off ‘Enable SSL Offloading’.
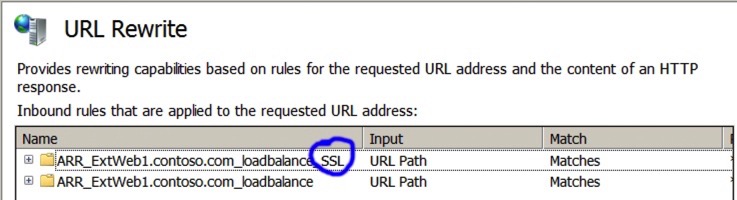
For our final trick, we are going to modify the re-write rules so that it only captures and routes traffic for ExtWeb1.contoso.com to IntWeb1.contoso.local. To do this, select the very root of the IIS installation, and select the ‘URL Rewrite’ option as highlighted below:
In the URL Rewrite Screen, you should see a couple of rules for the farm we have just created – one for HTP and one for HTTPS (SSL). In my lab, I’m going to delete the HTTP one as I don’t want to forward HTTP requests, only HTTPS – note that the SSL/HTTPS one has an SSL marker on the end. Use the ‘Remove Rule’ on the right hand pane to remove the HTTP one it hat’s what you want to do.
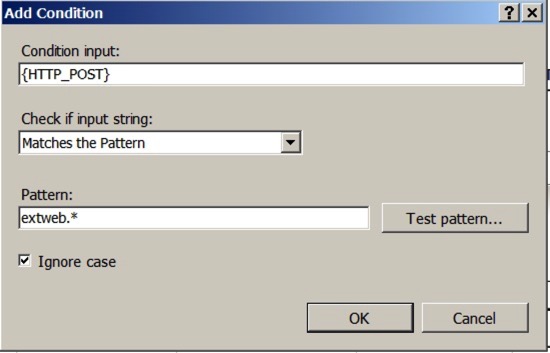
Next, we’re going to modify the SSL rule to only affect traffic for extweb1.contoso.com. To do that, select the rule, and hit the ‘Edit’ button on the right hand pane. Further down the page, you will see an area marked ‘Conditions’ – these are the conditional modifiers to apply to the rule – you will see there is already one there making this rule match traffic that has HTTPS switched on. Click the ‘Add’ button to add a new rule – note that it’s {HTTP_POST} we’re interested in, but you can select it from the list rather than type it in.
Click ‘OK’ and then Apply the rule … and you’re done! Easy isn’t it? You can then go through and add in Server Farms & rules for other specific routing requests with different targets. For Microsoft Lync for example, you could have your meet, dialin, and web-farm stuff all directed appropriately.
Video Run Through I’ve also put together a video showing the whole process from start to finish – you can view that below.
Let’s look at a simple way to get a copy of your live Active Directory environment for testing purposes. The process is:
Implement a new domain controller in your live environment
Physically separate this new domain controller (after it’s synchronised) to a completely separate network.
Fire up the new domain controller and seize all of the flexible single master operation roles to your newly isolated domain controller
Clean up the live environment removing the dead domain controller
What you’re left with is a complete copy of your Active Directory domain, in a completely isolated environment. Forgive the incessant bolding of the separation but it’s a very important point – once you’ve isolated that domain controller and seized the FSMO roles you absolutely must not let it out in to the wild – it would roam wild and cause all kinds of unhappiness. At best, it would ruin your weekend.
It’s pretty easy to do in reality – process is:
Promote and synchronise a new domain controller
Physically separate (there I go with the bold again) the unit from your main network.
Seize the FSMO roles on the disjointed Domain Controller making a whole self-contained copy of your Forest
Remove the domain controller and associated meta-data from your live domain.
So let’s run through the seizure, and clean up of the original Active Directory. I’m assuming you know how to promote a new domain controller, and physically separate it from your main network.
Seizing of FSMO Roles On your new and isolated domain controller you need to seize five FSMO roles – these are:
Schema Master – Forest-wide and one per forest.
Domain Naming master – Forest-wide and one per forest.
RID Master – Domain-specific and one for each domain.
PDC Emulator – PDC Emulator is domain-specific and one for each domain.
Infrastructure Master – Domain-specific and one for each domain.
Of course you’ll need relevant permissions to seize these roles – Schema & Enterprise Admins.
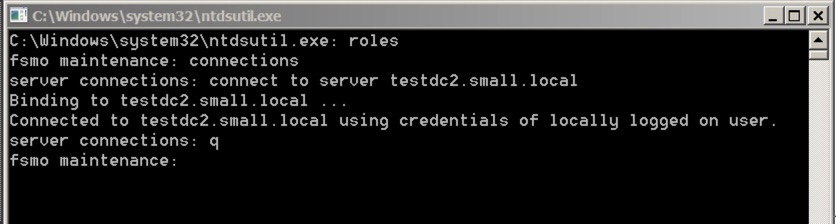
We can seize them all using the NTDSUTIL utility – let’s go through each of them in turn. Firstly, we need to set up NTDSUTIL – so fire it up from Start/Run, or from a DOS prompt – and do this:
The commands are:
Roles
connections
connect to server your server
q to quit to the higher menu
Next, we’re going to seize each role in turn. To seize each role you use:
seize role
..where role is:
pdc
schema master
naming master
rid master
infrastructure master
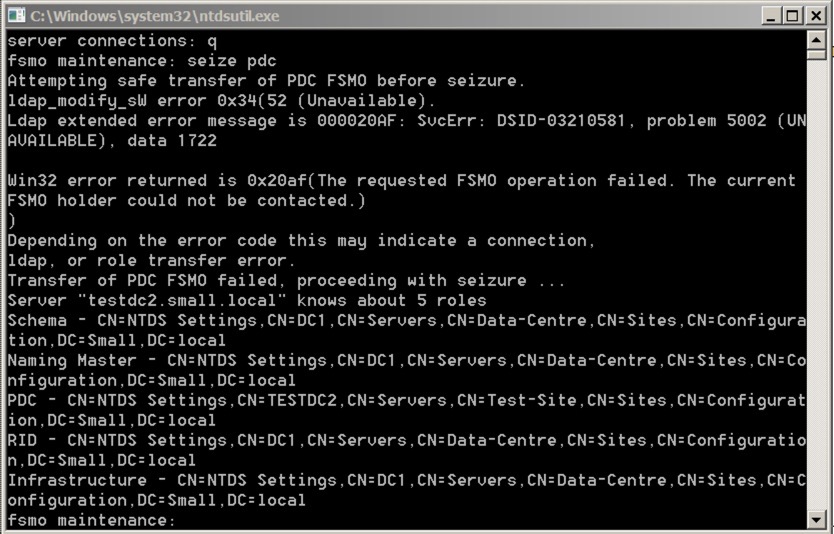
So let’s do the PDC first. The command is:
seize pdc
Once you enter that, you’ll receive a warning similar to this:
Say yes, and let it complete. You’ll see the completion/process in the window:
Notice that it first tries to do an orderly transfer before going through the seizure.
You’ll need to do the same for all of the remaining roles. Once they’re done, you’ll have a fully isolated copy of your Active Directory, complete the FSMO roles. You can then go off and do all of your testing in that environment – remember you must not allow this domain controller back on to your main network.
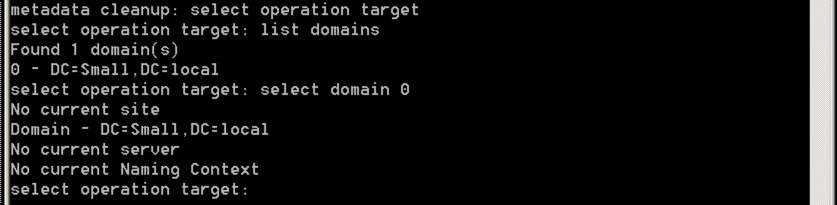
Clean up your Live Active Directory Once you’ve removed your DC and isolated it, you’ll still be left with all the objects in your live Active Directory – we’ll need to clean that up. Firstly, we need to fire up NTDSUTIL and connect to the relevant service. You do this as follows:
The initial commands are:
Metadata cleanup
connections
connect to server your server
q
We’re now ready to connect to to the items to clear up – to do this, you need to select the right domain, site and server. Let’s go through how you do this – firstly, from the NTDSUTIL use the following commands:
select operation target
list domains
select domain number
What you’re doing is selecting the relevant domain – it should look like this:
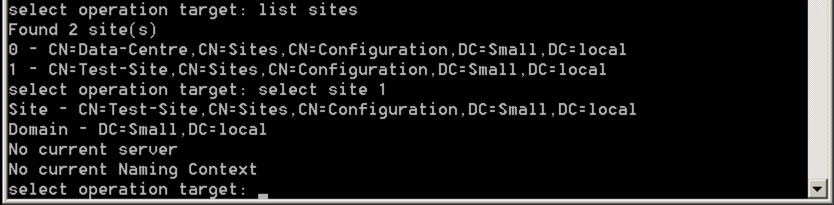
Next, we’re going to select the site with these commands:
list sites
select site number
It should look like this:
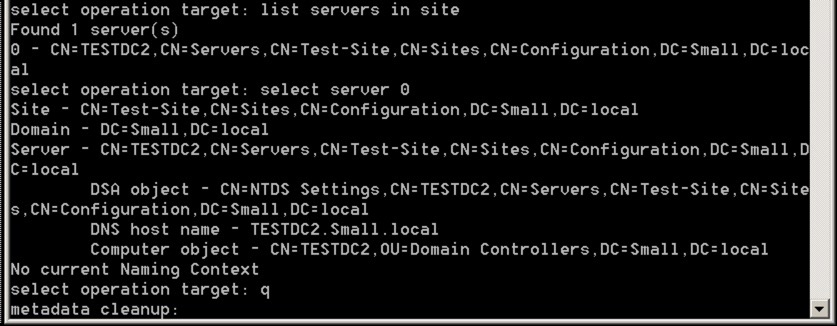
Finally, we’re going to select the relevant server in that site using these commands:
list servers in site
select server number
q
The q takes us back to the metadata cleanup level with the correct server specified – it should look like this:
The last stage is to delete the server – you do this using this command:
remove selected server
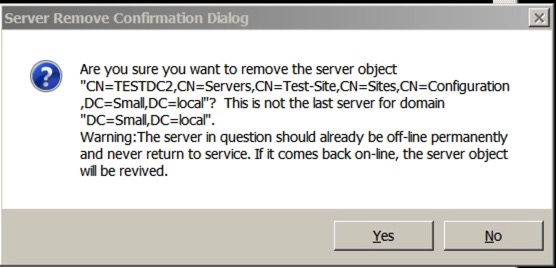
You’ll quite rightly receive a warning like this:
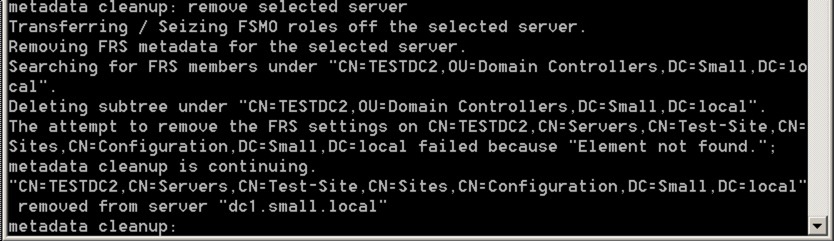
Say yes and let the command complete – the output should be like this:
…and you’re done! It’s worth scanning through your DNS too to see if there are any remnant records for the removed server too, but you’re pretty much done now and ready to go.
There’s a video below running through the whole process too, should you want to see it all in action.
It’s an incredibly hard subject to fully qualify really but at a basic level you need to know what happens when you apply a schema update to your system. Like I say, I’ll go in to the ins/outs in upcoming articles – but a very basic level it’s a good start to have a copy of your system to work from for testing purposes.
Performing Schema updates on your live Active Directory – from a change control perspective it can fill you with fear can’t it? It’s one of the few functions that are forest wide, and effectively irreversible (bar a forest restoration process).
To be absolutely fair, they very rarely go wrong – and even when they do, hardly anybody notices. What’s going to go wrong? A system breaks in the middle of the update? Usually you can just run the update again and let it finish. The biggest risk is from ineffectual planning. I mentioned a while ago that a friend of mine had rather unfortunately committed a schema update to their live systems without doing the prep for a previous edition – and of course, this negated their ability to implement the platform they wanted. It wasn’t unrecoverable – but it was … a little stressful to do. Editing your schema is not for the light hearted. I’ll happily dive in on a demo or test platform – but live? I’d avoid that at all costs. Article here for example on removing an Exchange 2013 domain prep:
I spend a lot of my time designing and being involved in the implementation of Microsoft Lync – and that always involves a schema update. I’m always slightly surprised at most company’s attitudes to schema updates. Pretty much 90% of them think ‘pah, what’s the worse that could happen’…and continue on regardless. A high percentage of them have little idea of what’s involved if it goes wrong.
My bigger clients usually have at least thought about it – some of them even tested recovery of the forest.
From a consultative point of view, I always try and include the ramifications of what’s about to happen with the recovery routes – I.e. attribute/schema updates, and how hard it is to roll back. On a tangent for a second – I get why a lot of techs see change control as a pain, and slowing down their day job – I try and look at it another way – it’s transference of risk and responsibility. If you make completely clear what is being done, what the risk is, and what the recovery method is – the decision to go ahead is with the business, not with the tech. As long as you’re broadly right you’ve made the business able to make a reasonable business decision against risk.
Anyway, I’m getting ahead of myself. Testing of schema updates, and forest recovery, are fairly key to any system really – and on that front I’m surprised by how many companies don’t do it. I suppose in some ways that goes to show how general reliable it is. I’ll be producing a number of articles on how to risk-assess, protect, and recover from schema updates – and this is just one of those base articles. There’s a lot of noise on the best ways of doing this out there though – so would be interested in what people think.
Let’s look at how you can create a copy of your Active Directory for testing purposes. It’s simple enough to do – and there’s a few ways of doing it. Firstly, let’s cover how to create a replica by implementing a new domain controller, synchronising it, then physically removing it and seizing the FSMO roles on that unit.
Some people don’t like this method as they think it’s risky and a little dirty – and I kind of get why they would think that. It’s also possible to do a normal forest recovery type restore, and we’ll look at that next….
In my working life of talking to many companies about their technology usage, and their deployment plans, I tend to find that the needs & wants of the average Systems/User Administrator are often forgotten. This, I think, is a dangerous mistake to make with a number of technology deployments as it can lead to issues and frustrations with deployment & administration.
Spend some time making your Administration team’s lives simpler, and you’ll be repaid with faster turn around times, and fewer errors in administrative functions. Just for clarity on that last bit, I’m not suggesting that Administrators are error prone – far from it – but you ask anyone to manually configure telephony for 30 users (for example) and expect them to get them 100% right all the time – well, I think you’re asking for a lot.
In my mind, I tend to think that if you are doing something specific, with a pattern, and repeatable in a manual method, well, quite frankly you’re doing it wrong. Wrong in that it’s slow, and probably more importantly – it’s error prone.
Microsoft Lync, and Exchange, are prime examples. There are loads of PowerShell tools available for automating tasks, and for implementing certain functions, features, and processes fully automatically and with minimal input. The problem is though that they require scripting skills. A lot of Sys Admins are very comfortable with scripting – but it still takes time and effort. What about front-line user managers? The ones who set up users, who configure their telephony policy for example – do they know scripting? Do you WANT them to know hows to script-admin against your systems? You’d hope the risk on the last one would be negated by security policy of course, but that’s not really the point.
When I’ve worked on larger projects I’ve always tried to put effort in to simplifying take on processes, whether those take-on processes are migrations from legacy, or delivery of new services. Make it simple, make it repeatable – and what you achieve are fewer errors, and faster take on. Fewer errors means less headaches from support calls, and fewer unhappy users during migration/take-on. I’m uncertain on the less/fewer in that sentence.
How does that apply to Microsoft Lync & Exchange, my most common take-on/migration project? Well, there products have their own administration tools. Lync Control Panel for example. Having multiple tools does involve additional understanding and take-on from the administration staff. Admittedly it’s really not hard to administer users in Lync Control Panel – but it is something typically new, and it is something additional.
The other thing – and probably the real drive – is that most common tasks are utterly repeatable. Think about that – repeatable. The task to achieve the the end game is the same, all the time. If that doesn’t shout out automation I don’t know what does.
Setting up a new user in an organisation is a great example – Add the user in Active Directory User and Computers, add them to the right groups etc. That gives them their identity. Next, jump in to Exchange management and configure their mailbox. Then, jump in to Lync management and configure their Unified Comms stuff. Sure you can see where I’m going with this – it’s a faff. A repeatable faff that’s prone to error.
How do I fix this? Well, I extend ADU&C to automate the common tasks of:
Configuring their Exchange mailbox
Configuring their Lync environment
Configuring their telephony in Lync etc.
There’s absolutely no reason that this cannot be extended to take-ons too, rather than new users. For example, with Lync Deployments, I often put in scripts that enable Administrators to enable groups of people, or in certain situations whole Organisational Units for example.
The result? Happier administrators, fewer take-on/enablement errors, fewer support calls, increased productivity, and a certain feeling of TECH AWESOME. You can’t argue with that can you?
The video below gives a run through of some of the Lync stuff – it will give you a good idea of what I mean. The hi-def version can be viewed by clicking here.