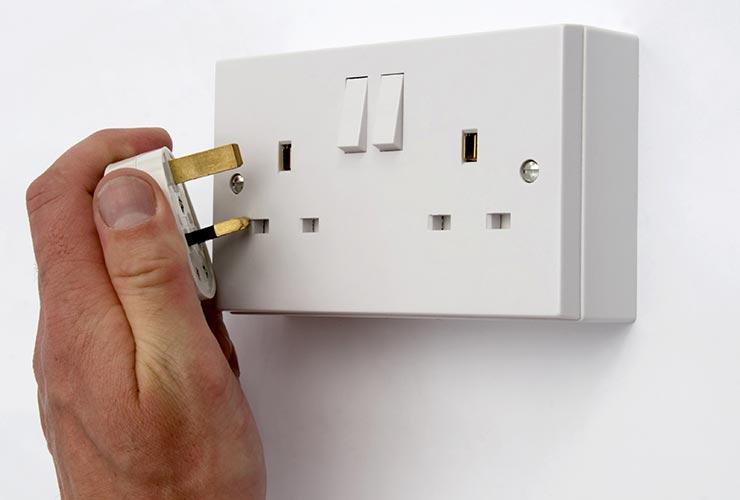
I’ve been clearing stuff out at home, and a big chunk of that clear out has been cables. I was throwing out a ton of US extension cables (I worked in the US for a while), and two things struck me:
1: None had fuses in. I even hacked one of them apart to check. 2. Some of them weren’t earthed.
This got me thinking about safety & stuff. The plug receptacles will be protected by the circuit breaker at the fuse box – but that will only protect the cable in the wall to that central distribution cabinet won’t it? Assuming it’s say a 20Amp breaker (I don’t know what they actually are), that means you could have 20Amps (or 2200watts) being pushed down an extension cable rated for less than half of that. Seems a recipe for a bonfire doesn’t it?!
Throw in some daisy-chained extension cables etc. and that sounds disastrous. What am I misunderstanding here? Anyway, it got me further thinking about how we do things in the UK.
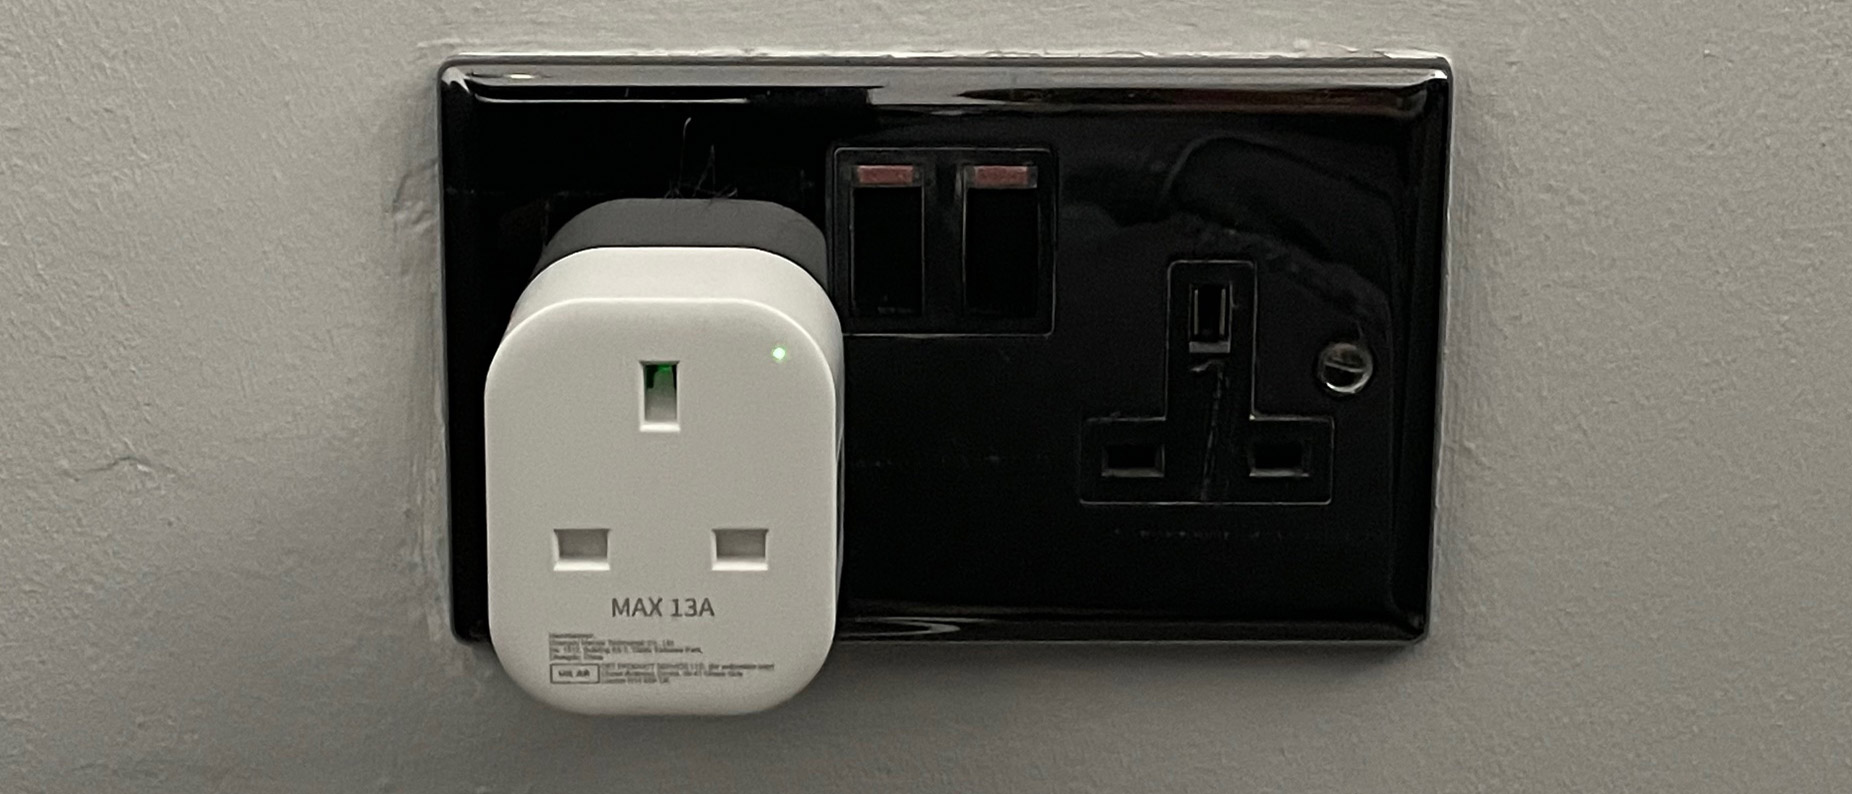
We of course have similar circuit breakers in the UK, although I think they’re typically rated at 32amps – which is 7680 watts. Our extension cables and plugs however are fuse protected – typically with a 13amp fuse. A 13amp fuse will allow up to circa 3120 watts at 240v before the fuse blows.
Yet everything is fitted it would seem with 13 amp fuses, regardless of power-draw. While it seems a lot safer than the US system it does seem like a blank assumption that 13 amps is the right protection point.
My main tech stack for example consists of 5 extension cables configured in a star formation. I.e., one ‘master’, and four connected to that master. Sounds excessive until you look at the load:
Tech Hub Power Draw
It averages about 150w during general day to day usage, which is about 0.62amps. Tiny. Even at full power on it peaks at about 500watts for a couple of minutes – again only 2.08Amps. So why would it be protected by a 13Amp fuse? It isn’t any more, it has a 3amp fuse in it and it powers up just fine. If it blows, I’ll put a 5amp fuse in I think. It’s all UPS protected anyway.
I had a brief scan around other things – Microwave, 13amps (reasonable), Kettle 13amps (reasonable), TV 13amps….Lol wut. I’ve never seen my TV pull more than 150watts so why on earth is it protected with a 13amp fuse? Just because, I guess. Same on the Playstation 5.
Anyway, I am probably obsessing over something I found vaguely interesting. Firstly, my sudden perception of how unsafe the US model of extension cables & power control seems to be, and secondly with our obsession with 13amp fuses over here in the UK!
I will say though that I think the UK plug is an absolute master of design. It would also seem I’m not the only one to think so!
I’d love to hear perhaps a better educated opinion on the matter.
Getting remote access to some machines – headless servers for example – can sometimes be a challenge. Sure, there’s RDP or VNC, however that requires the machine to be up, on, and usable doesn’t it? What about those times you need to deal with machine that isn’t accessible for whatever reason? Or if you need to do something that requires a good old fashioned keyboard, monitor and mouse? BIOS/Service Pack upgrades for example.
Well, that’s where these KVM units step in (Keyboard, Video, Mouse). Essentially they are devices that connect to the PC HDMI post, and provide a keyboard & mouse via USB. They then connect to your network allowing you to remote control that PC/Mac as if you were sat physically in front of it.
I tend to use Mac mini devices as my headless servers as they’re so capable, and use so little power. One challenge you have with those is that on a fresh reboot, if you have FileVault enabled (encryption), you must login with a physical keyboard at the device to get at the keys to unlock the drive for normal boot. This is a huge pain for a headless server.
I had taken to configuring a small boot OS that was not encrypted, and then having another encrypted partition with my ‘real’ user on. This would mean you would initially connect remotely and login as the unencrypted user over VNC, logout, and re-login as the user that has the encrypted partition. I’d move that user’s home folder to the encrypted drive too. A bit of an effort.
This unit solves this challenge as you’re effectively logging in from a local keyboard.
I’ve been through several KVM units like these over the years and never really found one that I got on with fully. Then I stumbled on the JetKVM on Kickstarter.
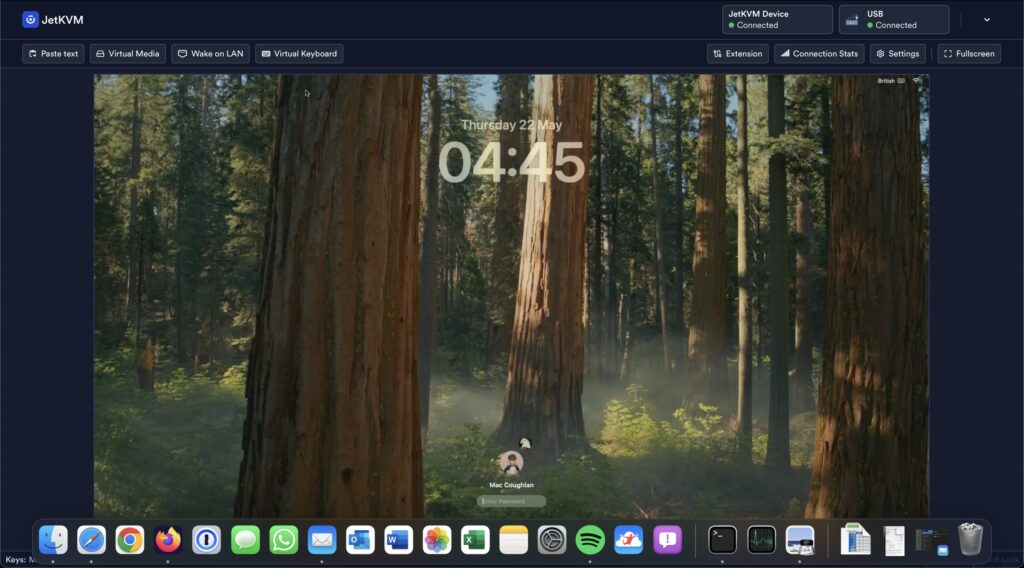
This is a small device that plugs in to your HDMI port, a USB port, and an Ethernet port on your network. It picks up its own IP Address (which it helpfully displays on the small screen), and you can then connect to the IP using a web-browser:
JetKVM Connected
It takes minutes to setup, and so far it’s been awesome. It’s done exactly what it said it would do. There are some considerations of course – a big one being power. If, when your machine goes to sleep, it stops powering your usb ports, then you could have an issue as the JetKVM gets its power from the USB Port. Fortunately, they provide a pass-through cable that allows you to power the JetKVM with a mobile-phone USB-C charger.
This was interesting as my observations with the Mac mini M4 have been that it does indeed power down the USB Ports on sleep…but, for some reason, the JetJVM maintains power. I know that Apple does use a low-power sleep system for keyboards and the like, so perhaps it’s through that mechanism? In any event, you can power it separately if you require. I also understand that a PoE version is in the works.
On the subject of power, the device doesn’t allow for physical power-down and re-start of the end-device. Not surprising if you think about it! I control that differently anyway, using Smart plugs. Depending on your use case however, help could also be coming for that….
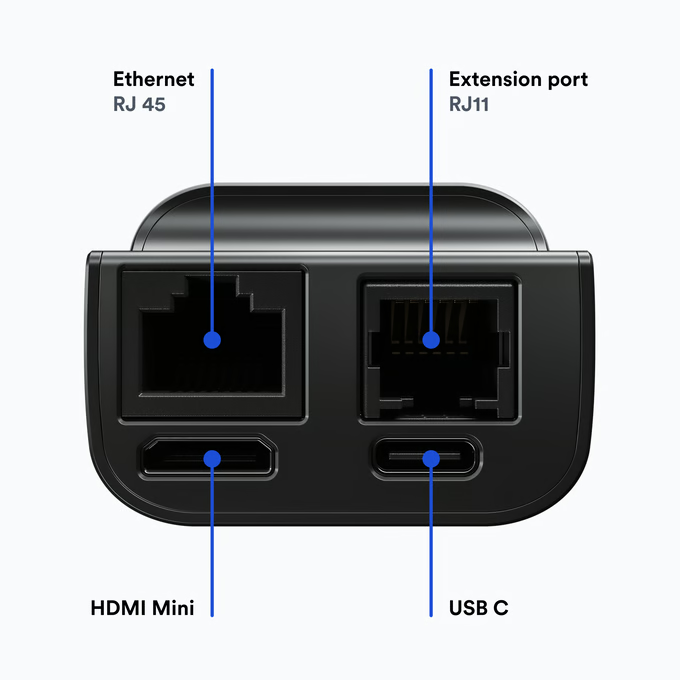
There’s also an RJ11 Port (serial). All the software is Open Source and is up on GitHub – I’d expect to start seeing some cool extensions coming! Perhaps one of those extensions could deal with power?
JetKVM portsJetKVM Front View
They do provide a cloud-access model too, to allow remote-access. Currently, this requires authentication with Google. I’ve not tried the remote access element as I have my own mechanisms to provide remote-access where it’s needed, however it looks like a fairly decent offering.
I paid 68US$ + 19$US Shipping back at the beginning of April, with the unit turning up about 10 May. I suspect now they’re clear of the Kickstarter campaign these will start popping up on Amazon and the like – and I suspect, when they do, I’ll have some further ones to buy.
Very happy with the unit so far, it’s been really useful!
I little while ago I was moaning on the Internet (shocked you are, I’m sure) about how I keep leaving half drunk cold cups of tea/coffee everywhere…anyway, somebody took some pity on me and told me they were sending me a little gift. What turns up but an Ember Heated Coffee Mug in stainless steel.
When I took this out of the box I couldn’t work out whether I thought this was the stupidest idea since the invention of stupid ideas, or whether it was going to be the best thing ever. That’s not something that often happens to me and tech, I usually know pretty quickly how I’m going to feel about something.
Fundamentally, all this thing does is allow you to set a temperature for your drink, and the mug will keep the drink at that temperature. For example, I like tea/coffee at about 57/58 Celsius. I connect the mug to my phone, use the app to set the temperature to the one I like, and then fill it with my drink. If the drink is less than the temperature I want, it heats it up. If it’s hotter, it lets it cool until it hits that temperature, and then it maintains it at that temperature. All rechargeable battery powered by a funky desk charger (more on that shortly).
Ember Application
So, either the stupidest thing ever, or brilliant. Which is it? We’ll get to that.
Does it work? Fundamentally, absolutely yes. If I make say a mug of tea it’ll keep it around 57 degree for a good 90 to 120 minutes, which is more than enough time for me to find it cold four hours later, but to get the odd hot mouthful along the way. From that perspective it works really well.
Let’s get back to those charging pads – they are not standard wireless charging pads – they’re unique to the Ember mugs. From a low charge the units take about 2 to 2.5 hours to fully charge – that’s quite a long time, however I found it’s never a problem as I tend to top them up as and when I’m using them – I.e., there’s a pad on my desk that I tend to use. In addition, whereas are you going to keep it other than on its charging pad?
The stainless steel looks good too – it’s a very nice finish and very easy to keep clean. It’s not however very big at 295ml in volume.
So was it the stupidest thing in the history of stupid or…? Well, given that 295ml was a little small for me I now have another one, bought with my own money. This one is in black and is a larger 414ml volume unit, rather than 295ml so some 40% larger by volume. So yeah, I’ve learned to really like the thing, and I absolutely must do to have spent 150 GREAT BRITISH EARTH POUNDS on one. Yeah. They’re expensive – real expensive.
They do however fulfil their function, and they do it well.
It’s not all joyous however, there are some things that bothered me – and I’ve managed to resolve most of them. So let’s look at those annoyances.
The Charging Pad Uses a Barrel Connector
Why for the love of everything USBC-C is the charging pad provided with a plug with a barrel connector. That’s really, really annoying. I don’t want to be carrying another plug about if I don’t need to, or having to plug something it for some non-standard device. Boo Ember, BOOOO. Saying that, I did find a solution – and it cost me a fiver. The solution is a Type C USB-C Female Input to DC 5.5 * 2.1mm Power PD Charge Cable fit for Laptop 18-20V from Amazon. This cable has USB-C on one end, and the correct barrel connector on the other. A little caveat however – I had to trim down the plastic sheathing on the barrel connector to allow it to fit properly on the charging pad. Once I’d done that, it works fine.
Some other observations with charging. It must be connected to a USB-C PD port. Interestingly, from a consumption point of view, you’ll see the unit peak at about 30-35w charging for a few minutes, before dropping back to circa 2-10 watts during the charge. It then seems to short-burst charge rather than constant trickle – that’s a bit odd. It’s a shame it’s so low as that’s why it takes so long to charge – although like I say, I’ve not noticed it being a problem, and I’ve rarely found it without charge.
Ember Mug Charging Power Consumption
A lid!
I don’t like having open tea/coffee mugs sitting about, they’re too easy to spill and I always have tech stuff about. Nobody wants to be in an episode of Chris Shaw and the Drowned Laptop. The units are fairly base heavy – the 295ml unit is about 400grams, with the 414ml one about 457grams – but they’re still full of liquid.
Fortunately however you can get lids – just be careful that you get the right lid for the right mug size!
Each is another 15GBP of course – the price of being into consumer tech can be uncomfortable.
The App
Ah, the app. Now initially this went pretty well. Setup was easy, it found the mug, it did a firmware update (on a mug – what a time to be alive). Admittedly I didn’t need to use the app very often. I have the same temperature for tea & coffee, so I set it, and forget it. The only time I need to use the app is to change the temperature or if I’m curious about the charge state.
Then, I imagine the Ember Software Development Team spent a little too long attending classes on Software Design run by Sonos. For a few months the app was buggy, and a huge pain in the backside. It would often lose your config requiring you to login in again, or lose the mug completely requiring a complete reset, or completely ignoring whatever you set in the app etc. Yeah, a complete Sonos.
Fortunately they do seem to have resolved that now. The app now (on Android at least, I haven’t really tried it on my iPhone) seems fairly stable and it’s rare I have a problem with it.
Ember App
Summary
So should you buy one? Absolutely not, unless you like the idea and the amount of money involved won’t stop you paying your mortgage. If that’s the case, get one immediately. I think they’re ace! I’d be bit wary of the Ember travel mug however. My travels around the various Reddit forums seem to indicate those units are not well liked – although to be fair here this is an anecdote not based on any real data.
They’re now in regular use in my house, and I rarely have a drink in anything else. I have several drink mugs – things like the Yeti Mug – and while they’d good, they offer a different problem. Often with those the drinks are still too hot for quite a while after you’ve made them! With the Ember they seem to cool at a reasonable rate, they just maintain the temperature you set.
I do wonder how long the battery will last (in terms of lifetime resilience), but again I’ve no real data on that. Would I be happy if they lasted say 3 years? I’d hope to get longer, but I’d imagine that’s a reasonable timescale for them.
Anyway, if this is coming across as a confused tech review, it’s because I’m slightly confused by the product. Love what it does, don’t like the barrel charger, and more importantly the stupid cost.
I know some of you may find this a bit of a shock but I think I got a bit carried away with the smart home thing. For a while there you could only really turn on any lights, or use any of the several kitchen appliances, by shouting at another appliance to turn the ****ing thing on. I could often be heard arguing with my kitchen when all I wanted was a bacon sandwich.
The idea is THE dream though, isn’t it? So Back to the Future – ‘Turn on the Lights!’.
Anyway, while I can still control most things in my house by voice, I rarely do. One thing that has survived the smart home cull however are the smart plugs.
There’s a few reasons for that:
-> I use a lot of power. My home labs cost a bit to run, so I try now to turn off what I can when it’s not in use.
-> I want to know what power I use. I need to expense some.
So I have ended up with two types of smart plugs – there’s the original ones that I bought which were single plugs that either could control one device, or of course could connect to an extension lead. The ones I used were the Meross MSS310 units. These have proven very reliable with a decent app. I can of course turn them on/off by voice – ‘Turn off the TV’ for example – and I do still do that sometimes. You can also setup routines so ‘Leaving the house’ turns off everything you’d not want on when you’re not there for example. That hasn’t had a lot of use, as I just don’t go anywhere.
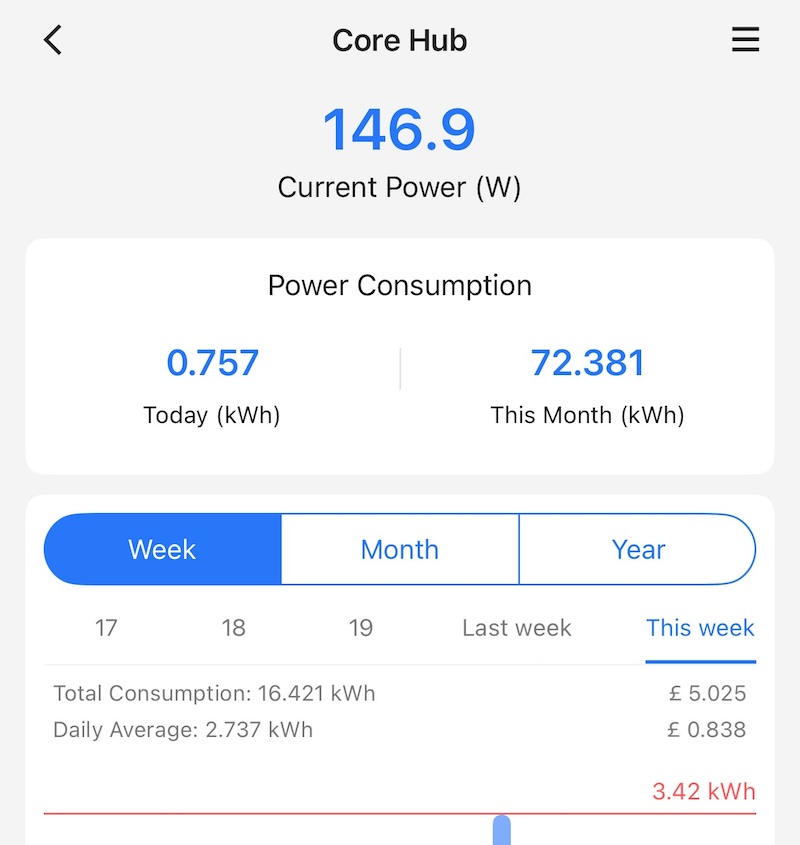
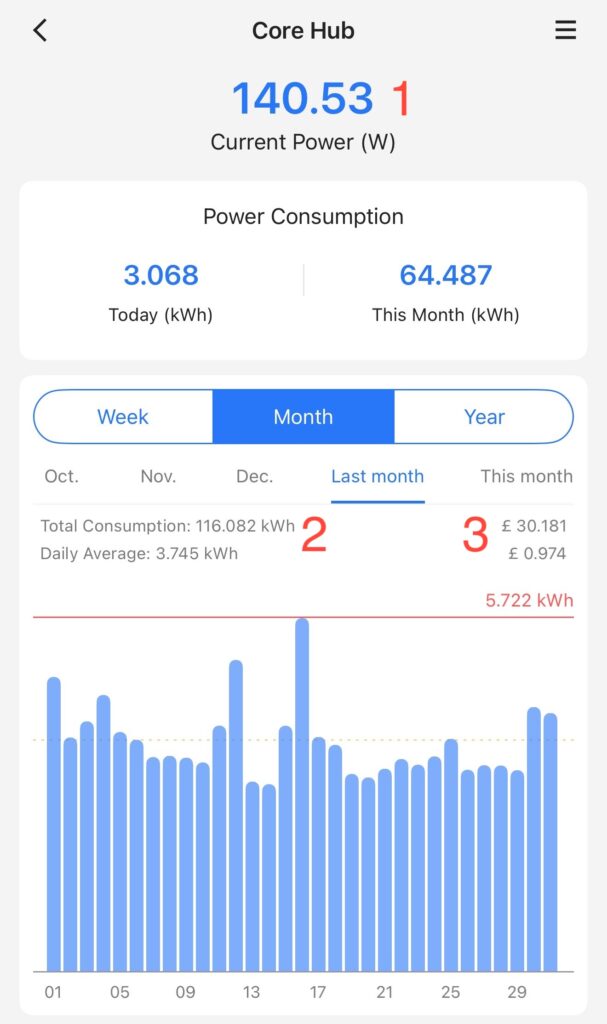
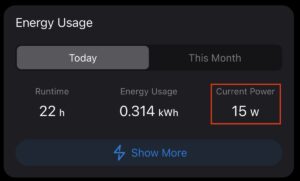
More importantly however the power tracking from these has proven really insightful and useful. The following for example shows the current power draw (1) of my core lab, and its power-usage for last month(2), and the cost for last month (3). Yes, the cost. I can tell it the cost per KwH and it works it all out for you.
Core Hub Power Draw
I’ve found this really useful. Can you see the trap coming yet?!
Knowing the power consumption of things has helped me knock about a third off of my power bill. That’s mad. There’s also environmental benefits to that too of course. I just no longer leave things running. My backup NAS only backs stuff up at night for example, there was absolutely no reason for it to be on for the other 22 hours of the day. The power analysis helped me work out that stuff.
This has however led me on to wanting to understand more. (The trap, it’s coming). So I looked into and invested into smart power strips. These are similar devices but essentially each plug on the power strip is its own smart plug. The ones I opted for were the TP-Link TAPO P304M. They cost me about 25 quid on Amazon, and are very easy to setup.
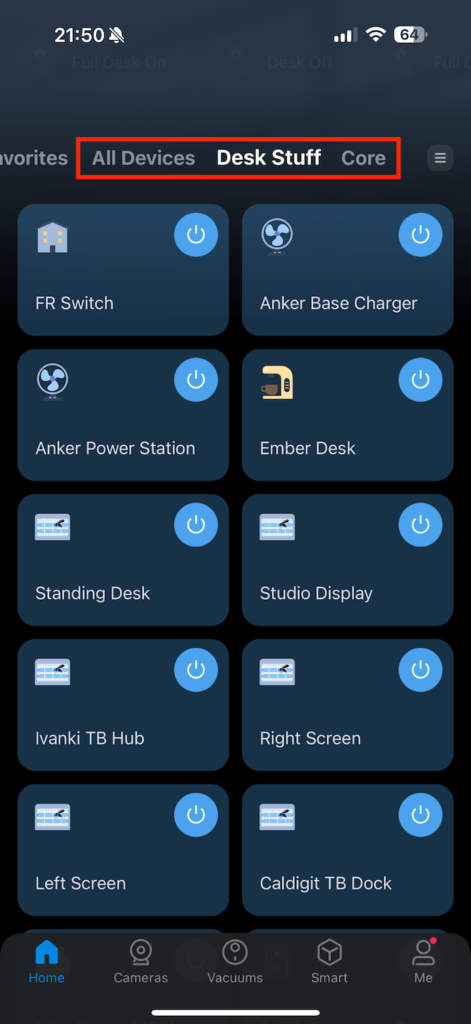
What these give you is the ability to setup collections of devices, and of course to setup automations. My real power users are my ‘core’ – which is my lab/storage etc. – and my desk. So I have fully configured both with these power strips. The app you can see all of the plugs – I.e., all of them, everywhere, or by collection – in my example, by ‘Desk Stuff’ or ‘Core’.
TAPO App
Now I can both control each individual plug on those strips each by having an automation process, or individually. So for example I have ‘Full Desk Off’ that turns off absolutely everything on my desk, and just a normal ‘Desk Off’ that turns off everything while leaving my charging ports for phones etc. all live.
Power Shortcuts
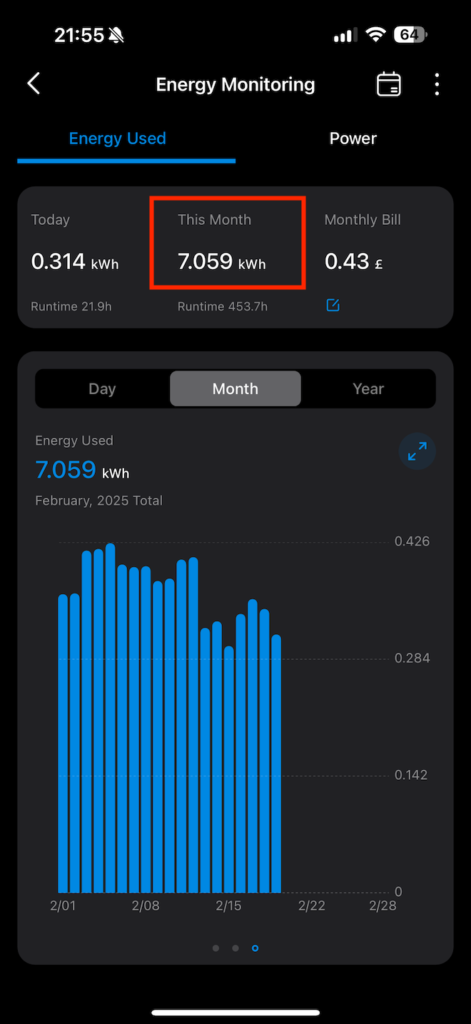
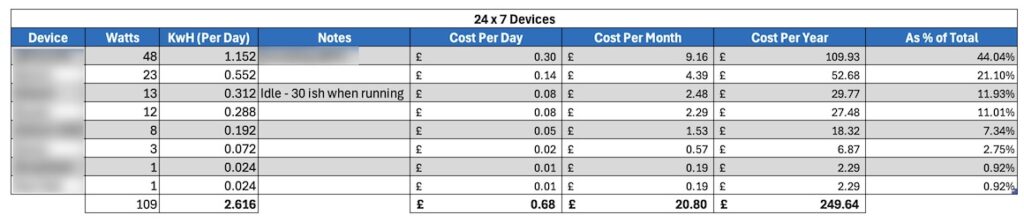
You also get a significant amount of power information for each plug on each and every strip. Oh my word, my advice is you need to be careful with this. If you’re not careful there will be SPREADSHEETS. This for example is the power consumption of my Mac mini M4 Server – this is on 24×7 and runs my Plex, and some other automation processes.
Single Power Energy Consumption
As a quick sidenote, those M4 Minis are fab low power units for Plex and general automation type stuff. Mine is only the base model 256GB/16GB unit, however it handles everything I’ve thrown at it, including a couple of VMs, just fine – while absolutely sipping on power:
M4 Power ConsumptionScreenshot
It’s usually lower than 15w – the above is when it’s busy! I also run it in low-power mode too as I rarely need its full performance. I mean the toughest thing I ask it to do is some video conversions and for those I don’t really care if it takes 2 hours or 5.
The Trap
The trap with this stuff is that you can, if you’re not careful, become slightly obsessive about power monitoring! Like I say, I have full costs now on my always-on stack etc.
Cost Analysis
Summary
I’m really happy with both the Meross plugs and the TP-Link power strips. They both seem to be fairly accurate on the power calculations – I’ve plugged one into the other to compare – and they’re within 2-3% of each other. I like the apps. The Meross app is arguably slightly nicer to look at and simpler to view, but it’s not a huge gap. Would I prefer them to be the same app…? Of course. I made the mistake however of having a power strip given to me to play with….so then ended up investing in the TP-Link ones myself, hence the two apps. It’s not a problem though, as I tend to use them for different things.
The Meross single plugs I use for measuring and controlling collections of devices, whereas the TP-Link ones I’m interested in measuring and controlling individual items. It works brilliantly for this purpose.
Like I say, I’ve stepped back a little from fully voice-automating stuff. The lights thing and controlling the kitchen were particularly challenging on that front – but both apps fully integrate to most voice services such as Alexa etc. so you can do that if you want.
Most of the automations I use are on my phone and from the Tapo app, and they work really well.
Now all I need to do is ween myself off obsessing about the numbers. I like numbers, they’re pretty!
A friend of mine asked me to check over a spec of a Network Attached Storage (NAS) device he was buying for home. Mostly for media, backups, and general storage, and a light bit of work use. The spec he sent me bothered me a bit, and I gave it some thought before replying. The spec he’d chosen was:
-> 4 x 24TB Hard Drives
-> 32GB RAM
-> 10Gbe Upgrade
The main thing that bothered me was the upgrade to 10Gbe when only using 4 drives, shortly followed by the thought of 24TB drives simply being too big – my preference would be for more, smaller, drivers. Let’s say 8 x 12TB in this instance, to give the same available storage.
Let’s talk through this logic – I’d be interested in your views.
Recovery Time
This is probably my key observation when choosing larger drives – recovery times become uncomfortable. Let’s imagine you have a four drive NAS consisting of those 4 x 24TB drives, and one of them fails. You order another one, and pop in the new drive – all good, right? No data lost.
Well, consider how long it is going to take your NAS to rebuild that array back to the point that you have some high availability again. Assuming a fast spinning drive (I use these) they’ll average perhaps 125-150MB/s during a RAID rebuild. That means it’s going to take 2-3 days for your RAID to rebuild. During that time your data is exposed, and the performance of your NAS will be severely impacted.
Assuming smaller drives – say 12TB – that recovery will take just over a day. Still a significant amount of time.
Performance
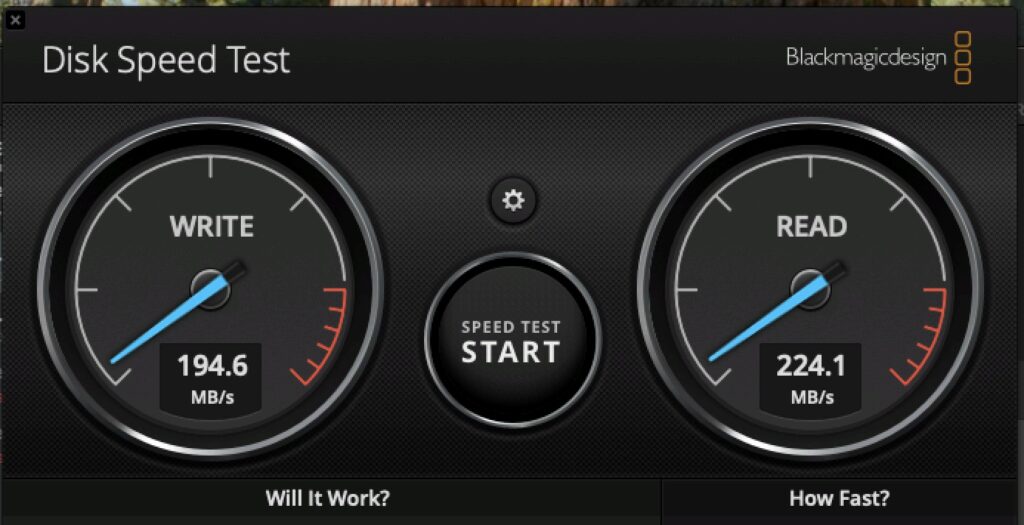
Back in the day when I was designing large Microsoft Exchange on-premises stuff, we always went for more drives. This was for the performance requirements. You could often end up with a lot more physical space than you needed, in order to achieve the performance throughput you required. Let’s consider the 4 x 24TB and a 10Gbe upgrade – you’re not going to see all of the benefit of the 10Gbe upgrade. One of the fastest spinning drives I have is an Enterprise Toshiba 16TB drive – here is its performance in a Thunderbolt chassis:
Screenshot
Even with four of those in your NAS, you’re not going to see more than 600MB/s across them (assuming one is for parity/high availability), despite having approximately 800MB/s of raw performance. Sure, it’s still loads better than your 110MB/s you’d get over 1Gbe.
If however you used 8 x 12TB drives, assuming they offered similar 200MB/s performance per drive, you’d get approximately 1600MB/s (raw). Even dropping a single drive for parity gives you 1400MB/s, which means you would get the benefit of the 10Gbe upgrade. You should get your 1-1.1Gb/s performance.
High Availability
This ties back to the recovery time I mentioned earlier—more drives allow for more robust availability models. Take RAID 5, for example, or Synology’s equivalent, SHR. In a four-drive setup, one drive is dedicated to redundancy, meaning you can lose a single drive without losing data.
With an eight-drive setup, you could opt for RAID 6, which provides even greater protection. In this model, two drives are used for parity, allowing you to sustain up to two drive failures before data loss becomes a risk. Think of it this way: if a drive fails, you can replace it while still maintaining redundancy during the rebuild process. However, you wouldn’t want to wait for a second failure!
Anecdotally (though anecdotes ≠ data), drives purchased together often come from the same batch, and rebuilds place significant stress on remaining drives. I’ll let you draw your own conclusions on that…
Space Availability
Next, let’s look at usable space – best demonstrated below.
RAID & Space AnalysisScreenshot
A 4 drive 24TB RAID 5 array gives you 72TB of available space, with 1 drive used for parity.
If you went with 8 x 12TB you’d better performance, and 84TB of usable space with a single drive for parity. I wouldn’t though, I would go with 8 x 12TB drives, in RAID 6 – in this model, you get the performance, the same usable space (72TB) as the 4 drive RAID 5, as well as two drives used for party.
Seems obvious to me!
Downsides of more drives?
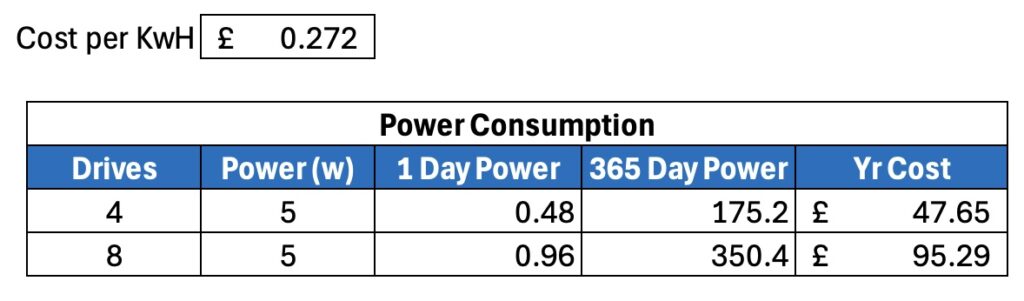
It’s not all sunshine of course, there are some things to consider. Firstly – power consumption – 8 x 12TB drives will use about 1KwH of power a day (assuming about 5w/drive). 4 x 24TB will use half of that – a difference of 183KwH over a year. In real money – well, GBP – that’s about 50GBP in extra power used by the 8 drives over the 4, over the 4. Not so terrible when you look at it like that?
Cost of power 8 drives compared to 4.
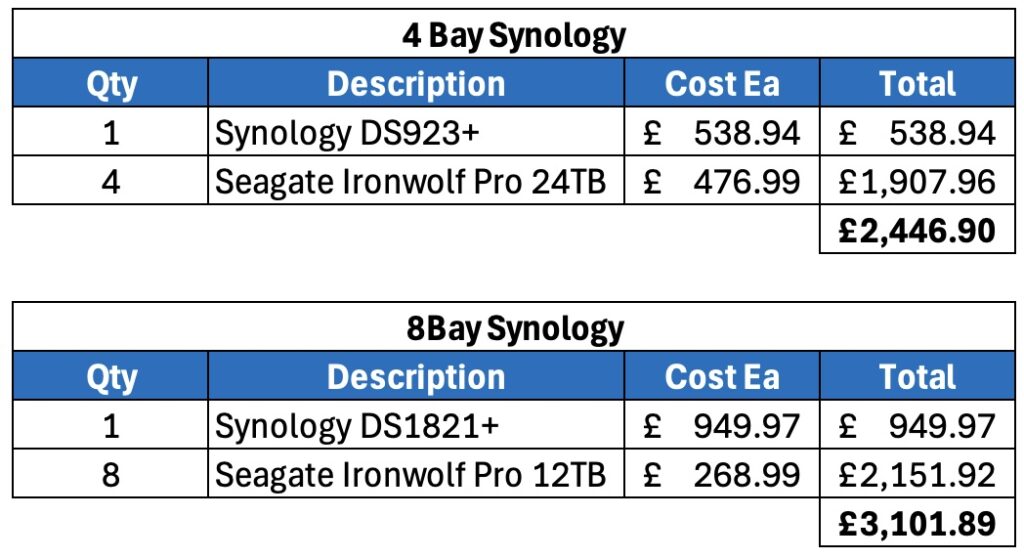
The other thing of course is that 8 bay NAS chassis cost more. A Synology DS923+ for example is about 500GBP, whereas an 8-bay Synology like the DS1821+ is nearer GBP950.
Let’s work out the costs, ignoring the RAM/10Gbe upgrade.
Cost ComparisonScreenshot
(For my American friends, in the UK our prices include VAT/Sales Tax – currently 20%).
Closer than you’d think isn’t it? The only downsides from what I can see are the increases in operational power costs, with the upsides being performance and data protection.
Summary
Personally, I’d go for more drives simply from the recovery time and data protection perspective – the increased performance is an added bonus.