Building a Skype for Business Standard Edition Server
Run through of a Skype for Business Standard Edition Server.
====
I’ve had a few requests to run through the build of a Skype for Business Standard Edition Server - so here it is. It’s pretty straight forward really, if anything it’s simpler and more reliable than Lync 2013 was from an installation point of view.
Firstly, you need an einvlorment to install in to. For my demo purposes I have the following Setup - note that each role has had Windows update run on them to bring them bang up to date.
DCSQL.contoso.local
192.168.0.100/24
This is a Windows 2012 R2 Server with the following roles installed:
- Active Directory domain controller for CONTOSO.local.
- DNS server.
- PKI (Certificate Authority) for private certificates.
STDFE.contoso.local
192.168.0.101/24
This is a Windows 2012 R2 Server that we’ll use for the Standard Edition Server builds.
Client1.contoso.local
192.168.0.102/24
Windows 10 Client/Office2013.
Client2.contoso.local
192.168.0.103/24
Windows 10 Client/Office 2013.
For Skype for Business Standard Edition on Windows 2012 R2, you’ll need KB2982006 installing - so go get that, and get it installed.
In terms of the environment, in my demo I assume the users can have SIP addresses @CONTOSO.com and @CONTOSO.co.uk.
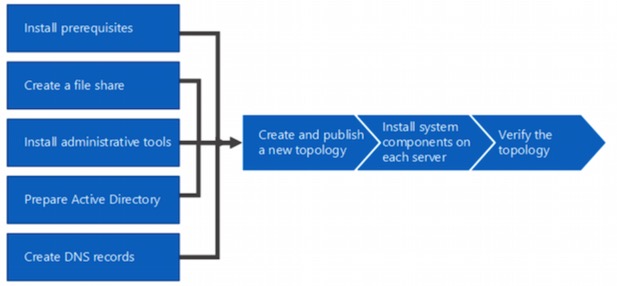
The flow of the installation is outlined pretty well in this article here from Microsoft. It follows this process:

This is the process I follow in the video below - so let’s run through the specific elements.
Pre-Reqs
The server needs a number of roles installing to support Skype for Business. You can see those pre-reqs here. The simplest way to install them is to install from an elevated PowerShell Prompt. You can use this command by copying/pasting into that PowerShell session to install the pre-reqs:
Add-WindowsFeature NET-Framework-Core, RSAT-ADDS, Windows-Identity-Foundation, Web-Server, Web-Static-Content, Web-Default-Doc, Web-Http-Errors, Web-Dir-Browsing, Web-Asp-Net, Web-Net-Ext, Web-ISAPI-Ext, Web-ISAPI-Filter, Web-Http-Logging, Web-Log-Libraries, Web-Request-Monitor, Web-Http-Tracing, Web-Basic-Auth, Web-Windows-Auth, Web-Client-Auth, Web-Filtering, Web-Stat-Compression, Web-Dyn-Compression, NET-WCF-HTTP-Activation45, Web-Asp-Net45, Web-Mgmt-Tools, Web-Scripting-Tools, Web-Mgmt-Compat, Server-Media-Foundation, BITS -source d:\sources\sxs
Note that if your machine doesn’t have Internet access you’ll need the Windows DVD, and you’ll also need to specify the path with -source
Once the above are installed, you’ll need to reboot.
You’ll need to create a file share for various server components. In my video, I’ve created one in the root of C: and shared it as S4BStore. The Administrators group on the machine you create the share must be given full control of that share.
Install the Admin Tools
Next, from the Skype for Business DVD, install the admin tools. It’s pretty easy.
Prepare Active Directory
We need to prepare the schema, and the local domain. Again, pretty easy, and I show you in the video how to do it.
Create DNS Records
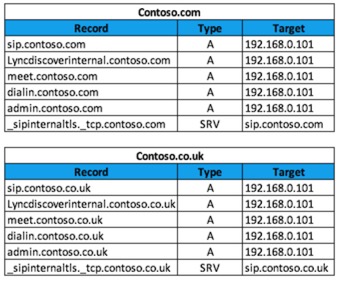
You need to create the DNS zones and records to support the domains - in this instance we’re using Contoso.com and Contoso.com. For my demo environment, I create these records:

Create & Publish the Skype for Business Topology
Next, you need to create and publish the Skype for Business topology. I run through this in the video.
Prepare the first Standard Edition Server
Again, I show you how to do this in the video.
Install Skype for Business Components
The installer takes information from the published topology and installs the relevant components. This is demonstrated in the video.
Once the above is done, and we’ve started the services (using run Start-CsPool –PoolFQDN stdfe.contoso.local from the Skype for Business Management Shell), we can get some users configured and logged in. Again, all in the video
It’s pretty straight forward really - honest!
blog comments powered by Disqus
