Turn off OSX SafeSleep
04/05/13 19:35 Filed in: Apple
How to modify the sleep mode on an Apple OSX Laptop.
====
Safe Sleep on an OSX Laptop is an interesting one. When you put your machine to sleep the contents of RAM are written out to your hard drive before the unit goes to sleep. If your machine loses power totally while in sleep then obviously the image is recovered from the drive and everything is hunky dory. It’s all fully automated, you don’t have to do anything. To my mind however I’ve only ever seen it a couple of times - usually when my laptop has been in sleep for a few weeks or so after vacation.
Are there any downsides to it? Well, not really…apart from a few things to consider. Firstly, how quickly your machine goes to sleep. My laptop has 16Gb of RAM in it for example, and writing out 16Gb means I have to wait a while for it to go to sleep. Also of course, it means there’s a 16Gb+about 1Gb image now stored on my SSD. Not ideal.
So…I tend to turn off safe-sleep. It’s faster to sleep, and doesn’t take up the room. I’ve yet to see any downsides from it either. Wow, just realised I’ve written about this before.
There’s various different sleep modes you can configure:
0:This is the traditional sleep mode - RAM powered on while sleeping, safe sleep disabled, and fast wake up.
1:Hibernation mode. RAM contents written to disk, system totally shut down while sleeping and slower wake up due to reading the contents of RAM off the hard drive.
3:This is the default on new machines. RAM is powered on while sleeping, but RAM contents are also written to disk before sleeping. In the event of total power loss the system enters hibernation mode. Safe-sleep - see?
5:Same as mode 1, but supports secure virtual memory.
7:Same as mode 3, but for those using secure virtual memory.
You can see what mode you’re in by using the following command in Terminal:
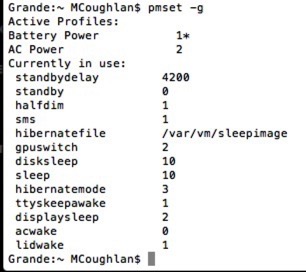
You can see from the above that this freshly built laptop is running in mode 3 - the default on newer machines. Also, you can see the path of the sleep image file.
As you can see, there’s a 17.18Gb image file in there. Not only is that fairly substantial, it also leads to a lot of writes to you SSD (if you have one).
Anyway, I much prefer mode 0 - fast sleep/recover, but there’s some risk should my machine run out of power. I’m OK with that - I rarely leave any applications open with data open anyway, and I’ve yet to have an issue using this mode on any of my machines due to this method of sleep.
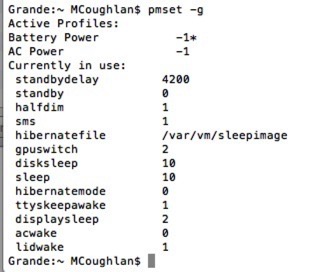
So, how do we set this mode? It’s pretty easy - you can do it from terminal with this command:
sudo pmset -a hibernatemode 0
You’ll need to authenticate as an administrative user. If you then run the ‘pmset -g’ command again to view, you should see that the hibernate mode has been set to 0:
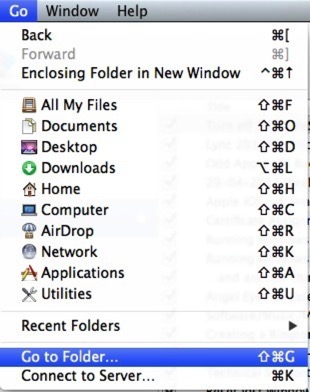
You can now at this point use Finder to go to /var/vm/sleepimage and delete the massive image file. In Finder, choose the ‘Go to Folder’ option on the ‘Go’ menu:
Once you’ve done all this you’ll find your machine sleeps a lot quicker, and you’ll not have the big image file being written out to your drive every time your machine sleeps.
If you do actually now & again want to put the machine into hard-drive storage sleep temporarily there’s apps out there to do it for you. There’s one quite cool one here for example:
An hibernation Dashboard widget for Mac OS X 10.4.3 and above
Be aware it doesn’t work on every machine however so test it before you use it in anger.
blog comments powered by Disqus