Since upgrading to MacOS Sequoia I noticed backups of my machines that had a lot of small files were either taking an age or failing. I also noticed that large transfers would slow down significantly after a while.
After thinking this was an issue with my networking…and finding it wasn’t, I managed to narrow it down to Sequoia – the issue wasn’t experienced on previous versions of MacOS or Windows. How odd.
Anyway, this setting on the Synology NAS seems to resolve the issue:
Do not reserve disk space when creating files
To configure it, go into ‘Control Panel’ on the Synology, and select ‘File Services’:
File Services
From the ‘Advanced Settings’ menu, you want to select ‘Others’ at the top, and turn on ‘Do not reserve disk space when creating files’:
Do not reserve disk space when creating files
NOTE: This will reset the SMB Service so if you have any active connections they may disconnect and re-connect.
Anyway, after I’ve done that, those weird little problems seem to have gone away. For the more technically minded, there’s a description of what this does below:
strict allocate (S) This is a boolean that controls the handling of disk space allocation in the server. When this is set to yes the server will change from UNIX behaviour of not committing real disk storage blocks when a file is extended to the Windows behaviour of actually forcing the disk system to allocate real storage blocks when a file is created or extended to be a given size. In UNIX terminology this means that Samba will stop creating sparse files.
This option is really designed for file systems that support fast allocation of large numbers of blocks such as extent-based file systems. On file systems that don’t support extents (most notably ext3) this can make Samba slower. When you work with large files over >100MB on file systems without extents you may even run into problems with clients running into timeouts.
When you have an extent based filesystem it’s likely that we can make use of unwritten extents which allows Samba to allocate even large amounts of space very fast and you will not see any timeout problems caused by strict allocate. With strict allocate in use you will also get much better out of quota messages in case you use quotas. Another advantage of activating this setting is that it will help to reduce file fragmentation.
To give you an idea on which filesystems this setting might currently be a good option for you: XFS, ext4, btrfs, ocfs2 on Linux and JFS2 on AIX support unwritten extents. On Filesystems that do not support it, preallocation is probably an expensive operation where you will see reduced performance and risk to let clients run into timeouts when creating large files. Examples are ext3, ZFS, HFS+ and most others, so be aware if you activate this setting on those filesystems.
I’m feeling a bit … lost. For some reason on one particular machine I don’t seem to be able to rename any Network Interface on Windows 11:
NIC Rename Screenshot
I’ve just tried it on another couple of machines and it’s worked fine – and I’ve obviously managed to rename some previously! So, anyone any idea what’s going on here? I’m sure we can do this with PowerShell though, so let’s do that.
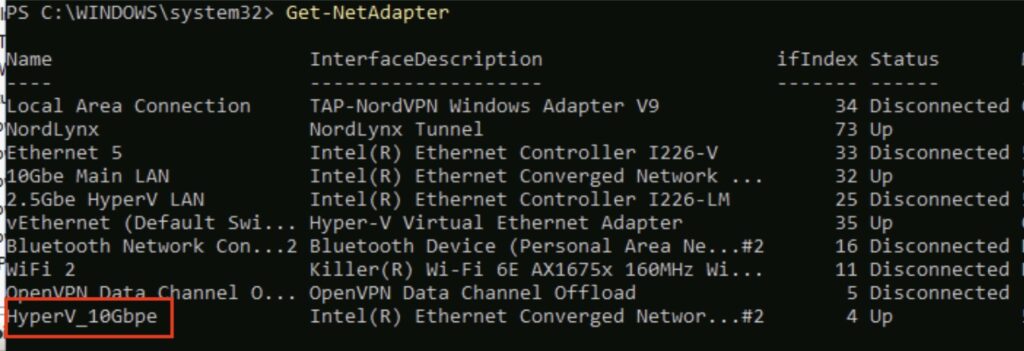
Fire up PowerShell as an Administrator and use the following command to get a list of your adapters:
Get-NetAdapter
Get-NetAdapter
You can see my output above. Next, rename the adapter using the following command:
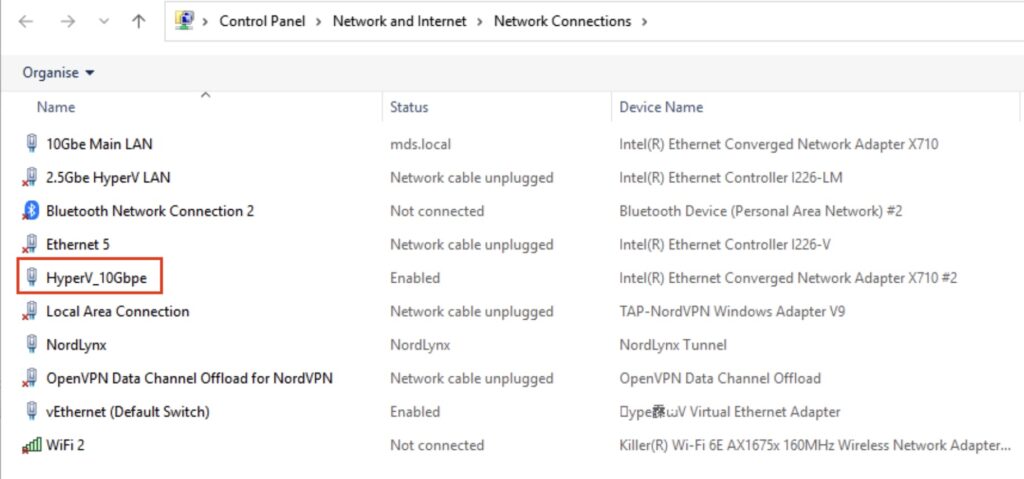
…obviously use the name of the interface you want to change, and what you want to change it to. Nothing appears to happen, but if you run the get-netadapter again you should see your changes:
Get-NetAdapterNetwork Connections
If anyone knows why I’ve lost the ability to do this in the GUI I’m all ears – I’ve tried removing all the HyperV vSwitch configuration but that didn’t seem to make any difference.
I recently wrote about how the UK government had demanded access to user data worldwide, and things have since moved on. Apple, as far as I can tell, has not fully complied with the order—remember, this demand applies globally, not just to UK citizens. What Apple has done is remove the general end-to-end encryption tool known as Advanced Data Protection (ADP) for UK users. But that’s it.
From a quick straw poll of several iPhone users, I found that most (around 95%) hadn’t even turned on ADP. So how big an issue is this really?
The Bigger Picture
I think the wider issue is a little misunderstood, but to be fair, it’s a complex one. Essentially, if you use a cloud service that isn’t end-to-end encrypted, the provider has access to your data. This means they can be compelled to hand it over to governments when legally requested. That’s not new.
What is murkier is the growing suspicion that even providers of end-to-end encrypted services may have been forced to insert backdoors—and legally, they can’t disclose it. That, I find horrific.
Why Apple, and Why Now?
It’s interesting how many people think this is just an “Apple issue.” I’ve seen people say, “I don’t use an iPhone, so this doesn’t affect me.” That’s not true. Apple just happens to be at the center of this particular story. Other tech giants likely face similar requests, but due to legal gag orders, they cannot disclose whether they’ve complied. Does that make anyone else uncomfortable?
Apple has said little publicly, but the removal of ADP in the UK seems to confirm compliance, at least partially.
If you back up your Android phone to Google, those backups are not end-to-end encrypted. If you store data in Microsoft 365 (Office 365), that’s not end-to-end encrypted either. What does this mean? It means the government can request your data, and Microsoft or Google can legally access and hand it over. Even Microsoft 365 Customer Lockbox doesn’t prevent this—it’s merely an administrative control, not a security barrier.
The Real Issue: End-to-End Encryption
So why the uproar over Apple’s ADP? The key issue is end-to-end encryption. When enabled, even Apple cannot access the data you store on iCloud, meaning they cannot comply with data access requests. Now, with ADP revoked for UK users, a significant portion of that data is once again accessible to Apple—and, by extension, to governments that request it.
What’s Still Encrypted?
To clarify, ADP encrypts everything a user stores in iCloud with end-to-end encryption. Without it, data is still encrypted, but Apple retains the encryption keys—meaning they can access and disclose it if required. However, some iCloud services remain end-to-end encrypted, even without ADP:
Passwords & Keychain
Health data
Journals
iMessage (not including cloud backups)
For a full list, check out Apple’s iCloud Data Security Overview. Anything labeled “end-to-end” means Apple has no access.
NOTE: If you backup your iPhone to iCloud, messages are included in those backups, which makes them accessible.
The Trust Issue
What really concerns me is how many other providers have been forced to weaken end-to-end encryption — and have complied without anyone knowing. WhatsApp is supposedly end-to-end encrypted, as is Facebook Messenger, but do we trust that there isn’t now a backdoor?
I suspect several MPs are quietly backing away from their WhatsApp groups as we speak.
What Happens Next?
This story isn’t going away anytime soon. Apple hasn’t fully complied—can you seriously imagine they would? The UK government demanding access to a US citizen’s iCloud backup would be a legal minefield. Can you picture Apple’s response to that?
I’ve also seen a lot of “I’ve got nothing to hide” responses. That’s a flawed stance—it even has a name: The “Nothing to Hide” Argument. Privacy isn’t just about secrecy; it’s about maintaining control over personal information.
So where does this leave us? If end-to-end encryption can be quietly removed or bypassed, is any cloud data truly private anymore? I’ll be watching closely to see what happens next….while also privately encrypting my own stuff.
I little while ago I was moaning on the Internet (shocked you are, I’m sure) about how I keep leaving half drunk cold cups of tea/coffee everywhere…anyway, somebody took some pity on me and told me they were sending me a little gift. What turns up but an Ember Heated Coffee Mug in stainless steel.
When I took this out of the box I couldn’t work out whether I thought this was the stupidest idea since the invention of stupid ideas, or whether it was going to be the best thing ever. That’s not something that often happens to me and tech, I usually know pretty quickly how I’m going to feel about something.
Fundamentally, all this thing does is allow you to set a temperature for your drink, and the mug will keep the drink at that temperature. For example, I like tea/coffee at about 57/58 Celsius. I connect the mug to my phone, use the app to set the temperature to the one I like, and then fill it with my drink. If the drink is less than the temperature I want, it heats it up. If it’s hotter, it lets it cool until it hits that temperature, and then it maintains it at that temperature. All rechargeable battery powered by a funky desk charger (more on that shortly).
Ember Application
So, either the stupidest thing ever, or brilliant. Which is it? We’ll get to that.
Does it work? Fundamentally, absolutely yes. If I make say a mug of tea it’ll keep it around 57 degree for a good 90 to 120 minutes, which is more than enough time for me to find it cold four hours later, but to get the odd hot mouthful along the way. From that perspective it works really well.
Let’s get back to those charging pads – they are not standard wireless charging pads – they’re unique to the Ember mugs. From a low charge the units take about 2 to 2.5 hours to fully charge – that’s quite a long time, however I found it’s never a problem as I tend to top them up as and when I’m using them – I.e., there’s a pad on my desk that I tend to use. In addition, whereas are you going to keep it other than on its charging pad?
The stainless steel looks good too – it’s a very nice finish and very easy to keep clean. It’s not however very big at 295ml in volume.
So was it the stupidest thing in the history of stupid or…? Well, given that 295ml was a little small for me I now have another one, bought with my own money. This one is in black and is a larger 414ml volume unit, rather than 295ml so some 40% larger by volume. So yeah, I’ve learned to really like the thing, and I absolutely must do to have spent 150 GREAT BRITISH EARTH POUNDS on one. Yeah. They’re expensive – real expensive.
They do however fulfil their function, and they do it well.
It’s not all joyous however, there are some things that bothered me – and I’ve managed to resolve most of them. So let’s look at those annoyances.
The Charging Pad Uses a Barrel Connector
Why for the love of everything USBC-C is the charging pad provided with a plug with a barrel connector. That’s really, really annoying. I don’t want to be carrying another plug about if I don’t need to, or having to plug something it for some non-standard device. Boo Ember, BOOOO. Saying that, I did find a solution – and it cost me a fiver. The solution is a Type C USB-C Female Input to DC 5.5 * 2.1mm Power PD Charge Cable fit for Laptop 18-20V from Amazon. This cable has USB-C on one end, and the correct barrel connector on the other. A little caveat however – I had to trim down the plastic sheathing on the barrel connector to allow it to fit properly on the charging pad. Once I’d done that, it works fine.
Some other observations with charging. It must be connected to a USB-C PD port. Interestingly, from a consumption point of view, you’ll see the unit peak at about 30-35w charging for a few minutes, before dropping back to circa 2-10 watts during the charge. It then seems to short-burst charge rather than constant trickle – that’s a bit odd. It’s a shame it’s so low as that’s why it takes so long to charge – although like I say, I’ve not noticed it being a problem, and I’ve rarely found it without charge.
Ember Mug Charging Power Consumption
A lid!
I don’t like having open tea/coffee mugs sitting about, they’re too easy to spill and I always have tech stuff about. Nobody wants to be in an episode of Chris Shaw and the Drowned Laptop. The units are fairly base heavy – the 295ml unit is about 400grams, with the 414ml one about 457grams – but they’re still full of liquid.
Fortunately however you can get lids – just be careful that you get the right lid for the right mug size!
Each is another 15GBP of course – the price of being into consumer tech can be uncomfortable.
The App
Ah, the app. Now initially this went pretty well. Setup was easy, it found the mug, it did a firmware update (on a mug – what a time to be alive). Admittedly I didn’t need to use the app very often. I have the same temperature for tea & coffee, so I set it, and forget it. The only time I need to use the app is to change the temperature or if I’m curious about the charge state.
Then, I imagine the Ember Software Development Team spent a little too long attending classes on Software Design run by Sonos. For a few months the app was buggy, and a huge pain in the backside. It would often lose your config requiring you to login in again, or lose the mug completely requiring a complete reset, or completely ignoring whatever you set in the app etc. Yeah, a complete Sonos.
Fortunately they do seem to have resolved that now. The app now (on Android at least, I haven’t really tried it on my iPhone) seems fairly stable and it’s rare I have a problem with it.
Ember App
Summary
So should you buy one? Absolutely not, unless you like the idea and the amount of money involved won’t stop you paying your mortgage. If that’s the case, get one immediately. I think they’re ace! I’d be bit wary of the Ember travel mug however. My travels around the various Reddit forums seem to indicate those units are not well liked – although to be fair here this is an anecdote not based on any real data.
They’re now in regular use in my house, and I rarely have a drink in anything else. I have several drink mugs – things like the Yeti Mug – and while they’d good, they offer a different problem. Often with those the drinks are still too hot for quite a while after you’ve made them! With the Ember they seem to cool at a reasonable rate, they just maintain the temperature you set.
I do wonder how long the battery will last (in terms of lifetime resilience), but again I’ve no real data on that. Would I be happy if they lasted say 3 years? I’d hope to get longer, but I’d imagine that’s a reasonable timescale for them.
Anyway, if this is coming across as a confused tech review, it’s because I’m slightly confused by the product. Love what it does, don’t like the barrel charger, and more importantly the stupid cost.
I know some of you may find this a bit of a shock but I think I got a bit carried away with the smart home thing. For a while there you could only really turn on any lights, or use any of the several kitchen appliances, by shouting at another appliance to turn the ****ing thing on. I could often be heard arguing with my kitchen when all I wanted was a bacon sandwich.
The idea is THE dream though, isn’t it? So Back to the Future – ‘Turn on the Lights!’.
Anyway, while I can still control most things in my house by voice, I rarely do. One thing that has survived the smart home cull however are the smart plugs.
There’s a few reasons for that:
-> I use a lot of power. My home labs cost a bit to run, so I try now to turn off what I can when it’s not in use.
-> I want to know what power I use. I need to expense some.
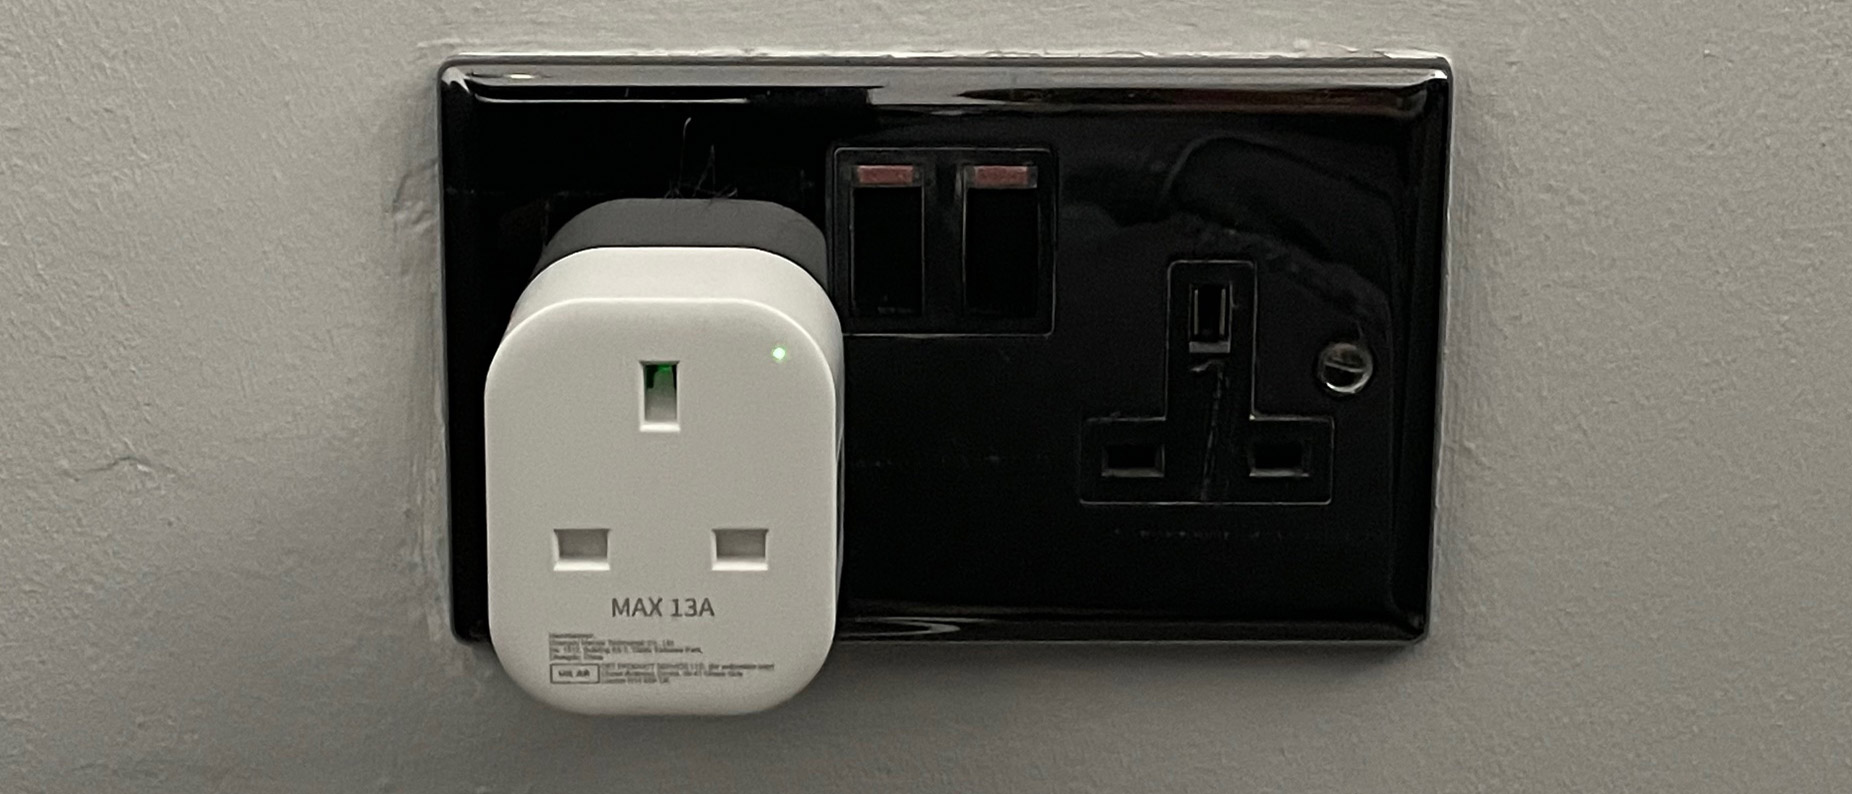
So I have ended up with two types of smart plugs – there’s the original ones that I bought which were single plugs that either could control one device, or of course could connect to an extension lead. The ones I used were the Meross MSS310 units. These have proven very reliable with a decent app. I can of course turn them on/off by voice – ‘Turn off the TV’ for example – and I do still do that sometimes. You can also setup routines so ‘Leaving the house’ turns off everything you’d not want on when you’re not there for example. That hasn’t had a lot of use, as I just don’t go anywhere.
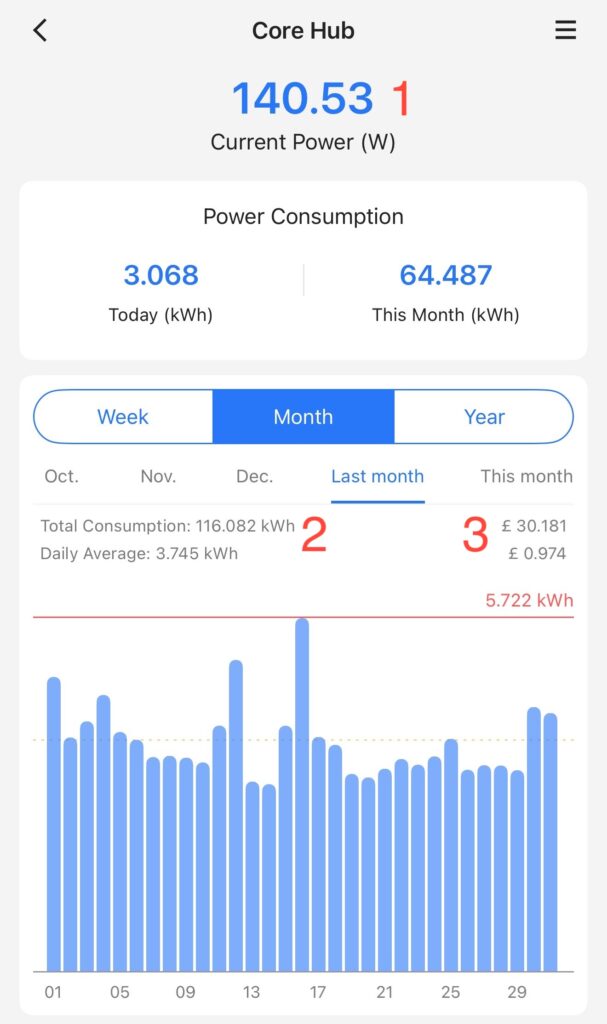
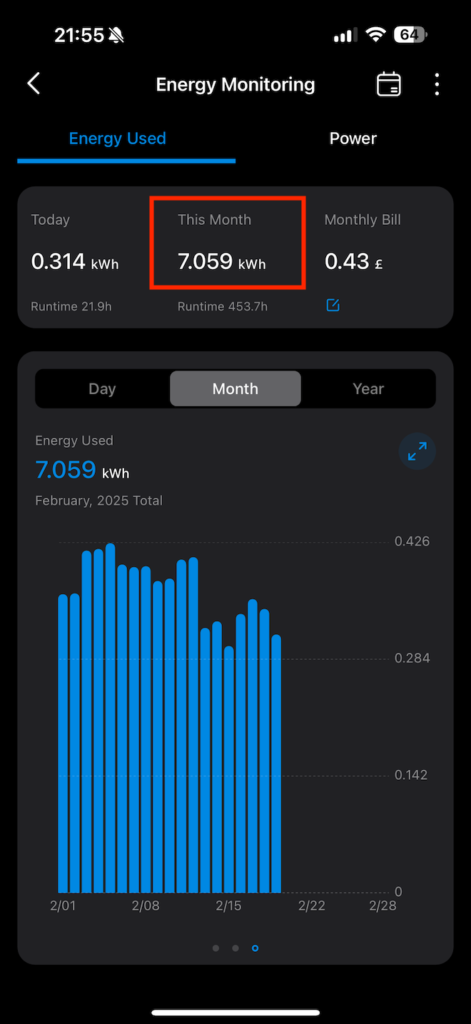
More importantly however the power tracking from these has proven really insightful and useful. The following for example shows the current power draw (1) of my core lab, and its power-usage for last month(2), and the cost for last month (3). Yes, the cost. I can tell it the cost per KwH and it works it all out for you.
Core Hub Power Draw
I’ve found this really useful. Can you see the trap coming yet?!
Knowing the power consumption of things has helped me knock about a third off of my power bill. That’s mad. There’s also environmental benefits to that too of course. I just no longer leave things running. My backup NAS only backs stuff up at night for example, there was absolutely no reason for it to be on for the other 22 hours of the day. The power analysis helped me work out that stuff.
This has however led me on to wanting to understand more. (The trap, it’s coming). So I looked into and invested into smart power strips. These are similar devices but essentially each plug on the power strip is its own smart plug. The ones I opted for were the TP-Link TAPO P304M. They cost me about 25 quid on Amazon, and are very easy to setup.
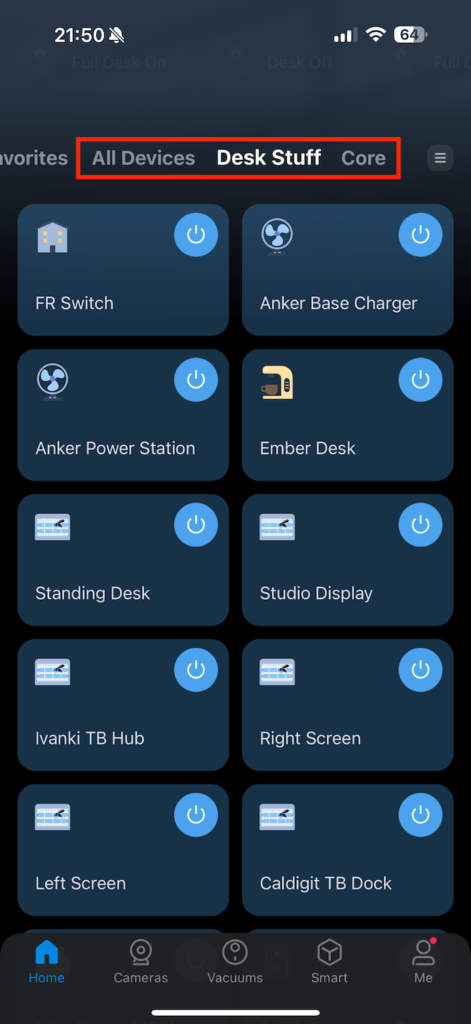
What these give you is the ability to setup collections of devices, and of course to setup automations. My real power users are my ‘core’ – which is my lab/storage etc. – and my desk. So I have fully configured both with these power strips. The app you can see all of the plugs – I.e., all of them, everywhere, or by collection – in my example, by ‘Desk Stuff’ or ‘Core’.
TAPO App
Now I can both control each individual plug on those strips each by having an automation process, or individually. So for example I have ‘Full Desk Off’ that turns off absolutely everything on my desk, and just a normal ‘Desk Off’ that turns off everything while leaving my charging ports for phones etc. all live.
Power Shortcuts
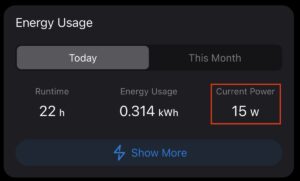
You also get a significant amount of power information for each plug on each and every strip. Oh my word, my advice is you need to be careful with this. If you’re not careful there will be SPREADSHEETS. This for example is the power consumption of my Mac mini M4 Server – this is on 24×7 and runs my Plex, and some other automation processes.
Single Power Energy Consumption
As a quick sidenote, those M4 Minis are fab low power units for Plex and general automation type stuff. Mine is only the base model 256GB/16GB unit, however it handles everything I’ve thrown at it, including a couple of VMs, just fine – while absolutely sipping on power:
M4 Power ConsumptionScreenshot
It’s usually lower than 15w – the above is when it’s busy! I also run it in low-power mode too as I rarely need its full performance. I mean the toughest thing I ask it to do is some video conversions and for those I don’t really care if it takes 2 hours or 5.
The Trap
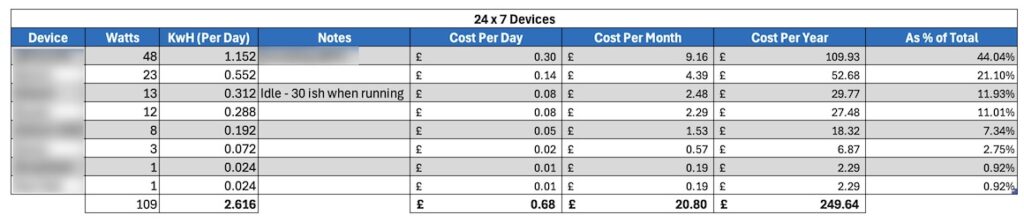
The trap with this stuff is that you can, if you’re not careful, become slightly obsessive about power monitoring! Like I say, I have full costs now on my always-on stack etc.
Cost Analysis
Summary
I’m really happy with both the Meross plugs and the TP-Link power strips. They both seem to be fairly accurate on the power calculations – I’ve plugged one into the other to compare – and they’re within 2-3% of each other. I like the apps. The Meross app is arguably slightly nicer to look at and simpler to view, but it’s not a huge gap. Would I prefer them to be the same app…? Of course. I made the mistake however of having a power strip given to me to play with….so then ended up investing in the TP-Link ones myself, hence the two apps. It’s not a problem though, as I tend to use them for different things.
The Meross single plugs I use for measuring and controlling collections of devices, whereas the TP-Link ones I’m interested in measuring and controlling individual items. It works brilliantly for this purpose.
Like I say, I’ve stepped back a little from fully voice-automating stuff. The lights thing and controlling the kitchen were particularly challenging on that front – but both apps fully integrate to most voice services such as Alexa etc. so you can do that if you want.
Most of the automations I use are on my phone and from the Tapo app, and they work really well.
Now all I need to do is ween myself off obsessing about the numbers. I like numbers, they’re pretty!
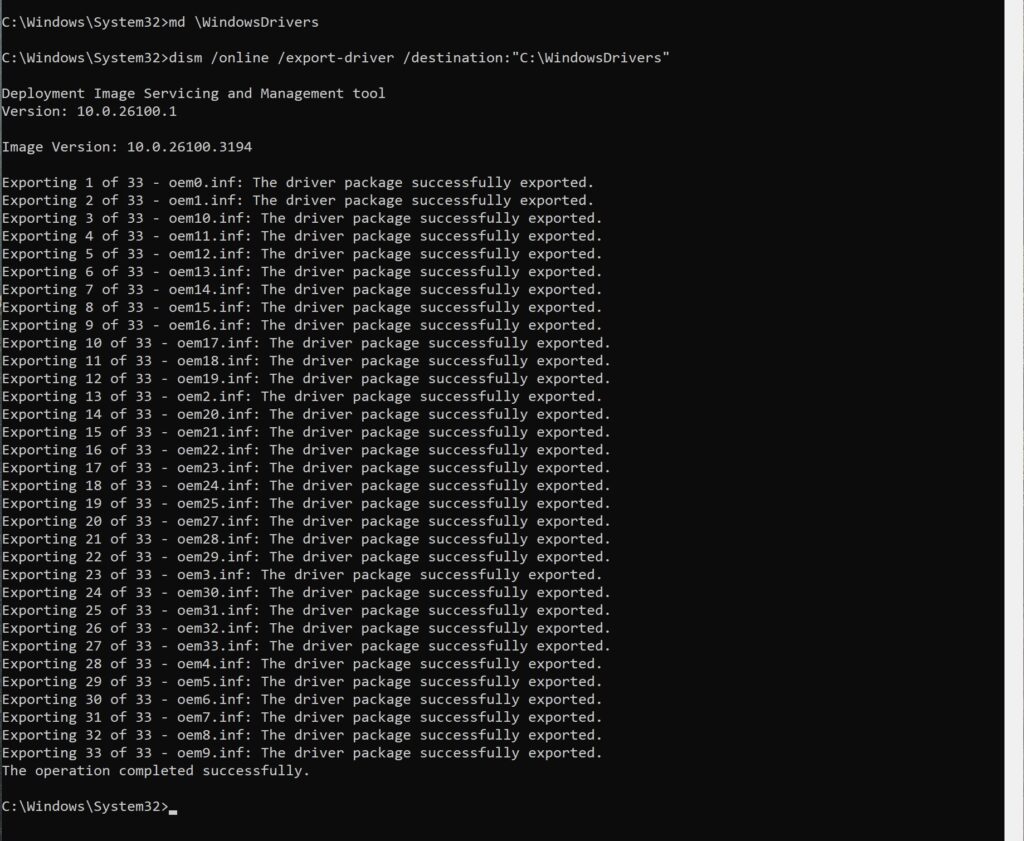
I was re-installing my Minisforum MS-01 recently as all the stuff I’d been testing on it meant it wasn’t really setup any more how I liked it. Anyway, one of the handy tips I’ve obtained from who knows where is a way to backup all of your device drivers before re-installing, helping to avoid the missing drivers thing in Device Manager.
It’s pretty easy too. All you need do is:
-> Create a directory for all your drivers ‘C:\WindowsDrivers’ for example.
This will then go and export all your drivers for you. You can see the process and the output below.
If you look in the directory, you’ll now see all your drivers.
Copy that directory off somewhere else, and you have a copy of all your drivers.
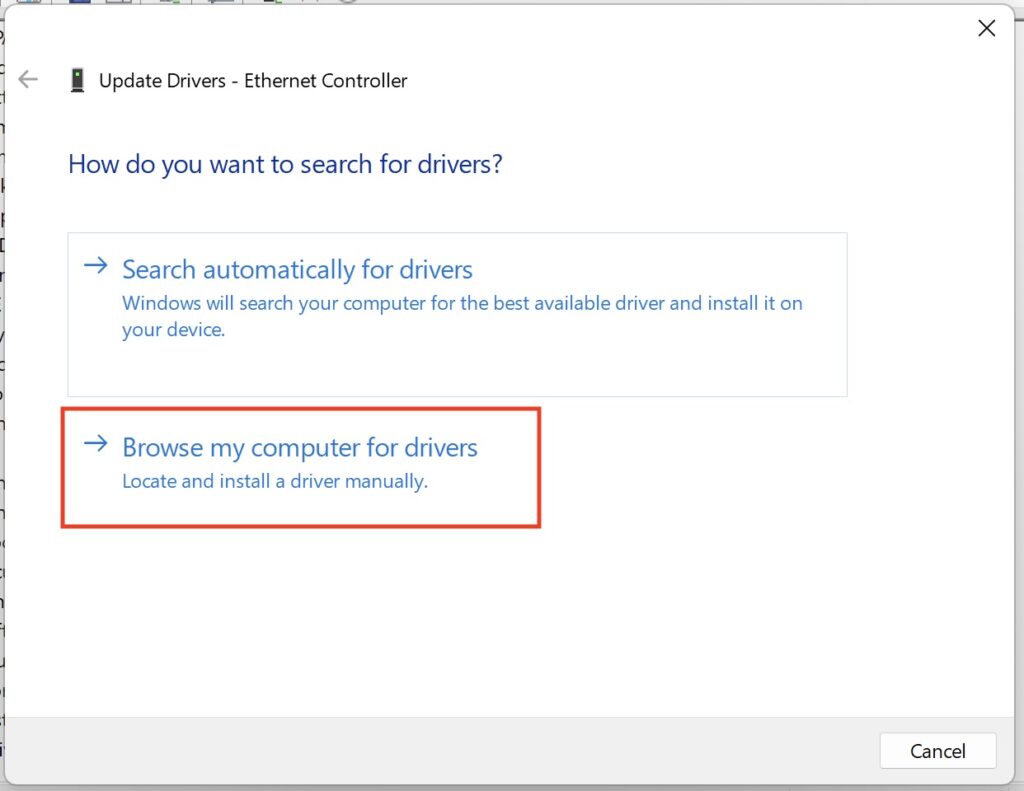
Now, when you go to re-install the machine, if any drivers are missing you can point Device Manager back to that directory or from a USB stick. In my example below, you can see that my device driver for my network card is missing (this example is from a Windows machine running on Parallels Desktop):
You can right click on that ‘Ethernet Controller’ and select ‘Update Driver’ – and from the screen that’s presented, select ‘Browse my computer for drivers’:
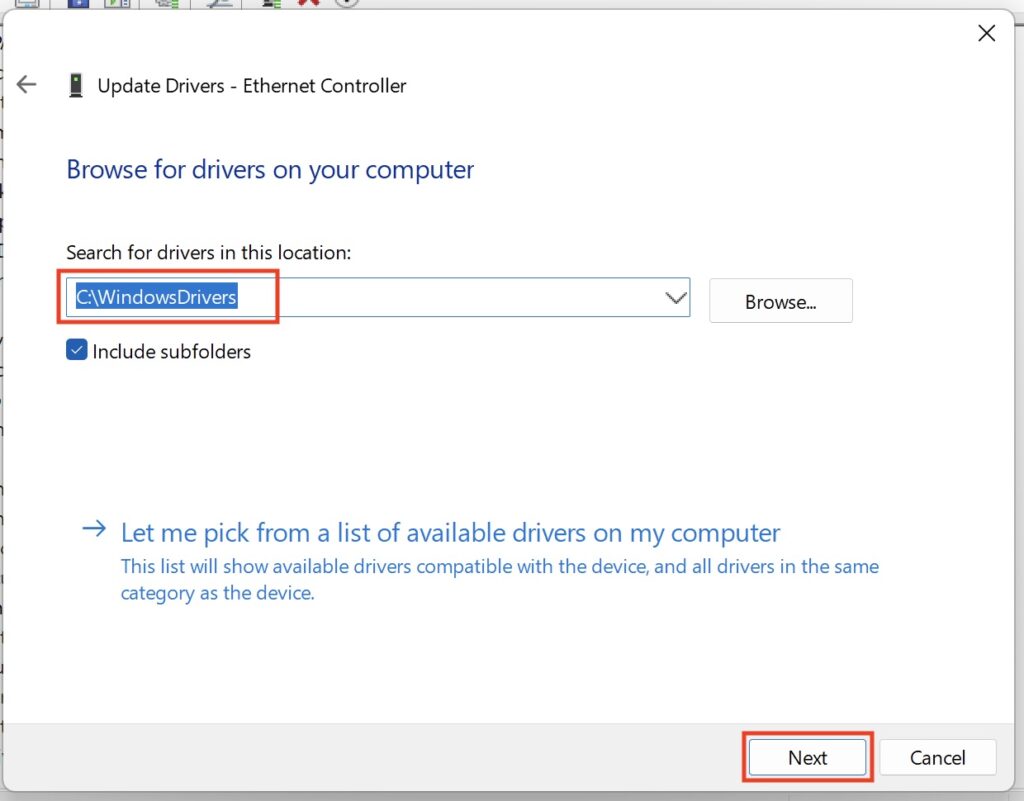
What you want to do now is select the folder where you have those exported drivers – or a USB of course. Make sure ‘Include subfolders’ is selected that way you don’t have to find the right specific directory. Then click ‘Next’.
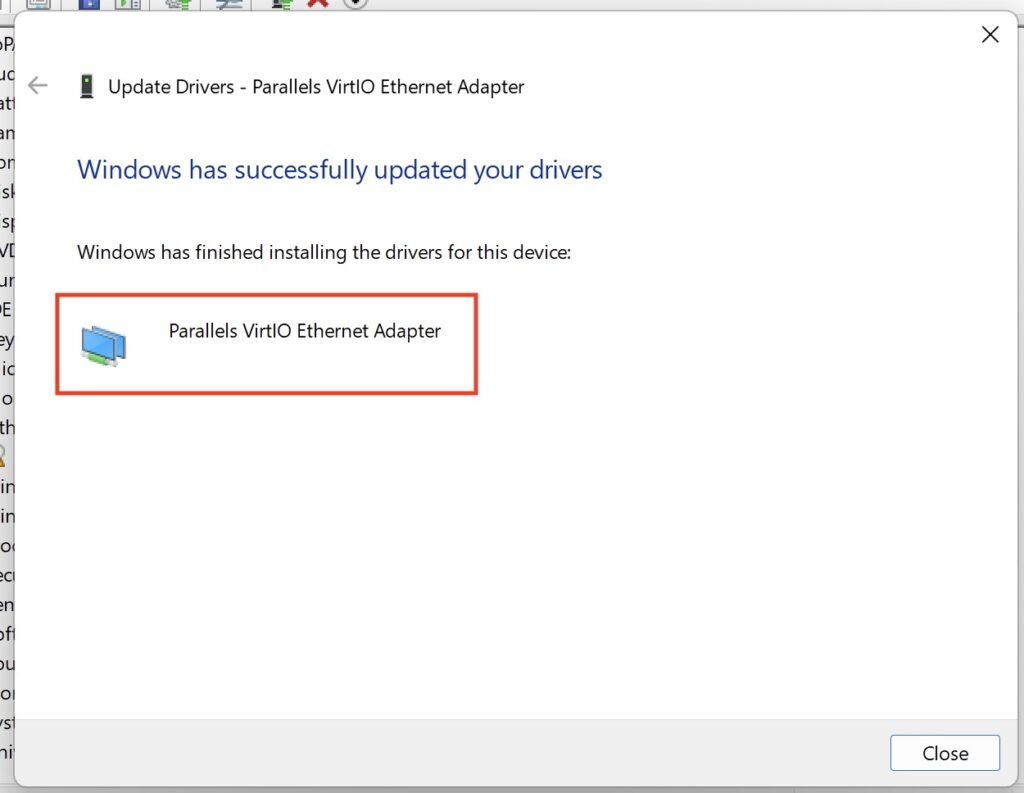
What you should see now is that the process has located the driver and installed it for you.
Now, if we look back in Device Manager, we should see the triangle/exclamation error has now gone.
Quite a handy thing that. I backup my drivers ever so often on my machines really to avoid having to hunt around for things. Anyway, you can also see a video run through here:
This story has been doing the rounds this week, and it’s blowing my mind that there isn’t more noise about it.
News headlineScreenshot
The UK is demanding that Apple put in a back-door to their encryption system that would allow the government to view anyone’s data held in iCloud. Not only that, Apple are, by law, not allowed do tell us that’s what the government is doing. I could not be more WTF without turning myself inside out.
The scope of this is also huge – it’s access to encrypted data worldwide, not just for people in the UK. I mean, come on. I see the US has already started to kick off about it.
Screenshot of BBC News
I can partially – I think, so far – accept that the government’s intentions are not to generally search and analyse people’s data through some form of mass surveillance…but I can’t imagine that conversation hasn’t come up. No doubt using the ‘won’t you think of the children‘ defence.
This idea of opening up a back-door into end-to-end encrypted services is a bit terrifying from a technical perspective and from a general understanding point of view. Do you genuinely think that it’s beyond the realms of thought that a method to exploit that back-door wouldn’t be found…? Or do you think it would only ever be used by the good guys.
I was having this conversation with a few non-techie friends recently (I have some), and they didn’t see the problem. Here’s the thing though, it would mean the government could see their data, but any bad-actor with half a brain would still easily be able to protect their stuff.
The only data this gives the government access to are idiot criminals and every member of the public. Let me explain.
Let’s say I’m a bad guy, and I want to have a conversation with another bad guy – let’s call him Donald. Now, I want to use publicly available end-to-end encrypted services such as WhatsApp or iMessage, but I know the government has access to that data via their back-door (fnarr).
Oh my! What do I do! Well, I do what any sane person would do and encrypt my data using my own keys before I used that service that the government has access to. Hell, I could use far stronger encryption than was originally implemented in WhatsApp or iCloud anyway.
So where are now in that scenario? The bad guys have secure comms, and everyone else’s data is exposed to the government. I suppose there’s an argument that if the government saw you were using private encryption that you’d stand out, but what are they going to do…outlaw the use of encryption?
This is such a bizarre and unnecessary attack on public privacy, obviously designed and implemented by people who have little idea of how encrypted communications work.
Imagine what other back-doors they’ve asked for – HTTPS for example, for your banking apps or everything else?
I’ve been in the hunt for new home-lab virtualisation servers. I previously used two 2018 Mac mini i7/64GB units. They have been solid units, and have served me well. I used Parallels Desktop for 90% of the virtualisation, with some VMWare Fusion in there too. They’ve lasted YEARS and have been rock-solid…but, their performance against their power consumption has been lacking compared to current offerings.
So I took a dual approach – for my constant stuff that needed to be on all the time (backups, some video conversion automation, AdGuard type stuff) I bought an Apple M4 Mini. More on this in another article, however it sips power while also being highly capable.
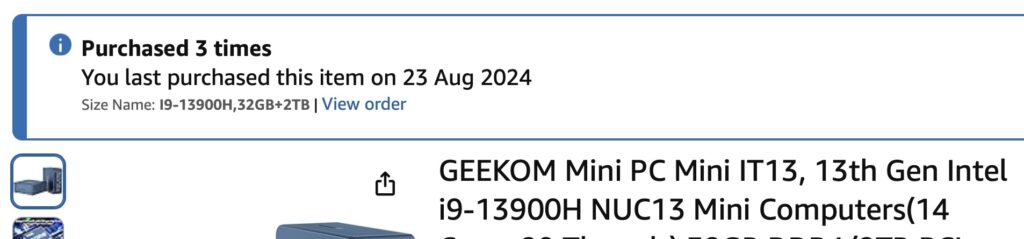
For my lab stuff – think 90% Windows, 10% Linux – I needed something x86. First, I looked at Geekom and their Mini IT13, and it was disastrous. I actually bought one direct from Geekom, and three from Amazon. All of them after a week or two just wouldn’t turn on.
Amazon Geekom Orders
I returned them all – so much so Amazon put me on the returns naughty step so I had to get AmEx involved, who were, as usual, absolutely badass at getting my money back.
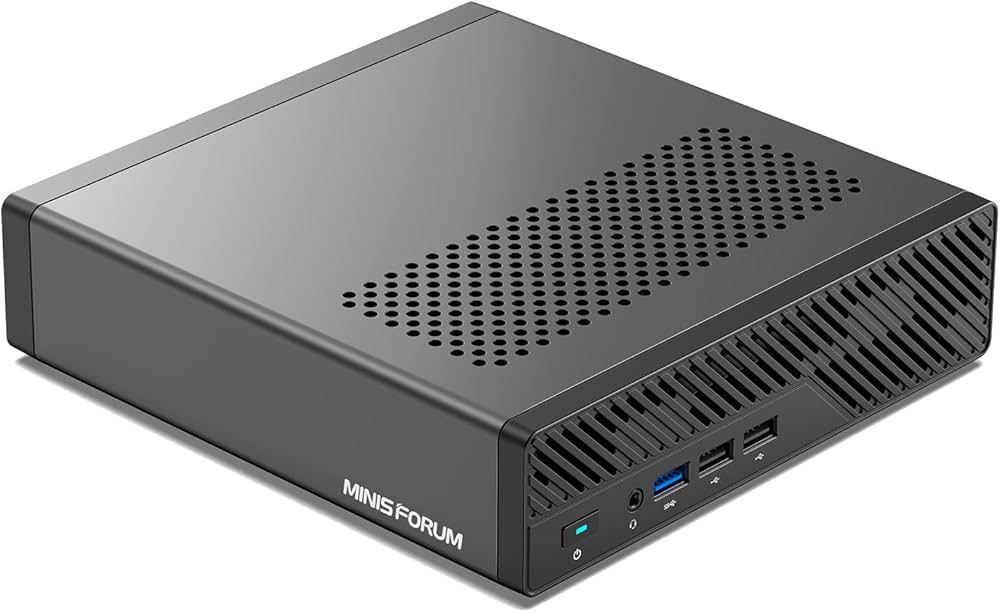
This is when I stumbled on the Minisforum MS-01. The specs on this thing seemed out of this world.
-> Intel i9 13900H
-> Dual DDR5-5200 up to 96GB
-> 2 x USB4
-> 2 x 2.5Gb Ethernet
-> 2 x 10Gb Ethernet
-> HDMI
Have a look for yourself at all these ports – absolutely mad.
MS-01 Rear
Internally, the unit supports up to three NVMe slots. THREE. 1 PCIe 4×4, one 3×4 and one 3×2. Additionally slot 1 can be configured to use a U.2 NVMe too. The graphics are integrated UDH750 I think, but – and here’s something else that amazed me about this unit – it also comes with a half-length PCIe 3×4 slot! With it being half-length you’re limited by what you can put in there, but there’s certainly options out there.
I was quite blown away when I saw the specs of these units, and couldn’t order one fast enough, and to spec it out. The spec I’ve gone for is:
-> 96GB RAM
-> 1 x 4TB NVMe
-> 2 x 1TB NVMe
This is connected now over 10Gbe for the main LAN, and 2.5Gb for my HyperV machines. Absolutely bonkers considering its size.
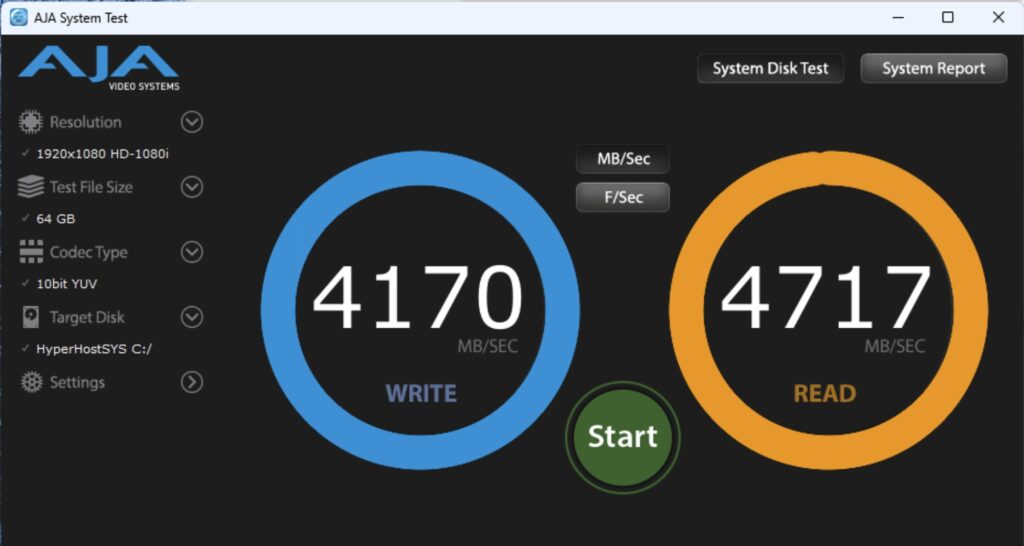
What’s the performance like? Well, let’s look at the primary SSD to start. This is a Lexar 4TB 4×4 that I already had.
SSD Performance
That’ll do. The other two SSD are a bit slower at about 2200MB/s read/write, still really acceptable.
The Intel 13900H in the MS-01 has a base TDP of 45watts but apparently can boost up to 115watts – it’s a mobile processor of course. By way of example, the desktop i-13900 has a base of 65W and boosts to 219W…but requires significantly more cooling.
You can see the Geekbench benchmarks for the 13900H here. If you want a bit of a giggle here’s the comparison between the 13900H and the binned M4 Max (I have the unbinned M4 Max). So processor performance is pretty good too – certainly good enough for what I need it for.
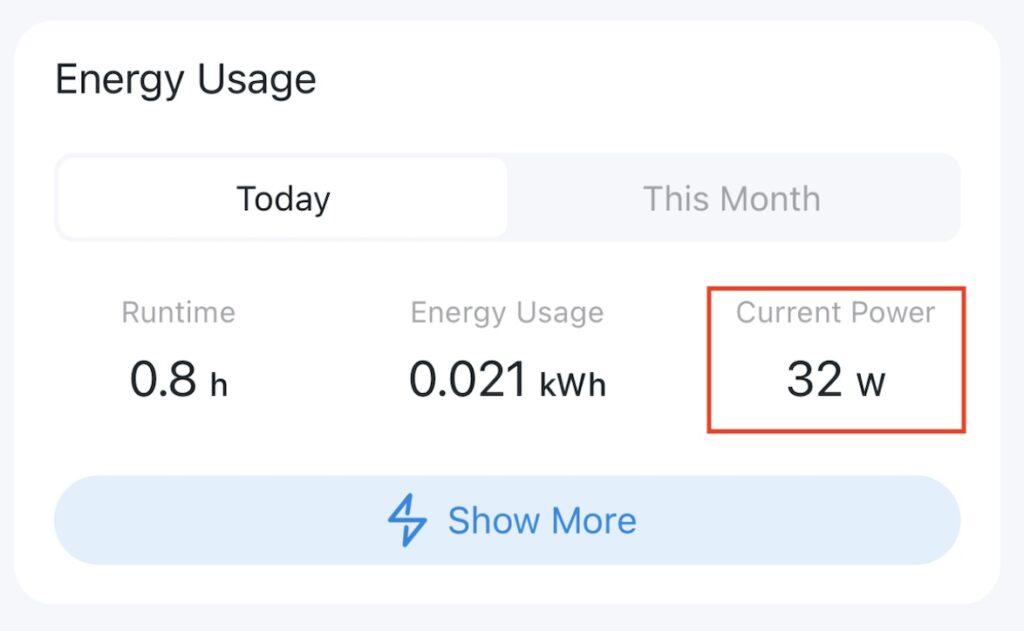
What about power consumption? At idle, the unit seems to average between 25 and 33watts, which is 0.6KwH to 0.8KwH per day.
MS-01 Power ConsumptionScreenshot
This does seem a little high compared to what some other people are reporting – several are reporting idle figures of 15-30 watts, but I’ve not seen it go that low. Perhaps it’s the spec and of course I have the 10Gbe interface in use.
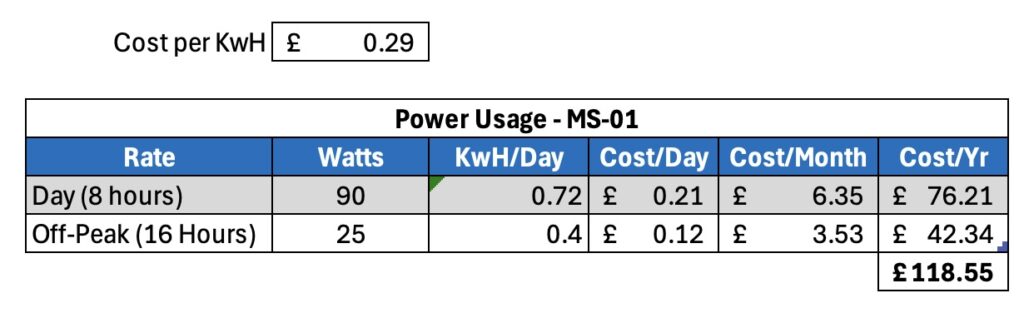
What about under load? It seems to peak at about 115-120w but then settles in to about 90w. Assuming 90w consumption that’s 2.2KwH/day (rounded up), which isn’t insignificant, but then how often are you going to have it flat out..?
Assuming you work it hard for 8 hours a day, but the rest it’s fairly idle, running costs at GBP0.29/KwH would be as follows.]
MS-01 Power Consumption
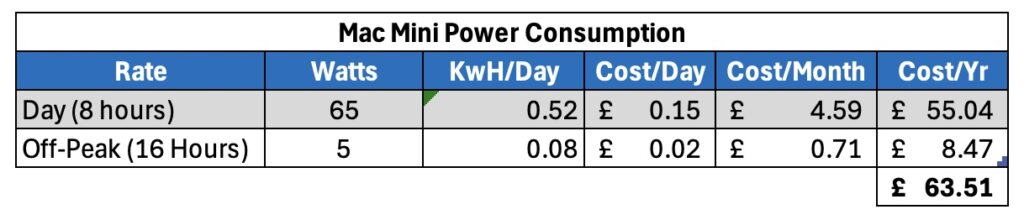
Just for the purposes of comparison – the M4 Mini I bought for my 24×7 automation stuff (Plex, backups etc.) averages about 5w at idle, and uses 65watts under full load.
M4 Mini Power Consumption
It’s a fairly decent difference isn’t it? Saying that, the M4 Mini can’t do all the x86 virtualisation that I need, but it’s still a reasonable comparison.
So what do we have at this point? Well, we have a small, powerful PC, with great networking, internal storage, and reasonable power consumption. There must be some downsides, right?
Well, so far, not too many. I do have some observations however. Firstly, noise. If these units are next to you, you will hear the fans. They seem to spin up even with the slightest of activity. They’re not particularly loud however you will hear them. They don’t bother me at all.
I also have a weird issue with the networking. Firstly, those two 10Gbe SFP+ ports. If I try use both of them they work for a little while but eventually I start to get problems with disconnections and the performance plummeting. If I had to guess, it’s because I’m using SFP+ to RJ45 connectors in there, and they’re getting heat soaked – so in effect, I can’t use both SFP+ 10Gbe connections at the same time. Not a huge issue given it also has two 2.5Gb ports.
Next is a weird one, and it sounds like a configuration bottle neck I’m hitting rather than an actual problem with the unit. With HyperV configured to use the 2.5Gbe interface only, and with management etc. on the 10Gbe port, I only get circa 2.5Gb performance not the 10Gbe port. In fact it’s so close to 2.5Gbe it makes me think this is a config issue. If I remove the HyperV configuration I get nearer the 10Gbpe. Something I’ll look into in the future I think, however it’s not that big a deal to me in reality.
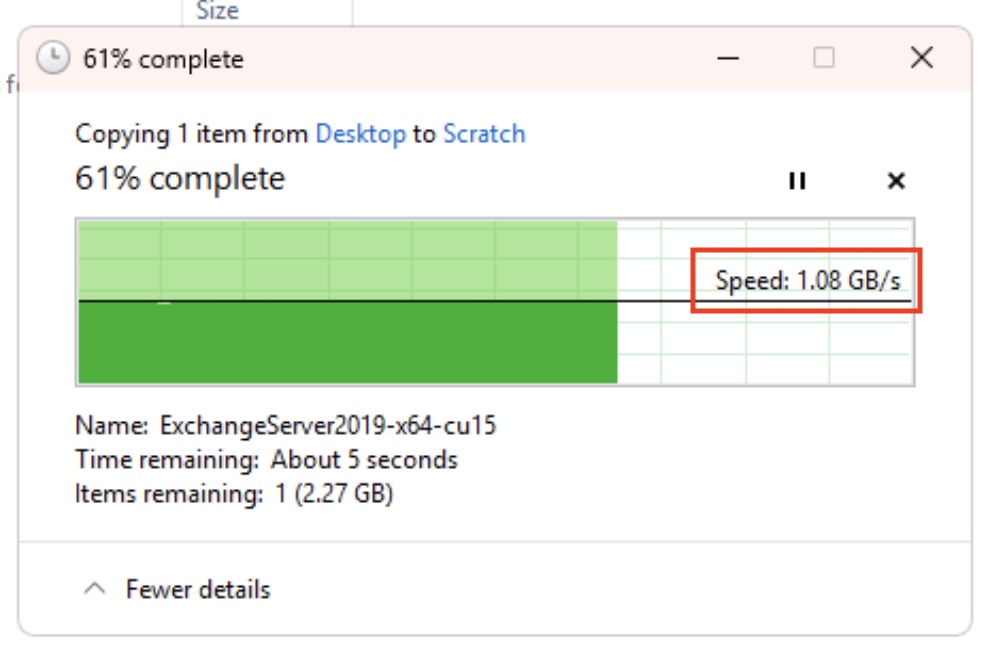
2025-02-25 20:32:04: I’ve now resolved this – it wasn’t just suspiciously close to 2.5Gbps it was 2.5Gbps…but it was reporting as 10Gbps. Essentially I was using a cheap non-managed 10Gb/2.5Gb switch, and an SFP+ to RJ45 converter on the MS-01. I swapped the switch for a 10Gbps QNAP managed switch and what do I see… the port running at 2.5Gbps. Swapping out the SFP+ to RJ45 connector and just using a straight fibre connection I now not only have the 10Gbps connection, it’s also running a lot cooler. I’ll test both 10Gbps connections shortly and see if running them both is workable.
10Gbps File Copy
What am I running on it? Well, my longer term plan is to configure it as ProxMox unit, for now however it’s running Windows 11 and HyperV. Not a great combination, but good enough for something I’m working on. I mean look what it’s running right now:
HyperV
That’s not too shabby is it?
Oh while I remember, the unit also supports Intel vPro for remote management – this allows for remote control, including BIOS level KVM access. How cool is that? Very useful for when trying to manage the unit remotely, and far more like grown up server solutions. It’s pretty impressive.
Costs
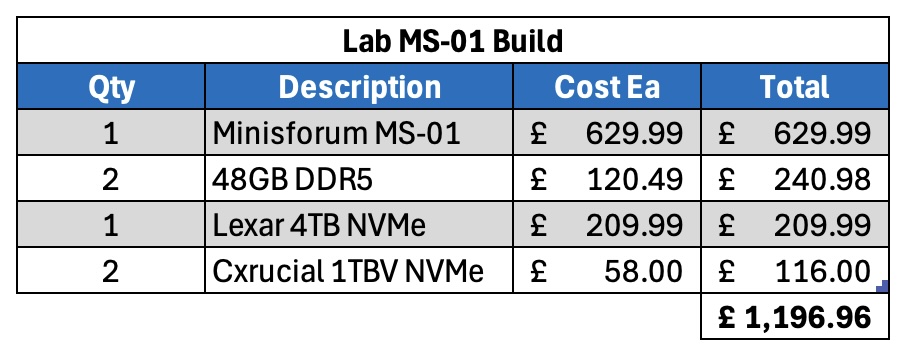
Now on to the thorny issue of costs. These are not particularly cheap units. Let’s look at this build – although I did have the SSD kicking about already.
Lab Build
NOTE: For my US readers, the above costs include our sales tax (VAT) at 20%.
So the cost isn’t insignificant, but for the capability I think it’s a bargain?!
Support
Now, this is worth being aware of. I’ve seen a few horror stories about dealing direct with Minisforum, and if it was anything like my experience dealing with Geekom I’d be very nervous about buying direct. Buy from Amazon however and any problems you can make their problem, and their returns process is usually excellent.
What’s Coming
It’s also worth being aware of the Minisforum MS-A2 that’s due for release circa April 2025. This has an AMND Ryzen 9 9 9955HX Core/32 Thread processor in it which will be even faster than the i9-13900H, so perhaps it may be worth waiting for that?
Then again if you’re always waiting for what’s around the corner you’d always be waiting for what’s around the corner.
Summary
I’m very happy with this Minisforum unit. The connectivity is bonkers, its power consumption reasonable, and its performance is certainly good enough for my purposes as a virtualisation lab host. I’d go as far to say as I’d be happy to use it as my every day machine should needs be, it’s that capable. It’s a little pricey – certainly compared to the Geekom, but then so far it hasn’t decided to become a paperweight – and there’s some concern about direct support from Minisforum, but so far, everything has been rosey and I suspect I’ll end up buying another one.
A friend of mine asked me to check over a spec of a Network Attached Storage (NAS) device he was buying for home. Mostly for media, backups, and general storage, and a light bit of work use. The spec he sent me bothered me a bit, and I gave it some thought before replying. The spec he’d chosen was:
-> 4 x 24TB Hard Drives
-> 32GB RAM
-> 10Gbe Upgrade
The main thing that bothered me was the upgrade to 10Gbe when only using 4 drives, shortly followed by the thought of 24TB drives simply being too big – my preference would be for more, smaller, drivers. Let’s say 8 x 12TB in this instance, to give the same available storage.
Let’s talk through this logic – I’d be interested in your views.
Recovery Time
This is probably my key observation when choosing larger drives – recovery times become uncomfortable. Let’s imagine you have a four drive NAS consisting of those 4 x 24TB drives, and one of them fails. You order another one, and pop in the new drive – all good, right? No data lost.
Well, consider how long it is going to take your NAS to rebuild that array back to the point that you have some high availability again. Assuming a fast spinning drive (I use these) they’ll average perhaps 125-150MB/s during a RAID rebuild. That means it’s going to take 2-3 days for your RAID to rebuild. During that time your data is exposed, and the performance of your NAS will be severely impacted.
Assuming smaller drives – say 12TB – that recovery will take just over a day. Still a significant amount of time.
Performance
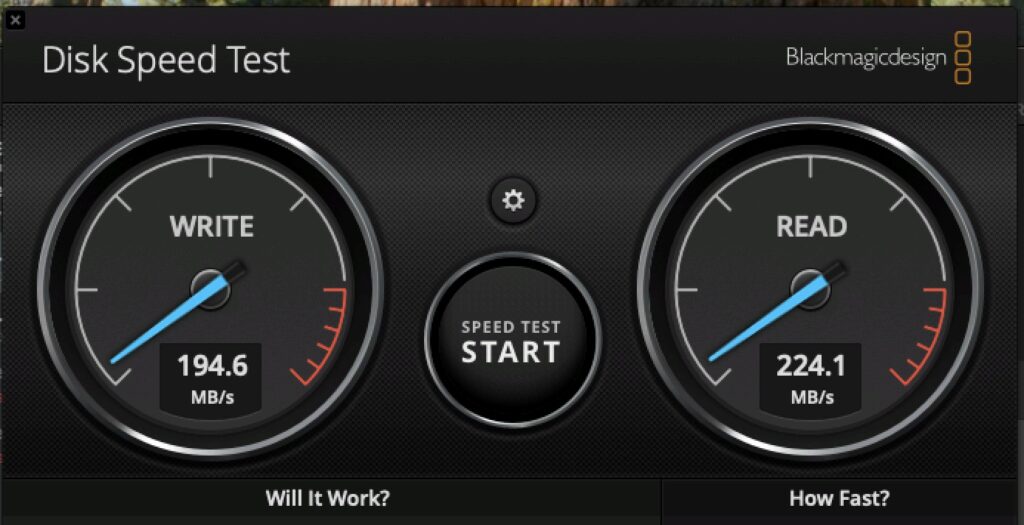
Back in the day when I was designing large Microsoft Exchange on-premises stuff, we always went for more drives. This was for the performance requirements. You could often end up with a lot more physical space than you needed, in order to achieve the performance throughput you required. Let’s consider the 4 x 24TB and a 10Gbe upgrade – you’re not going to see all of the benefit of the 10Gbe upgrade. One of the fastest spinning drives I have is an Enterprise Toshiba 16TB drive – here is its performance in a Thunderbolt chassis:
Screenshot
Even with four of those in your NAS, you’re not going to see more than 600MB/s across them (assuming one is for parity/high availability), despite having approximately 800MB/s of raw performance. Sure, it’s still loads better than your 110MB/s you’d get over 1Gbe.
If however you used 8 x 12TB drives, assuming they offered similar 200MB/s performance per drive, you’d get approximately 1600MB/s (raw). Even dropping a single drive for parity gives you 1400MB/s, which means you would get the benefit of the 10Gbe upgrade. You should get your 1-1.1Gb/s performance.
High Availability
This ties back to the recovery time I mentioned earlier—more drives allow for more robust availability models. Take RAID 5, for example, or Synology’s equivalent, SHR. In a four-drive setup, one drive is dedicated to redundancy, meaning you can lose a single drive without losing data.
With an eight-drive setup, you could opt for RAID 6, which provides even greater protection. In this model, two drives are used for parity, allowing you to sustain up to two drive failures before data loss becomes a risk. Think of it this way: if a drive fails, you can replace it while still maintaining redundancy during the rebuild process. However, you wouldn’t want to wait for a second failure!
Anecdotally (though anecdotes ≠ data), drives purchased together often come from the same batch, and rebuilds place significant stress on remaining drives. I’ll let you draw your own conclusions on that…
Space Availability
Next, let’s look at usable space – best demonstrated below.
RAID & Space AnalysisScreenshot
A 4 drive 24TB RAID 5 array gives you 72TB of available space, with 1 drive used for parity.
If you went with 8 x 12TB you’d better performance, and 84TB of usable space with a single drive for parity. I wouldn’t though, I would go with 8 x 12TB drives, in RAID 6 – in this model, you get the performance, the same usable space (72TB) as the 4 drive RAID 5, as well as two drives used for party.
Seems obvious to me!
Downsides of more drives?
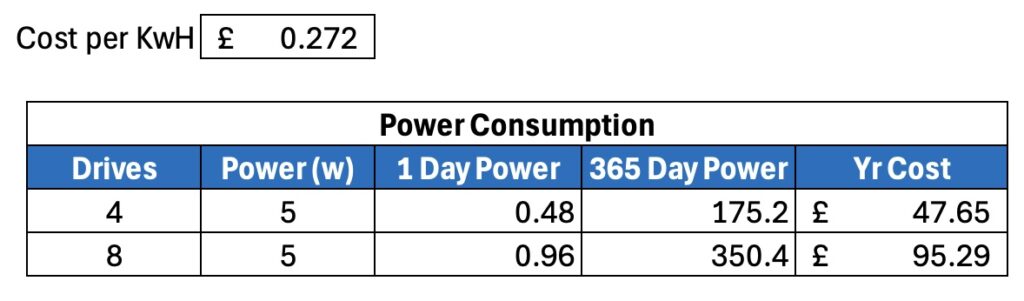
It’s not all sunshine of course, there are some things to consider. Firstly – power consumption – 8 x 12TB drives will use about 1KwH of power a day (assuming about 5w/drive). 4 x 24TB will use half of that – a difference of 183KwH over a year. In real money – well, GBP – that’s about 50GBP in extra power used by the 8 drives over the 4, over the 4. Not so terrible when you look at it like that?
Cost of power 8 drives compared to 4.
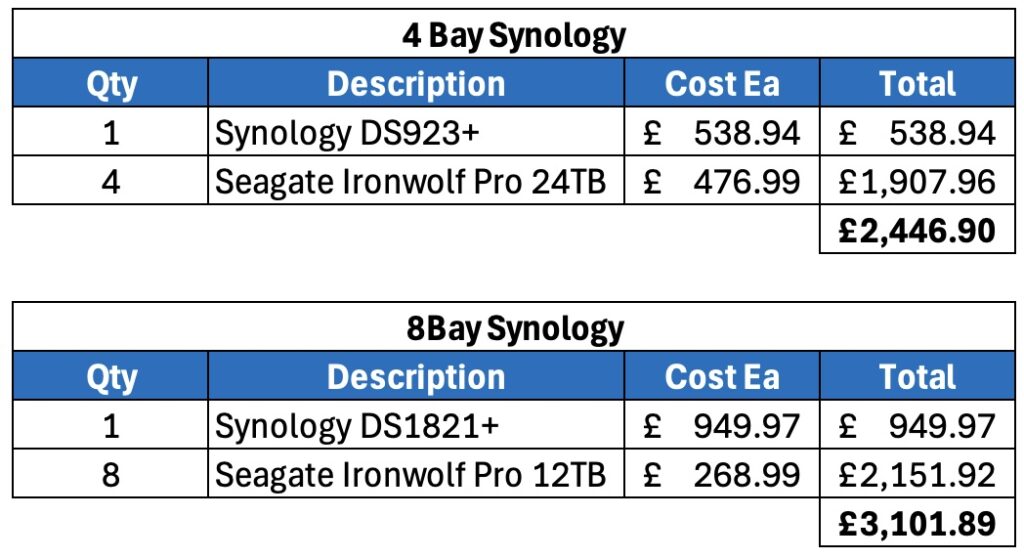
The other thing of course is that 8 bay NAS chassis cost more. A Synology DS923+ for example is about 500GBP, whereas an 8-bay Synology like the DS1821+ is nearer GBP950.
Let’s work out the costs, ignoring the RAM/10Gbe upgrade.
Cost ComparisonScreenshot
(For my American friends, in the UK our prices include VAT/Sales Tax – currently 20%).
Closer than you’d think isn’t it? The only downsides from what I can see are the increases in operational power costs, with the upsides being performance and data protection.
Summary
Personally, I’d go for more drives simply from the recovery time and data protection perspective – the increased performance is an added bonus.